Pages

Showing posts with label holidays. Show all posts

Friday, September 02, 2016

VVVVVery Quick V-Stitch Cowl

Sometimes you have a skein of fingering-weight yarn that doesn't want to be socks, either because it's too delicate to care for or too special to relegate to something you're just going to stick inside shoes anyway.  Single-ply yarns, cashmere blends, hand-dyed souvenir yarns from trips to far-flung yarn stores ... all of these can be showcased beautifully in this V-stitch crochet cowl.  The pattern is simple and easy to start and stop, making this the perfect on-the-go project, especially as gift-giving season approaches.

Materials:
  • 4.0 mm crochet hook (US size G)
  • 4.5 mm crochet hook (US size 7)
  • about 60 gm fingering weight yarn (I used Hedgehog Fibers' Skinny Singles from River Colors Studio in color Opalite)
Abbreviations:
SC - single crochet                ch - chain
DC - double crochet              sl st - slip stitch

Technique:
  1. Using the 4.5 mm hook, chain 84.  Join with a sl st, being careful not to twist.
  2. Using the 4.0 mm hook, chain 4.  DC in same chain as sl st.  [Skip chain, (DC, chain 1, DC) in next chain] around.  End round with sl st in 3rd chain of beginning of round, then sl st in the resulting ch-1 space to the left of where you just joined.
  3. Chain 4. DC in same ch-1 space as sl st.  [DC, chain 1, DC) in next ch-1 space] around.  End with a sl st in 3rd chain of beginning of round, and sl st in the resulting ch-1 space to the left of where you just joined.
  4. Repeat step 3 until cowl is desired length or you are not quite out of yarn (sample repeated the round 27 times).
  5. Using the 4.5 mm hook, chain 2.  [SC loosely in space between next 2 DC stitches] around.  End with a sl st in second stitch of beginning of round.  Fasten off and weave in ends.
Notes:
There's no reason this pattern has to be confined to fingering weight yarns. Just adjust the hook sizes to match your yarn choice (when in doubt, go bigger than you think you need, because you want the stitches to be flexible and soft).  Chain an even number of stitches that's big enough to slip over your head once it's joined into a circle, and get going!  For reference, I used 62 stitches with aran/chunky yarn (super fast project!) and 100 chains with heavy lace weight yarn (much slower going, but a totally awesome way to use the qiviut yarn I bought in Alaska).


Monday, October 17, 2011

No mermaids here

This year I decided to pull the mermaid costume listings from my etsy shop so that I could concentrate on training my intern on the finer points of ninja-costume-sewing:
She ran the accelerator, I steered.  And nobody ended up bleeding on the costume - bonus!

Monday, February 14, 2011

Whoa, cutest lollipops ever!

http://zakkalife.blogspot.com/2011/02/its-bird-its-plane-its-super-valentine.html

Way to go - these are awesome!  Although I have to admit, the idea of cutting out 20 little bitty masks makes my scissor hand hurt ...

Sunday, November 07, 2010

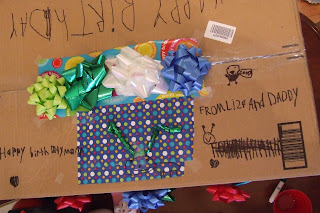
LazyKid is undeterred by a lack of wrapping paper ...

... she just makes her own.
 She decorated it while it was sitting next to me at dinner last night, and she kept asking me for more "things I like."  That's why it's got stars, our two cats, a fairy, a self-portrait, and the Eiffel Tower on it.

Not to mention sparkly purple leaves, a heart-shaped peace sign, and apple trees.

Not sure why she thinks I love millipedes and some sort of green-antlered deer, but I'm willing to go with it.

Especially since they let me open the present a day early.  Score!

Thursday, October 08, 2009

Look! Free press for Lazy Mama!

I am really excited to have been included in a listing of etsy costumes available for Halloween. You can find the link here.

While you're there, check out some of the other costumes. We've got a lot of really talented folks on etsy, so if mermaids aren't your thing, maybe the baby sushi or cupcake costumes will float your boat. Sooooo cute!

Thursday, February 12, 2009

Last-minute greeting cards

Okay, so the package to the Lazy Grandparents needed to be in the mail today, and Lazy Kid wanted to make a Valentine's day card to go with it. Glitter glue wouldn't dry in time, so I hauled out Plan B: punching designs in cardstock with a hammer and nail.

1. Put a piece of corrugated cardboard on a solid surface (one you don't mind nicking up a bit if someone gets a little too excited with the hammer), then put the paper to be punched on top. I used regular cheapo cardstock for Lazy Kid's card, and some commercial blank greeting cards for my versions. Make sure you're looking at the inside of the card, poking the holes toward the outside of the card.

2. Use a lightweight hammer to force a thin nail through the cardstock into the cardboard (but hopefully not into the table under it), punching a small hole in the card. Repeat the process, placing holes no closer than about 1/4" apart (much closer together and the paper will tear, and then the kid will cry, and that's not the point of this, now is it?). You can lightly trace a design for the child to follow, or tape a pattern to the paper and remove it when all the holes are punched, or just let them wing it. Or, if you're really dumb, you can hold the nail while the kid hammers, which lets you control where the holes will end up, and also really, really hurts. Don't ask how I know this.

Lazy Kid's card, made with me aiming the nail (ow)
The bumps made by the nail pushing through will be different sizes depending on what size nail you use and how deep it penetrates, so if there's a specific look you're going for, play around with it on a piece of scrap paper before you let the kid go to it.

One of my cards - the outer heart followed a pattern, the inner one was done freehand

If you use a fairly large nail, you could even glue or tape a piece of colored paper behind the holes so the color would show through (and your traced pattern would be covered up), but it's really the texture of the holes that makes this so fun. I've made a bunch more this morning, whenever I could wrest the hammer away from my daughter. I love that our craft session included the sentence, "I want to make another card - where's the hammer?"

Monday, November 03, 2008

Seriously

1. I decided to make people socks for Christmas presents. Wait - actually, I decided to make EVERYONE socks for Christmas presents. Each pair takes at least 16 hours of knitting time. If I make one for every person with whom we normally exchange gifts, that's 15 pairs of socks. WTH was I thinking? I'm going to be knitting like a maniac from now until 12:01am December 25th. On the positive side, at least I have an excuse to try out some of the 14,000 sock patterns I've favorited on ravelry.

2. When did it become impossible to find the end inside the ball of yarn? I like to pull from the center so the ball doesn't roll all over the floor gathering cat hair, but I'm on my second completely disasterous skein situation. Usually you can reach a finger inside the ball, pull out a small chunk at the end of the skein, and find the end. But recently when I reach inside I end up pulling out a tangled mass of spaghetti that's the size of a lemon, and I still can't find the end. So I either have to reroll the whole skein, or just pull from the outside. Until I get my ball winder, I'm letting that puppy roll around on the floor. Friends don't mind a little cat hair in their socks, right? It just adds extra insulation ...

Monday, October 20, 2008

Pimpin' my homies


The Cleveland Handmade etsy team has an orange-and-black challenge going, with voting continuing until Sunday, October 26, so stop by the site and pick your favorite. Sign up for the mailing list at the same time, and you're entered to win a gift certificate good at any of the participating shops. Just in time for holiday shopping!
Oh, and in case you were wondering, yes, I do have an entry - the Halloween Hexagons quilt. I can't decide whether I like this view better, or the view they used for the ballot - I guess it doesn't really matter, does it?

on the needles

Yup, the Christmas rush has started already.

My goal this year is a pair of socks for everyone we exchange gifts with, which means two boys, a preschooler, my parents, LazyHusband's parents, LazyHusband's sisters, LazyHusband and Lazy Kid. That's a lot of stockinette.

Depending on how tight on time I am, I may count the socks for LazyHusband and Lazy Kid as already done, and really early, too!

But I've got my mother's socks on the needles, using stretch cotton self-striping sock yarn, and using the Jaywalker pattern for the legs (just plain stockinette for the feet). I've got the first sock finished, and dove right into the second sock ... only to find out that the striping width varies from one end of the skein to the other, so that when I started the second sock pulling yarn from the outside of the ball, I got wide stripes, but the first sock (from the inside of the ball) had thin stripes. So I frogged the second and dug around to find the inside end, started the sock again, and the stripes were thin. Huzzah!

And I have yarn for my mother-in-law's socks, my father's socks, and a pair for me and Lazy Kid to match. I probably have enough scraps left to do the boys' socks out of the leftovers from LazyHusband's socks, and I'm waiting for inspiration to strike before I buy yarn for my sisters-in-law. Plus, one of them lives in San Diego - not much sock-wearing going on there, unless I make her a pair of tabi to go with her flip-flops.

For some reason, I also decided it was a good idea to try the Liberty blanket in Mason-Dixon Knitting Outside the Lines, which is 4'x5' and done in an intricate Fair Isle pattern that has a pattern repeat of like, um, 60 rows. And the yarn is sticky enough on the needles that I'm getting carpal-tunnel from trying to scootch the stitches along as I knit. I've taken to grabbing sections of it with my teeth to pull it along ... so now my lips are chapping, too.

What the hell was I thinking? At least it's just for me, so if I have to stuff it in the back of a closet for a while to regain my composure, nobody's going to miss out at Christmas. Besides, the first five rows of the pattern look really nice ... and I've only made like two errors that I know of, neither of which will be noticeable once I'm done. Right? Right.

Monday, September 22, 2008

Happy fall!


Now go buy something to decorate your house, like my new Halloween Hexagon quilt!
Or make something, like a crocheted Zombie Bunny!
Or get a treat bag for YOU - forget the kids, mommies need candy, too!

Sunday, September 07, 2008

Attack of the (formerly) UFOs

After a brief family meeting, it was decided that I would take some time this weekend to get started on my holiday etsy shop sewing, since I've got Halloween, Thanksgiving and Christmas all looming on the horizon. My first goal was to clear out some of the UFOs that have been hanging around, clogging up the cutting table and taking up space in my brain.


So, in roughly the order they were completed, here's the list of the FOs from this weekend:
  1. SWAK blanket as a gift for a friend.
  2. Two custom mermaid costumes.
  3. A school bag for Lazy Kid, who starts "real" preschool tomorrow.
  4. Some throw pillow covers for Christmas, made from redwork patterns I got here. Sorry for the embarrassingly bad photo, but I was in a hurry. Notice I've got two pillow covers but only one pillow? Waiting for a sale at Joanns to get another one ...
  5. Two eyelet lace SWAK blankets for the shop.
  6. A Halloween Hexagon quilt from stash fabric, which is all basted and ready to start quilting.
  7. Three madras plaid homespun SWAK blankets for the shop.
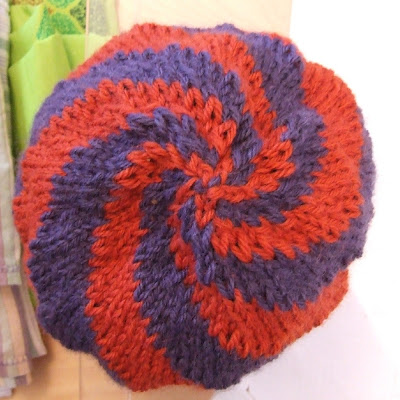
  8. A swirly wool toddler/child hat that I'm insanely proud I designed myself. See how the stripes swirl and decrease toward the top of the hat? Brilliant!
  9. Pieces for the next baby quilt for the shop cut out and ready to start piecing.
  10. And, if I stop typing and get my butt in gear, I may be able to finish my first pair of winter socks of the season, which are about 3/4" from the toe decreases right now.

So I'm going off to watch football (yawn) and knit furiously fast. Hope your weekend was equally productive!

Friday, April 18, 2008

More gifts for the kiddo

LazyToddler's third birthday is looming on the horizon, which means I've been sneaking off to Toys R Us instead of crafting, and I've been spending waaaaay too much time browsing on etsy. I have to admit, etsy is a little short on non-clothing gifts for the toddler set - lots for babies, lots for older kids, not so much for those who are short on attention span and long on destruction. So with that in mind, I've been trying to find things I think she'll enjoy, at least until she breaks them into (hopefully) non-lethal pieces within 20 minutes of opening them.

Not really. I have found a few things that I think are age-appropriate and fun. In the order in which the packages made it to our door:


Pixie Dust star-shaped goat's milk soaps from abreathofFrenchair. These arrived super-fast, in great condition and in the cutest packaging I've seen yet. Yes, there really is that much pink packing paper in that adorable black-and-white box! I think LazyToddler is really going to enjoy using these in the bath, and the small size means that we won't be stuck using one yucky bar of soap for weeks and weeks. And she's going to smell yummy, just in time for the stinky sticky summer season. Bonus!

Handpainted ceramic pendant from LisaEverettDesigns. They're available in all of the colors shown above - I ordered the white one, figuring that it's likely to match more outfits that way. Of course, we're dealing with a three-year-old's sense of style, so that was probably unnecessary :) I'm going to pick up some ribbon to use to make the "chain" for it, which I'm hoping will prove more durable (or at least more easily replaced) than the regular link chain on some of her dearly departed jewelry. If this one works out well, I may pick up some of the artist's other paper-covered pendants for the kiddo or myself - but these looked more durable for now.

"Pink PJs" ribbon wand from (who else?) ribbonwand. I think this is soooo cute, with the stripes and the pinkness and all. I'm hoping that the "Brass swivel hardware to ensure ease of movement" will prevent some of the tangling problems we had with a stationary-mount silk streamer we got for Christmas last year. Plus, the stick is shorter, so it's less whackable than her current rain-stained, knotted, pathetic-looking one. I wasn't sure this would make it here in time for LazyToddler's birthday, since it was coming from Canada, and Canada Post is notoriously laconic when it comes to getting stuff to the lower 48. But it showed up today, a little more than a week after the order was placed, so, Go, Canada Post!

That's it, at least so far. I may keep trolling for a while to see if any t-shirts strike me as must-haves, even though LazyHusband will kill me if I bring one more item of clothing into her room. It's okay if she never wears anything more than twice, right? Back me up here, peeps!

Wednesday, March 19, 2008

Shop message

****SHIPPING ALERT****
I will not have access to my shop for the next few days, so anything ordered between 3/19/2008 and 3/24/2008 will ship on TUESDAY 3/25/2008. In order to make up for the inconvenience, I will upgrade all US shipments to Priority Mail at no cost to buyers, so you'll probably get the package the same day you would have if I was able to ship with my normal diligence and speed ;) Have a great Easter, everyone!

Saturday, March 15, 2008

FREE PATTERN - Very Vernal Placemats


I developed this pattern as a free giveaway for Birds of a Feather in Avon, Ohio. If you're in NE Ohio, I can highly recommend that you stop by and say hi (and pick up a pattern while you're there spending lots of money on cool fabric and yarn). If you're not in NE Ohio, you're in luck, because I'm posting the pattern here!

Directions:
1. Cut one 13”x17” rectangle each from front fabric, back fabric, and batting.
2. Lay batting flat on a work surface, smoothing out any wrinkles. Lay back fabric face-up on top of the batting, smoothing out the wrinkles and matching the edges.
3. Lay the front fabric face-down on top of the back fabric, smoothing out the wrinkles and lining up the edges as best you can. Secure all three layers around the outside of the rectangle, using straight pins or quilt binding clips.
4. Using a 1/2" seam allowance, stitch around the perimeter of the rectangle, pivoting at the corners and leaving about a 4” opening for turning.
5. Trim the corners on the diagonal close to the seam to eliminate the extra seam allowance. Turn the placemat right-side-out through the turning opening, finger-pressing the seams flat and making sure the corners are completely turned.
6. Pin or binding-clip the edge of the placemat all the way around, folding the extra seam allowance inside at the turning opening. Topstitch about 1/4" in from the edge all the way around the edge of the placemat.
7. Trace desired template from the end of this post onto paper or cardstock (you'll need to size it up, since I can't get it to show as full size - the egg is about 7" long and the flower is about 5" long). Cut scrap strips to be 2 1/2" wide or narrower, using a pinking blade if desired. Sew the long edges of two scrap strips together with a 1/4" seam, holding the wrong sides together as you sew so that the seam allowance ends up on the right side. Press seam open. Repeat, adding strips on to the ones you’ve sewn until you have a block that’s at least as large as your template.
8. Cut appliqué shapes from the strips you’ve sewn together, pinking the edges if desired.
9. Use temporary spray adhesive to adhere the appliqués to the placemat in desired locations.
10. Use a free-motion foot or darning foot to stitch around the edges of the appliqués, stitching about 1/4" or less inside the edges of the shape.
11. Complete quilting as desired.

Tuesday, February 12, 2008

Free project - Fabric postcard Valentines

I made these with my not-quite-three-year-old daughter for her preschool classmates. She picked out fabrics and manned the glue stick; I manned the sewing machine and occasionally told her where to stick things down. It probably took me under an hour to make the five I needed for her class.

Supplies:

  1. Sew fabric scraps together until you have a piece that's at least 4"x6". Repeat to make a second piece.
  2. Use the glue stick to apply glue to one side of the interfacing or Timtex, then adhere it to the wrong side of one of the pieces you made in the first step. Repeat for the other side of the interfacing or Timtex.
  3. Zigzag stitch or serge around the edge of the interfacing or Timtex, making sure you drop the needle off the edge so that one side of the zigzag is sewing through just the fabric. Trim the excess fabric, being careful not to cut into the stitching.
  4. Use the glue stick to apply glue to more fabric scraps, then adhere them to one or both sides of the postcard.
  5. Stitch slightly inside the edge of these fabric scraps to raw-edge applique them to the postcard.
  6. If you wish, stitch a message onto the postcard (use a darning foot, drop your feed dogs, and spell it out in cursive ... or program your fancy sewing machine to embroider it for you, Ms. Lazypants!)

Monday, February 11, 2008

Faux Chocolate Easter Bunny Pattern Page


Nothing says “Easter” like a chocolate bunny … unless it’s a chocolate bunny that can be used year after year without getting its ears bitten off!

This pattern is suitable for beginners, but does assume that you know how to make a single crochet stitch.

Finished size is about 10" from bottom to the tip of the ears.

A person with average sewing skills should be able to complete this pattern in less than 3 naptimes (6 hours).

Photos from the pattern:

The vanishing loop method of working in the round


Finishing the head

Pattern includes illustrated instructions, and it is packaged in a resealable plastic bag (6"x9"), ready to hang and sell. Pattern also includes a link to this web site, where buyers can access a free pattern to make a Goodie Basket to match the bunnies.

Wholesale price: $4.00/pattern

Suggested retail price: $7-$9, or whatever the market will bear in your area

Free shipping on your first order! Shipping charges for subsequent orders will be the actual charges for USPS Priority Mail to your destination.

I am willing to make free samples to display in your shop, if you are willing to provide the materials. Please contact me for more information on this service.

For more information or to place an order, please contact Gretchen Woods at Lazy Mama Designs: lazymamadesigns (at) yahoo (dot) com.

NEW!! You can also place orders through my shop at etsy.com - just convo me with a request, including the number of patterns you'd like to buy, and I can post a custom listing for you at the wholesale price.

Thank you for your interest, and I hope to hear from you soon!

Tuesday, January 08, 2008

Product review - more handmade kid toys!

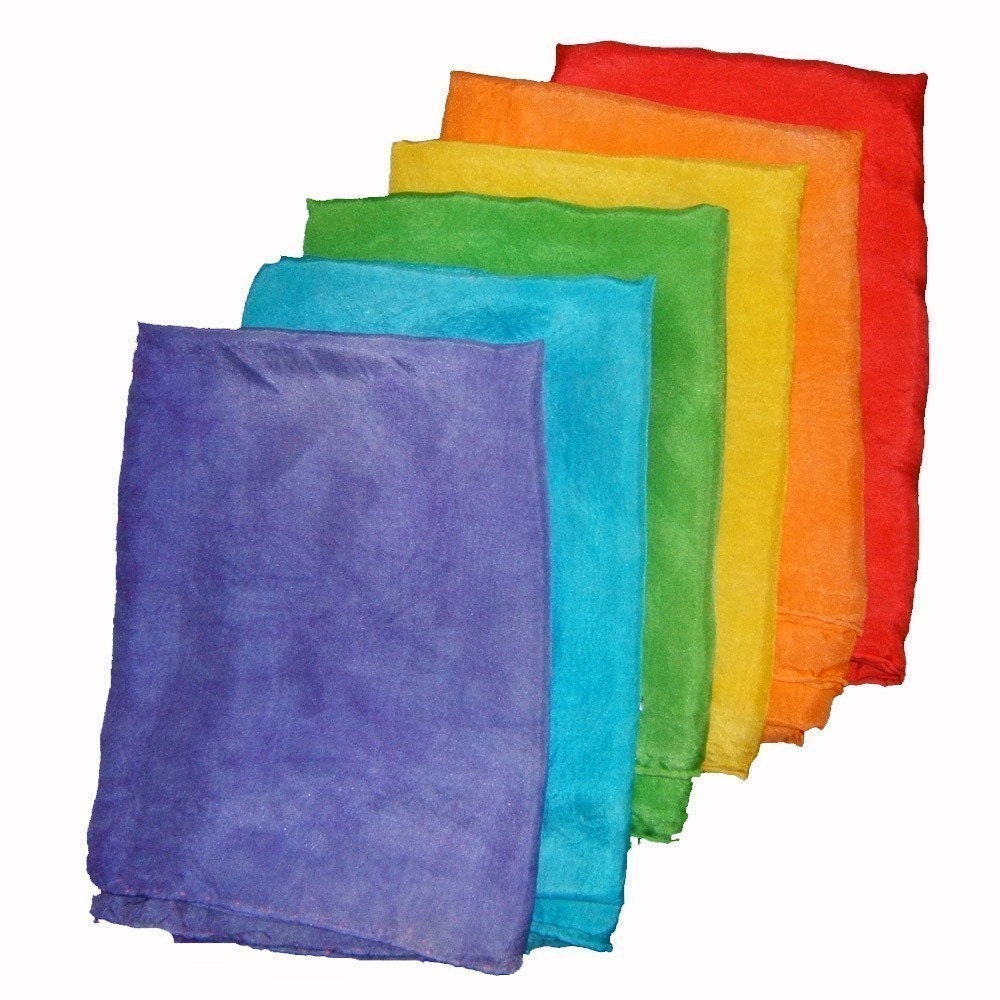
One of the things I like about etsy is that sometimes I am able to find less-expensive versions of toys I see in catalogs. That was the case with the silkies I bought from Beneath the Rowan Tree. I had seen similar scarves in several of the higher-end, granola-friendly toy catalogs, but I finally decided to get them after finding them (slightly) cheaper and handmade.

Basically, it's a set of six different colors of silk scarves, each about a yard square. It doesn't sound like much, but put those in the hands of a two-year-old ("I'm two-and-a-half, not TWO!!!!!") who has recently discovered her imagination, and you'd be surprised to see what happens.

I've been waiting to post this until I could get the video uploaded, because it really helps you understand what a great toy these are. This was what she came up with in the first 20 minutes we played with them:


Since then they've been wrapping paper, and a giant pool to jump into, and giant fish in the giant pool, and a wig, and flags, and ... And this is all since Saturday night. Score!
This is another gift I could have made ... after all, they're just squares of fabric with rolled hems. Hear that? Rolled hems. As in, "those curse-inducing banes of my existance any time I deal with sheer fabric" rolled hems. Thank you, but I'll pay someone else to roll them for me, and dye them, too, while they're at it :)

Sunday, January 06, 2008

I'm done. I think.

There's some more quilting that could be added, but I'm not sure it should, so I'm going to bed. Sneak peeks after I get some sleep, y'all.

And in the midst of my late-night sewing frenzy, I came up with my next idea, which is possibly book-worthy. I've been biding my time, waiting for a book-worthy project to hit me before I bothered to research the whole craft publishing biz. Looks like I've got some catching up to do ...

Thursday, December 13, 2007

Little Capers


Alright, I don't know if this technically counts as handmade, but it is from a smaller company, and it is made in the USA, and it does support fellow moms-with-ideas, so I'm prepared to count it.

In the interest of prodding my daughter away from fairies and princesses (and toward clothing that might protect her from frostbite in the coming months), I purchased the following from Little Capers:
That's a long-sleeve t-shirt with generic super hero logo on the front, and a detachable cape on the back. Hurray for non-licensed superheroes! Hurray for capes! Hurray for washable costumes that can be worn in public and will fit in the carseat!

This is not a cheap gift, but if it's something that she can wear every day which will forestall at least part of the "you have to take that off to eat/sleep/go outside" arguing, it will be worth every penny. Assuming that she will wear it at all, mind you. She'll probably use it to top off that god-awful poofy ballet skirt I'm making, which will serve me right, I guess, but maybe, just maybe, I can get her to wear a pair of jeans. Once.

Little Capers come in various generic superhero styles (you've got to check them out - the Saturn one is soooooo cool!), in sizes from 6 months up to 6 years. Available at local boutiques in many states, the shirts are also available for purchase direct from the company at http://www.littlecapers.com/ .

Thursday, December 06, 2007

More handmade toddler gift suggestions

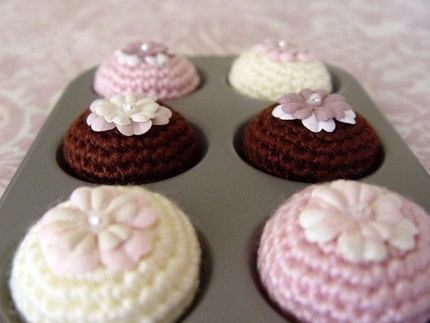
Next up on the fake-food roundup - crocheted "two-bite" cupcakes from pukashell creative designs.


I don't even know where to start with these. They're so tiny! They're so cute! They come packaged in a miniature muffin pan that is both tiny and cute!


I really waffled about buying these for Liza, since tiny amigurumi cupcakes aren't exactly labor-intensive. However, I decided that by the time I went out and bought the right colors of yarn (which I don't have) and the muffin tin (which I don't have) and the buttons (oh, the buttons! So cute! So not in my stash!) and finally sat down to make the things, not only would it be as expensive as buying them online, but I'd never get around to it and would end up with a bunch of yarn and buttons that never got used.


So, support a fellow etsy artist, keep my stash smaller, save time - what's not to love?


The only downside for you guys is that the artist doesn't have any currently in stock in her store, although there are some really cute larger cupcake playsets available, and the polymer clay jewelry that looks like dessert is pretty cute for older kids.