Pages

Showing posts with label crafts. Show all posts

Friday, March 19, 2010

Another thing to do with your kid's artwork

When Lazy Kid painted some lovely watercolor fruits this summer, I knew I was going to have to do something special to preserve them for posterity. One scan, 10 minutes of editing/cutting/pasting, and less than an hour of sewing later, I've got two new placemats for our table.

I used the inkjet-ready, colorfast cotton pages you can find at most sewing and craft stores. I set my printer to print photos at the highest quality, and they turned out pretty sharp:


After I got the Lazy Kid fabric printed, I dug out some of my favorite stash, which I've used to make curtains for my last two kitchens, and which happened to coordinate perfectly with the colors of the fruit. Score!


I sewed strips onto three sides of the art to get it to be the right height for a placemat, then sewed the larger block onto the side to make it the right width. Grabbed some coordinating fabric scraps for the back, found some batting that was just large enough to work, and made myself an inside-out (quilt) sandwich. Stitched around the outside but left an opening for turning, turned it right side out, then topstitched around the edge to help it lay flat and close the turning opening. Topstitched around the Lazy Kid art to help it lay flat, and it was done!

Now, the fabric I printed at home is only "washable," not actually washable, so I'm going to have to Scotchguard the living heck out of these before I let Lazy Kid anywhere near them. But once that's done, I have hopes that these will be cheering our table for the rest of the summer!

Monday, March 08, 2010

Proud of my princess

Lazy Kid is almost 5 now, so I figured it was time for her to try her hand at embroidery. Here she is with her first piece, about half of which she completed on her own, with my only help being to hold the hoop for her while she handled the needle and thread:


We used some leftover Aida cloth I had in my stash, and some perl cotton that my mother got at a yard sale or something (because I know I didn't buy it). We used a slightly sharpened tapestry needle - basically, whatever I could find that had an eye large enough for the cotton but was still small enough to fit through the holes in the cloth.


I got her started, making the knot and showing her how to handle the needle safely and make the stitches roughly where she wanted them. I did a cross for the center of the flower, and she filled in the rest. I did one leaf, she did the rest. I started the sun, she finished it. She was patient, moving the needle around until it came out exactly where she wanted. And she knew exactly what she wanted, specifying when I had to change the thread colors for her and even asking how to take out one stitch that didn't work the way she wanted it to.

And when she was done "drawing with string," she insisted that she had to sign her work. I did the "Z" and "A" in her name, and she did the rest.

I am unbearably proud of her. Now if she'd just show any interest in doing it again ...

Wednesday, February 24, 2010

Book recommendation

This week Lazy Kid and I are focusing on learning about art, so I checked some books out from the library to expand our repertoire of craft techniques. One of the books I'm most excited about is called Easy Art Fun, by Jill Frankel Hauser. This book is really designed for use in classrooms, but a lot of the projects lend themselves to home crafting, as well.

What I like best about the book is that it's designed to be used by early readers, so the format of each page is the same, and it's all really clearly spelled out. Each project fits on two page sides (which face each other, so there is no flipping back and forth to finish something), and each offers variations on the project to make it more complicated or with a different theme. There are sections that focus on coloring, cutting with scissors, making toys, making gifts, making things for pretend play, making music, and making wearable art.

Lazy Kid is not quite five, but she reads really well, and she was able to breeze through reading several of the projects to pick out one she wanted to do. The book is a great way to get kids some practice with real-life reading, rather than story reading - practical reading really does use a whole different subset of words and phrases that kids need to learn.

And the projects are quite nice, with several old favorites and quite a few that I've never seen before. Lazy Kid chose to make the Monster Mouth game, where you decorate a paper bag like a monster face and try to throw balls of paper into the open mouth. Personally, I want to make some bendy people (paper cutouts with baggy ties taped to the back to let you bend the dude into different positions) and a few other projects that are new to me.

Monday, August 31, 2009

Parenthacks: Painting without ruining your table

We're working on a dinosaur diorama, and I thought now was a good time to show how we set it up so that LazyKid can do crafts at our nice cherry dining room table without giving me a heart attack.

1. All craft projects are primarily done on some plastic serving trays I got on clearance at Target. This gives us a place (with a rim in case of spills) that she can be messy, but almost everything wipes off. Even dried-on "permanent" paint comes off with a bit of persuasion. And when we need the table for a meal, we can pick up the whole craft and move it out of the way.

2. I've been using heavy-duty foam plates as palettes for the paint, which lets her mix the colors together but limits the volume of paint she gets at any one time. The foam plates are easy to wash off and reuse over and over ... I just finally got rid of the set we'd been using for the past two years. Now we're using some disposable plastic drink cups. I cut the tops off of them so that each cup is only about 2 1/2 inches deep. This means that they're low enough to be hard to tip over, and again, it limits the amount of paint the kid can have. They're also low enough that LazyKid doesn't try to rest the paintbrush in them, which means she doesn't catch the paintbrush with her elbow and tip them over that way. These are wash-and-reuse items, too. We've also used styrofoam egg cartons as palettes, but that's harder to share among several artists, since all of the cups are stuck together.

3. Lots of paper towels, right there at the scene. It's much easier to clean up a spill if you don't have to run across the room to get a towel. Plus, if the towels are right at hand, it's much more likely that LazyKid will try to clean up the mess herself before asking me for help. We've also had good luck with using up some old packages of baby wipes as craft cleanup wipes.

4. Storage for the paints that makes them easy to carry without dropping or spilling. We've only got a few acrylic paints right now, so they're in a small shoebox that's stored with the rest of the painting supplies in a plastic tote. The plastic tote has all the poster paints, paint brushes, paint stamps, palettes, and stencils, all in one place. When we want to paint anywhere - on the easel in the basement, on the floor in the livingroom, at the dining room table, outside on the picnic table - we can just grab the tote and take everything with us in one trip.

5. Lots of supervision. If I'm not actually doing the craft with her (I helped paint some of the larger diorama figures above), I try to be physically with her at the table while I do something crafty on my own. I've got a number of mindless knitting and crochet projects I can grab to fill in a few minutes while LazyKid paints or works with clay ... things that can be picked up and put down a lot without getting messed up too much. I've found that trying to do things away from the table - like cook dinner or wash dishes - ends up with the kid making more of a mess than if I'm right there.

Hope some of these tips help keep you (and your table) crafty but organized!

Wednesday, June 17, 2009

Monday, March 16, 2009

This looks like a really cool idea

Has anyone tried them? I'd love to know how they work.
I also love the idea that you can buy them enclosed in a greeting card. Now that's unique marketing!

Thursday, February 12, 2009

Last-minute greeting cards

Okay, so the package to the Lazy Grandparents needed to be in the mail today, and Lazy Kid wanted to make a Valentine's day card to go with it. Glitter glue wouldn't dry in time, so I hauled out Plan B: punching designs in cardstock with a hammer and nail.

1. Put a piece of corrugated cardboard on a solid surface (one you don't mind nicking up a bit if someone gets a little too excited with the hammer), then put the paper to be punched on top. I used regular cheapo cardstock for Lazy Kid's card, and some commercial blank greeting cards for my versions. Make sure you're looking at the inside of the card, poking the holes toward the outside of the card.

2. Use a lightweight hammer to force a thin nail through the cardstock into the cardboard (but hopefully not into the table under it), punching a small hole in the card. Repeat the process, placing holes no closer than about 1/4" apart (much closer together and the paper will tear, and then the kid will cry, and that's not the point of this, now is it?). You can lightly trace a design for the child to follow, or tape a pattern to the paper and remove it when all the holes are punched, or just let them wing it. Or, if you're really dumb, you can hold the nail while the kid hammers, which lets you control where the holes will end up, and also really, really hurts. Don't ask how I know this.

Lazy Kid's card, made with me aiming the nail (ow)
The bumps made by the nail pushing through will be different sizes depending on what size nail you use and how deep it penetrates, so if there's a specific look you're going for, play around with it on a piece of scrap paper before you let the kid go to it.

One of my cards - the outer heart followed a pattern, the inner one was done freehand

If you use a fairly large nail, you could even glue or tape a piece of colored paper behind the holes so the color would show through (and your traced pattern would be covered up), but it's really the texture of the holes that makes this so fun. I've made a bunch more this morning, whenever I could wrest the hammer away from my daughter. I love that our craft session included the sentence, "I want to make another card - where's the hammer?"

Thursday, August 14, 2008

Parenthack - how to keep the sand on the sand art

Last time I did sand art with Lazy Kid she insisted that we hang the resulting work of art up on the refrigerator ... where it then shed sand all over my hardwood floor, despite the Contact paper. Not good.

So when we made new sand art yesterday, I decided to try something different. This time I waited until it was dry, then put the art in a plastic sheet protector (like you'd use in a notebook) before we stuck it to the fridge. Now all of the sand gets caught in the sheet protector, and she can still see her work of art every day. Neato mosquito!

Oh, and in case you were wondering, this time we used watered down glue (about 2/3 glue and 1/3 water), a paintbrush, and gravity to make some cardstock sticky enough for the sand. They turned out pretty cool - this one's my favorite:

Tuesday, June 17, 2008

Sand Art for Small People

We picked up some sand art kits from the $1 bins at the front of Target a few weeks ago, and they've been a big hit ... except that it takes me longer to peel off all the stickers than it does for Lazy Kid to pile obscene quantities of sand on the resulting sticky patches. And she gets frustrated when the color doesn't go in the tiny little spots she's targeting ... which is why I came up with my own version of sand art that's easier for small kids to handle.

Safety warning: This project isn't for kids who still put stuff in their mouths all the time, unless you REALLY want to be cleaning multi-colored sand-filled poop up for several days. And you don't, trust me.

Materials:
Contact paper (clear or colored)
Colored sand
Optional: scissors and paper, or photos cut from magazines, or other flat stuff to stick down
Outside area to work that you don't mind having covered in sand

Technique:

Cut Contact paper to be about the size of a sheet of printer paper. Peel backing off to expose the sticky side, then tape it securely sticky-side up to a table or work surface. I found it was easiest to use one of my trusty craft trays for this (makes it easier to pick up and knock off the excess sand at the end).

Stick down any paper or other flat things you want to use. If you want to mimic a "real" sand art page, cut shapes out of construction paper and then cut inside them to form just the frame of the shape, so that the child can sprinkle sand inside the outline. Or just stick down pictures, or sequins, or glitter, or random sticks that blow onto the sheet from the windstorm that has kicked up since you started the craft.

Let child apply sand to the sticky parts of the Contact paper.

We still had the sand in the little bags it came in, so I just cut the corner off the bag and let her pour it and spread it out with her fingers.
You could also put it in small bowls and let them use spoons or their fingers to sprinkle it on the paper. You can get really creative with this - put their hand down and sprinkle around it to make a handprint, then fill it in with a different color; trace letters or pictures you slide underneath the clear Contact paper; etc.


When you've finished all the sand stuff, pick up the paper and knock off the excess (and trust me, there WILL be excess). We did this by just picking up the whole tray so I didn't have to deal with floppy sticky sandy Contact paper much.

If you want to preserve the sand art (i.e. not have it dribble sand all over your kitchen floor for the next three weeks), stick a piece of clear Contact paper on the art so the sand is sandwiched between the sheets. If you want, cut the outside of the sheets to be even, or into a shape, but remember - the sand is going to REALLY dull the scissors fast, so don't use your good sewing scissors for this!

If you used clear Contact paper for both sheets, you can hang the art in the window as a suncatcher. Otherwise, it looks great on the refrigerator, or as a small placemat for snacks, etc.

Hope you have fun with this project! Now, let's just hope I can find a cheap source for more sand, because we're going through it at a fast clip around here ...

Friday, May 16, 2008

Awwww...

Lazy Kid shows off some of the results of our craft binge:

The individual-sized-cereal-box puppet, which is significantly more complicated than the construction paper ones that inspired it (find them in Incredibly Awesome Crafts for Kids by Better Homes and Gardens). We added a polar fleece sleeve to make this look more like the "alligator" it's supposed to be ... the hot pink fleece Lazy Kid picked out kinda takes away from the effect, doesn't it?

Next up: Using glitter glue to make prints for birthday thank you cards.

This was supposed to be "use glitter glue to make pictures on craft foam," but Lazy Kid prefers to make huge blobs of color, and I thought those would take forever to dry. So we pressed pieces of paper onto the craft foam and made prints from the blobs, like these:

We got about four prints from each set of glue blobs, and the remaining glue washed off of the craft foam really easily so we can use the foam again next time. We got a couple extra prints by pressing paper onto the first (somewhat globby) print from each series.

Still in process: Salt clay figures, most of which are painted a hideous Pepto-Bismal pink. Yum.

Keeping the kiddy crafts corralled

Lazy Mama HQ was Kid Craft Central yesterday, with no fewer than three ridiculously involved craft projects begun and sorta finished. Go, us!

While we were in the thick of it, it occurred to me that my method of keeping the kid craft projects corralled might be of interest to my readers, some of whom might not have come up with it on their own. Our house is somewhat small, you see, and while we managed to find a small closet to house all the kid craft supplies, Lazy Kid doesn't have a dedicated craft table or anything like that. Instead, she's got sort of a corner of our kitchen counter, and for larger projects we spread out on the dining room table. So being able to keep the craft surfaces clean - and pick them up quickly when we're done - is important to my sanity.

Enter the plastic serving tray. We bought several of these from Target a few years ago, originally as a way to contain the cat food that our messy eaters nudge out of their bowl when they're famished. Then the trays got cleaned up and actually were used as serving trays when we ate out on our patio. And now they've been drafted into duty as craft stations, keeping crayons from rolling off the table, paints from staining the tablecloth, and cotton balls from blowing all over the house when the door opens.

They wipe clean easily, and best of all, when I need room on the dining room table or kitchen counter, I just pitch all the craft supplies onto the tray and throw the whole thing back in the closet. Cleanup doesn't get much easier than that, unless you count the old "fingerpaint in the bathtub and hose the kid down afterward" trick.

So if you're doing kid crafts, keep your eyes on the clearance rack at Target - they change plasticware designs every month or two, and when they do, you can get one of the older designs at a significant discount.

Thursday, May 01, 2008

In retrospect,

... maybe it was a bad idea to let LazyChild help pull out the stuffing I needed for a project for her birthday party this weekend.

Maybe this will finally push me over the edge and give me an excuse to buy a Dyson. Yeah, right.

Saturday, March 15, 2008

FREE PATTERN - Very Vernal Placemats


I developed this pattern as a free giveaway for Birds of a Feather in Avon, Ohio. If you're in NE Ohio, I can highly recommend that you stop by and say hi (and pick up a pattern while you're there spending lots of money on cool fabric and yarn). If you're not in NE Ohio, you're in luck, because I'm posting the pattern here!

Directions:
1. Cut one 13”x17” rectangle each from front fabric, back fabric, and batting.
2. Lay batting flat on a work surface, smoothing out any wrinkles. Lay back fabric face-up on top of the batting, smoothing out the wrinkles and matching the edges.
3. Lay the front fabric face-down on top of the back fabric, smoothing out the wrinkles and lining up the edges as best you can. Secure all three layers around the outside of the rectangle, using straight pins or quilt binding clips.
4. Using a 1/2" seam allowance, stitch around the perimeter of the rectangle, pivoting at the corners and leaving about a 4” opening for turning.
5. Trim the corners on the diagonal close to the seam to eliminate the extra seam allowance. Turn the placemat right-side-out through the turning opening, finger-pressing the seams flat and making sure the corners are completely turned.
6. Pin or binding-clip the edge of the placemat all the way around, folding the extra seam allowance inside at the turning opening. Topstitch about 1/4" in from the edge all the way around the edge of the placemat.
7. Trace desired template from the end of this post onto paper or cardstock (you'll need to size it up, since I can't get it to show as full size - the egg is about 7" long and the flower is about 5" long). Cut scrap strips to be 2 1/2" wide or narrower, using a pinking blade if desired. Sew the long edges of two scrap strips together with a 1/4" seam, holding the wrong sides together as you sew so that the seam allowance ends up on the right side. Press seam open. Repeat, adding strips on to the ones you’ve sewn until you have a block that’s at least as large as your template.
8. Cut appliqué shapes from the strips you’ve sewn together, pinking the edges if desired.
9. Use temporary spray adhesive to adhere the appliqués to the placemat in desired locations.
10. Use a free-motion foot or darning foot to stitch around the edges of the appliqués, stitching about 1/4" or less inside the edges of the shape.
11. Complete quilting as desired.

Monday, February 25, 2008

YoMama Infant Quilt prototype finished!

What is it? A quilt you can use to make an infant's tummy-time a little less boring (and keep your carpets a little less urp-covered). Machine pieced from visually stimulating black and white prints, the quilt features brightly colored hand-stitched yo-yos sewn to the quilt by hand to provide the quilting.


This is a prototype; patterns to make your own, as well as some completed quilts, should be available in the shop later this week.
This is the inaugural project in my new line of patterns designed to be completed at least partially by hand. All of the hand crafted parts of these projects are will fit inside a gallon-sized plastic bag (most will fit in a quart-sized one, which is perfect for popping in your purse or diaper bag). This approach allows crafters to take the project with them and do some work during the little pieces of idle time they can find throughout the day. For example, I made all the yo-yos for this project while watching Sesame Street with my daughter, supervising my daughter at an indoor playground, and riding in the car.

Tuesday, February 12, 2008

Free project - Fabric postcard Valentines

I made these with my not-quite-three-year-old daughter for her preschool classmates. She picked out fabrics and manned the glue stick; I manned the sewing machine and occasionally told her where to stick things down. It probably took me under an hour to make the five I needed for her class.

Supplies:

  1. Sew fabric scraps together until you have a piece that's at least 4"x6". Repeat to make a second piece.
  2. Use the glue stick to apply glue to one side of the interfacing or Timtex, then adhere it to the wrong side of one of the pieces you made in the first step. Repeat for the other side of the interfacing or Timtex.
  3. Zigzag stitch or serge around the edge of the interfacing or Timtex, making sure you drop the needle off the edge so that one side of the zigzag is sewing through just the fabric. Trim the excess fabric, being careful not to cut into the stitching.
  4. Use the glue stick to apply glue to more fabric scraps, then adhere them to one or both sides of the postcard.
  5. Stitch slightly inside the edge of these fabric scraps to raw-edge applique them to the postcard.
  6. If you wish, stitch a message onto the postcard (use a darning foot, drop your feed dogs, and spell it out in cursive ... or program your fancy sewing machine to embroider it for you, Ms. Lazypants!)

Monday, November 12, 2007

Pattern testing

When Hillary from Wee Wonderfuls asked for volunteers to test a new pattern this weekend, I threw my hand in the proverbial air while shouting "Ooooh! Ohh! Pick me! Pick me!" I guess she heard me, because I spent a couple hours Saturday night trying out her new gnome pattern.


Despite using completely the wrong fabrics, refusing to use pins, completely forgetting to attach Mr. Gnome's unibrow before sewing on the backing, and having to go back and hand-stitch some of the seams I screwed up, they turned out looking pretty spiffy:

Moral of the story: If I can make these suckers look cute at midnight with stash fabrics and a grudge against using pins, ANYONE can make them look cute. Now, go forth and purchase gnome patterns (when she has them available in her shop, which should be soon)!

***Edited to add: http://weewonderfuls.typepad.com/wee_wonderfuls/store/ link to the shop where the gnomes are now available

Tuesday, August 14, 2007

Locker Pockets pattern page

Locker Pockets

Stash your stuff in style with this quick-to-sew organizer, perfect for hanging in a locker or on a bedroom wall. Easy to personalize with funky fabrics and patches or embroidery!

Finished size: 9”x26”

This pattern can be sold as a kit with fat quarters for the pockets and 1/3-yard cuts for the front and back. Also makes a great class for parents or parent/child teams - contact me to arrange for a designer-led class!

A person with average sewing skills should be able to complete this pattern in about 1 naptime (2 hours).

Photo from the pattern: Shaping the pockets

Pattern includes illustrated instructions, and it is packaged in a resealable plastic bag (6"x9"), ready to hang and sell.

Wholesale price: $4.00/pattern
Suggested retail price: $7-$9, or whatever the market will bear in your area

Free shipping on your first order! Shipping charges for subsequent orders will be the actual charges for USPS Priority Mail to your destination.

I am willing to make free samples to display in your shop, if you are willing to provide the materials. Please contact me for more information on this service.

For more information or to place an order, please contact Gretchen Woods at Lazy Mama Designs: lazymamadesigns (at) yahoo (dot) com.

NEW!! You can also place orders through my shop at etsy.com - just convo me with a request, including the number of patterns you'd like to buy, and I can post a custom listing for you at the wholesale price.

Thank you for your interest, and I hope to hear from you soon!

Wednesday, August 08, 2007

Mophead and Friends pattern page

Introducing ... Mophead and Friends!

These fast, fun little loveys are sure to gather lots of “awwwws” at a baby shower. Lots of snuggly fringe makes them popular with babies, while the “tuck in your back pocket” size is a hit with parents. Be sure to make more than one to prevent “lost lovey meltdown!”
Pattern includes directions for Mophead, Sleepy Lion, Fuzzy Flower, Shooting Star, and the abstract square.

Made from 1/3 yard cuts of fleece, these loveys are easy to pre-cut for customers who are looking for a quick project. They sell really well when displayed with samples of the finished loveys, so be sure to request some when you order.

Detail of my favorite design, Sleepy Lion.


Pattern includes detailed instructions and templates, and it is packaged in a resealable plastic bag (6"x9"), ready to hang and sell.

Wholesale price: $4.00/pattern

Suggested retail price: $7-$9, or whatever the market will bear in your area

Free shipping on your first order! Shipping charges for subsequent orders will be the actual charges for USPS Priority Mail to your destination.

For more information or to place an order, please contact Gretchen Woods at Lazy Mama Designs: lazymamadesigns (at) yahoo (dot) com.

NEW!! You can also place orders through my shop at etsy.com - just convo me with a request, including the number of patterns you'd like to buy, and I can post a custom listing for you at the wholesale price.

Thank you for your interest, and I hope to hear from you soon!

Monday, December 04, 2006

New items in the shop

I've been a crocheting machine the last few weeks, so there's a new scarf and two new hats up for sale in the shop. Check them out if you've got time (and about $10 to spend on handmade Christmas gifts!).

One thing you won't find in my shop (because it's loosely based on another seller's pattern, and I'm awaiting permission from her to sell them) is my fully clothed bunny amigurumi toys. They're croched from leftover yarn I took with me over Thanksgiving, and I'm pretty happy with how they turned out. I really like the overalls on the one bunny, and I like how the cotton yarn I used on the girl bunny worked up. Take a look:

Thursday, November 09, 2006

Bonus project - Cards by kids

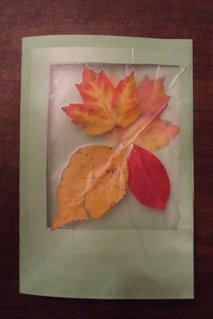
With Christmas card making season almost upon us, I thought I'd share my idea for making quick and easy cards with kids, even ones who are too young to give a darn about crafts. The instructions here are for a pretty low-budget, basic card, but you'll see how it's possible to really glam this up if you have older, craftier kids.

Materials for each card: one sheet of construction paper, two or three pieces of clear Contact paper (each about 6" wide and no more than 8" long), and things to stick to the Contact paper (sequins, glitter, leaves, photos, stickers, pieces of colored paper, petals - pretty much anything that's pretty flat will work)
  1. Take a sheet of construction paper or printer paper (or fancy cardstock, whatever you have) and fold it in half so that you have a 8 1/2" x 5 1/2" rectangle.
  2. Cut a window in the front of the card. You don't want it to be too large, or there won't be any room left to write inside the card, because the inside of the card is going to show through the window.

  3. Cut two pieces of contact paper so that each is at least 1" wider and 1" taller than the window you just cut in the card.

  4. Open the card up and lay it on your work surface so that the outside of the card is facing up.

  5. Now arrange your decorations in the window of the card. You may want to save a few decorations to stick to the inside of the card later on to give it a 3-D effect. Some of the decorations may be attracted to the Contact paper via static electricity as you're putting it on, so be try not to make the design too finicky, or you'll end up repositioning a lot of the decorations.


  6. With the decorations arranged in the window, peel the backing off of one piece of Contact paper and stick it to the front of the card so that it overlaps the window by about 1/2" on all sides. Press down on the decorations to stick them firmly to the Contact paper.


  7. Pull the card away from the table - hopefully the decorations should stick, while the table doesn't. Reposition any decorations that fell off.

  8. Now open the card to the inside and stick a second piece of Contact paper over the first, again overlapping the sides of the window.

  9. If you saved a few decorations, scatter them on the inside of the card and cover them with an additional piece of Contact paper.

  10. Write your message, and you're done!

This size of card is great for giving to people in person, but you may want to start with a smaller card size if you're planning to mail it. Otherwise, you can do what I did with this one - fold it in thirds and stick it in a business envelope :)