Pages

Thursday, November 30, 2006

The cross stitch project from heck

I love to cross stitch, but somehow I always end up picking projects that are so intricately shaded that you go blind trying to differentiate between 14 different shades of peach for the skin tones. Every time this happens, I vow that I will examine all future projects for this problem and refuse to buy any that require more than two different shades of any one color.
Ha.

Should have thought of that before I bought the advent calendar project four or five years ago. It's been sitting in the back of my craft closet for years, waiting until I was dumb enough ... er, motivated to start working on it. When my daughter was born last year, I finally decided it was time to start. Round about Halloween I finally had time to work on it.

By Thanksgiving 2005 I had determined that, if I didn't go insane first, I might be able to finish by Christmas 2006, if I put some effort into it and ditched all of my other stitching projects. That worked for a while, and then summer came and I was fed up with stitching trees and snow and fuzzy bunny slippers.

I had to put production into high gear this fall to finish in time, but by god, I made it. Sure, I was stitching the last four day markers last week at my in-laws' house ("Honey, isn't that the same thing you were working on last year?" "Um, yeah. I think I need more chocolate."), and they're in the box we shipped back that got waylaid by the postal service and won't be here in time for the start of Advent tomorrow. But at least I've got until the 21st before I need them, and the rest turned out beautifully, if I do say so myself:

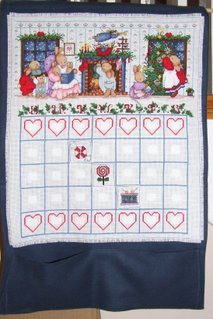
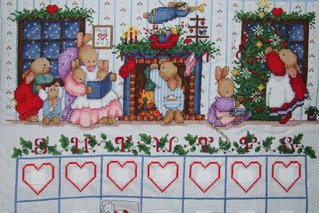
Every one of those stupid rabbits is made of four colors of brown, and the mother's skirt? Something like six shades of pink. Gahhh.

Ahem. Anyway, I upgraded the original finishing instructions to stabilize the work on a piece of felted wool, and I used velcro instead of spray sticky stuff to adhere the markers to the days. That saggy part on the bottom is a pocket I made to hold the day markers, which are all inside and making it look a little funny right now.

So now we're ready for tomorrow morning, when my bright-eyed little girl will probably smear peanut butter all over the stitching. If so, she's totally getting a pasteboard one next year :)

Monday, November 27, 2006

Tip - getting accurate hand tracings of squirmy kids

If you've ever tried to get a toddler to hold still long enough to trace around their hand for a craft project, you know it's like trying to herd cats. Here's a pointer from my friend Sybil, who has plenty of experience overcoming this problem - each year she makes Christmas ornaments in the shape of her (3) kids' hands.

Instead of trying to hold the hand still and trace around it (which gives you sort of a bloated-looking hand, anyway), get the child's hand slightly wet and then make a handprint on dark colored construction paper. The water will leave a mark on the paper, which you can trace around while the child goes off and squirms somewhere else.

We tried this tonight while Liza was taking her bath, and I have a few extra pointers. First, less is more when it comes to the water. If the hand is too wet, it leaves a huge soggy handprint that is hard to trace around and is probably larger than the actual hand, anyway. And have several pieces of paper handy, especially if you're doing it as part of bathtime, because it takes a little practice to get the fingers positioned right before you press the hand down (and you're liable to rip the paper the first time you try to trace around the wet print).

If I have time, later this week I'll post a free pattern for making my version of the handprint Christmas ornaments, which takes considerably less time (and cursing) than Sybil's version. But I'm sure you can come up with your own variation, too. If so, why not post a link so all of us can see it?

Sunday, November 19, 2006

Proof of the superiority of crochet

Working only during nights, weekends, and the occasional naptimes:
Number of weeks it took to knit a size 2T sweater for my daughter in a ridiculously easy design: 8


Number of days it took to crochet a size large sweater for myself: 4
Go, Happy Hooker book! Next up, the Violet Beauregard skirt from the same book. No good shots of that that I can find online - here's the best I can do. If a somewhat novice crocheter can make this in 10 days, I can totally whip it out over Thanksgiving, right?

Saturday, November 18, 2006

Sometimes procrastination pays off

I've been slacking off on my pattern development and etsy posting recently. I have good reasons why the two quilts I've developed are sitting unpatterned on a chair by my desk, gathering dust. There are some non-craft writing projects I've been developing, for one thing, and for another, I've been farting around with designing a new logo and banner for the redesigned etsy shop.

You can see some of those results here in the new color scheme, etc. I'm still trying to tweak it to display exactly the way I want, but at least it's not brown anymore.

One of the things I did this week was to make stationery with the logo on it - address labels, letterhead, business cards. In theory this should be a 10-minute project, but of course I managed to drag it out over the course of several naps and one really late night. I finished them up on Wednesday afternoon ... and Thursday I got my first sale on etsy.

Coincidence? I think not.

So when I shipped out the packages on Thursday afternoon, they sported Lazy Mama stickers, included Lazy Mama business cards, and I even managed to grab some of the slightly-less-than-full-0n-Christmasy tissue paper we have to wrap one of the items. I think I need to make keychains, or come up with some sort of small "thank you" to include with shipments, since some of the other etsy folks seem to do that. Maybe a tiny Lazy Mama quilt keychain? I guess I'd need to find a supplier for those split-ring keyrings, but that shouldn't be too difficult.

Oh, and in case you missed it, I'll write it again ... I got my first sale on etsy this week!!!!!!

Monday, November 13, 2006

Even my friends have mad skillz


Part of my birthday present from our good friends and former next-door neighbors up in Cleveland. I believe this is the batch that was made using apples stolen (yes, Matt, it's called stealing when you don't ask permission, even if you tried and the person wasn't home) from the tree in what used to be our backyard. I'm halfway afraid to try it ... but not as afraid as I am of the plum wine he's making using fruit from the ornamental plum trees on the treelawns in their development.

Sweater: accomplished!

Since I've started working on my writing and craft business, I've been pretty good about setting aside my time in the evenings to work on projects that aren't for sale. Sometimes it's hard to walk away from a quilt that needs an hour of work to be finished, but I don't want to turn into one of those people who only makes things to sell, never for her own family.
I, Lazy Mama, have knit an entire sweater! Okay, it's a size 2T, but STILL. This is the one I started when we got home from our vacation in September, so I managed to complete it in about a month and a half of not-quite-every-evening work. Bet you want to see it, huh?
Next up on the While Watching Netflix Movies lineup? Finish a Christmas present I need to have done by Tuesday, and work on some projects out of the Happy Hooker book. And crochet another sweater for Liza. And a few for myself (one of those skull and crossbones sweaters from the Happy Hooker is TOTALLY on my list).

Online children's story time

http://www.storyplace.org/storyplace.asp

I haven't checked out the parts for older kids, but the toddler section is neat. It's got stories, games and crafts for about two dozen different themes, all simple enough that a toddler could do them with adult help. Check it out!

Thursday, November 09, 2006

Tagline development

In case anyone out there is actually reading this, I need your opinion on designing my logo and store banner.


I'm considering two possible slogans . The safe one is "Keeping crafty moms sane, one project at a time." The somewhat edgy one is, "Put down that baby and sew something!"


I'm guessing that since my logo is kind of benign (thanks to the free clipart from Word), I should stick with the safe slogan. If anyone has any better ideas, I'd love to hear them.


Maybe I can make up some mailing labels that have the snarky slogan on them.

Bonus project - Cards by kids

With Christmas card making season almost upon us, I thought I'd share my idea for making quick and easy cards with kids, even ones who are too young to give a darn about crafts. The instructions here are for a pretty low-budget, basic card, but you'll see how it's possible to really glam this up if you have older, craftier kids.

Materials for each card: one sheet of construction paper, two or three pieces of clear Contact paper (each about 6" wide and no more than 8" long), and things to stick to the Contact paper (sequins, glitter, leaves, photos, stickers, pieces of colored paper, petals - pretty much anything that's pretty flat will work)
  1. Take a sheet of construction paper or printer paper (or fancy cardstock, whatever you have) and fold it in half so that you have a 8 1/2" x 5 1/2" rectangle.
  2. Cut a window in the front of the card. You don't want it to be too large, or there won't be any room left to write inside the card, because the inside of the card is going to show through the window.

  3. Cut two pieces of contact paper so that each is at least 1" wider and 1" taller than the window you just cut in the card.

  4. Open the card up and lay it on your work surface so that the outside of the card is facing up.

  5. Now arrange your decorations in the window of the card. You may want to save a few decorations to stick to the inside of the card later on to give it a 3-D effect. Some of the decorations may be attracted to the Contact paper via static electricity as you're putting it on, so be try not to make the design too finicky, or you'll end up repositioning a lot of the decorations.


  6. With the decorations arranged in the window, peel the backing off of one piece of Contact paper and stick it to the front of the card so that it overlaps the window by about 1/2" on all sides. Press down on the decorations to stick them firmly to the Contact paper.


  7. Pull the card away from the table - hopefully the decorations should stick, while the table doesn't. Reposition any decorations that fell off.

  8. Now open the card to the inside and stick a second piece of Contact paper over the first, again overlapping the sides of the window.

  9. If you saved a few decorations, scatter them on the inside of the card and cover them with an additional piece of Contact paper.

  10. Write your message, and you're done!

This size of card is great for giving to people in person, but you may want to start with a smaller card size if you're planning to mail it. Otherwise, you can do what I did with this one - fold it in thirds and stick it in a business envelope :)

Monday, November 06, 2006

New in the shop

Just listed today:

Lazy Mama's Unusually Useful Receiving Blanket


Hand quilted wholecloth miniature wallhanging quilt:

Hydrangea and vintage handkerchief wallhanging quilt:

And one from a few weeks ago, Lazy Mama's Jack Pack:


Stop on by the shop, buy many things!

Greetings and Salutations!

Welcome to Lazy Mama Speaks, your place to find out what's going on at Lazy Mama Designs. I've been posting a lot of new stuff at my etsy shop, and I thought it would be fun to share some information on my recent projects, as well as some sneak peaks at upcoming items for sale on my site.

This site is still under construction, and I'm trying out the new beta version of blogger, so bear with me while I get things under control. Until then, here's a brief refresher on who I am, what I'm doing, and why someone so busy calls herself "Lazy Mama."

Who is Lazy Mama?
I got suckered into quilting by the wily folks at a fabric store in Cleveland, Ohio, who could spot an easy mark when they saw one. A decade later, I still spend way too much money at fabric stores and way too much time in my sewing studio.

When my daughter was born a year and a half ago, I was afraid I was going to have to cut back on my projects. Instead I’ve developed ways to enjoy crafting on a scale and a schedule that fits my new-mommy status – I call it the Lazy Mama way!

I design projects that are practical but cute, that look impressive but go together quickly, that look professional but involve the bare minimum of fuss. These projects go together so quickly, you may find yourself making extras to give as gifts! I try to design projects that I can finish in the span of one or two of my daughter’s naps, or that I can finish in the tiny pieces of time I carve out for myself in the evenings before I collapse into bed.

By using these tidbits of time to do something I enjoy, I’ve found a way to keep up a hobby I love and maintain some sanity during my daughter’s childhood. And I'm finding inspiration in the products I can make for my daughter to wear and play with ... so look for more toys, patterns and baby items in the coming months.

I enjoy taking traditional craft designs and adding a modern twist with bold colors and non-traditional techniques. My goal is to make beautiful, functional art that makes the owner feel happy when they look at it. I hope it's working!