Pages

Showing posts with label crochet. Show all posts

Friday, September 02, 2016

VVVVVery Quick V-Stitch Cowl

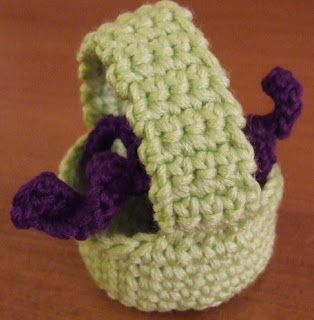
Sometimes you have a skein of fingering-weight yarn that doesn't want to be socks, either because it's too delicate to care for or too special to relegate to something you're just going to stick inside shoes anyway.  Single-ply yarns, cashmere blends, hand-dyed souvenir yarns from trips to far-flung yarn stores ... all of these can be showcased beautifully in this V-stitch crochet cowl.  The pattern is simple and easy to start and stop, making this the perfect on-the-go project, especially as gift-giving season approaches.

Materials:
  • 4.0 mm crochet hook (US size G)
  • 4.5 mm crochet hook (US size 7)
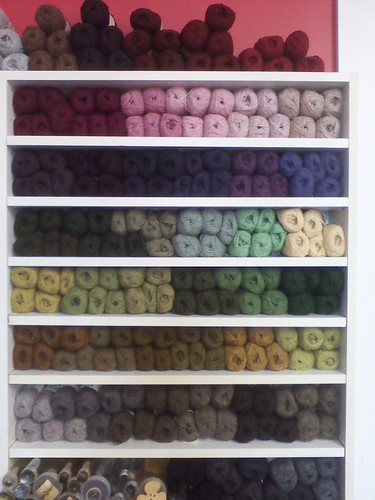
  • about 60 gm fingering weight yarn (I used Hedgehog Fibers' Skinny Singles from River Colors Studio in color Opalite)
Abbreviations:
SC - single crochet                ch - chain
DC - double crochet              sl st - slip stitch

Technique:
  1. Using the 4.5 mm hook, chain 84.  Join with a sl st, being careful not to twist.
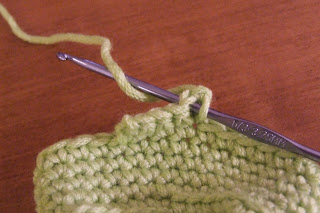
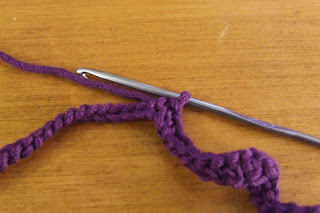
  2. Using the 4.0 mm hook, chain 4.  DC in same chain as sl st.  [Skip chain, (DC, chain 1, DC) in next chain] around.  End round with sl st in 3rd chain of beginning of round, then sl st in the resulting ch-1 space to the left of where you just joined.
  3. Chain 4. DC in same ch-1 space as sl st.  [DC, chain 1, DC) in next ch-1 space] around.  End with a sl st in 3rd chain of beginning of round, and sl st in the resulting ch-1 space to the left of where you just joined.
  4. Repeat step 3 until cowl is desired length or you are not quite out of yarn (sample repeated the round 27 times).
  5. Using the 4.5 mm hook, chain 2.  [SC loosely in space between next 2 DC stitches] around.  End with a sl st in second stitch of beginning of round.  Fasten off and weave in ends.
Notes:
There's no reason this pattern has to be confined to fingering weight yarns. Just adjust the hook sizes to match your yarn choice (when in doubt, go bigger than you think you need, because you want the stitches to be flexible and soft).  Chain an even number of stitches that's big enough to slip over your head once it's joined into a circle, and get going!  For reference, I used 62 stitches with aran/chunky yarn (super fast project!) and 100 chains with heavy lace weight yarn (much slower going, but a totally awesome way to use the qiviut yarn I bought in Alaska).


Tuesday, March 15, 2016

Simple and Beautiful Sampler Afghan

Patterns are funny things. Sometimes they spring into life, fully formed, like they've been lurking in my brain all along. And sometimes I need to play around with some yarn and a hook and see what the fiber "wants" to be.

I had a supply of Malabrigo Rios leftover from another project, and I knew I wanted to make an afghan. The colorway I had - Piedras - varies A LOT between hanks, so I knew that making one big blanket wasn't the best option. So it would be done in blocks ... and I'd been meaning to come up with a sampler pattern for my not-quite-experienced crochet students to use ... and Erika is always up for holding new classes at the shop ...

After a few hours of digging around, I found the wonderful block-of-the-month afghan designed by Ren Murphy (http://theinspiredwren.blogspot.com/p/crochet-along.html). It had many of the traits I wanted - it was reversible, textured, and relatively easy. But not all of the blocks were exactly what I had in mind, so I designed a couple blocks based on some of my own favorite textures. After getting Ren's permission to use her designs for the class, I rearranged her blocks in order so that they go from easiest - nothing but single crochet - to the most complicated - some very straightforward front-post double crochet. Voila! A new pattern (and class) is born!
crochetsamplerafghan1
The class is offered at River Colors Studio, and I'm teaching two new blocks each month. I'll post the previous month's instructions here periodically, in case you're not in the Cleveland area but want to play along with us. Feel free to post links to pictures of your own projects in the comments!

And now, without further ado, here's the first handout:


Simple and Beautiful Sampler Afghan

Materials needed:
  • Washable, worsted-weight yarn in two colors - about 50 gm of each for one class, about 600 grams of each for the entire throw-sized afghan (but you can purchase as you go along, if you want), or about 300 grams of each for the baby blanket. Shop sample used Malabrigo Rios in colorways Pocion and Piedras.

Time to pick your project size!

  • If you want to make a 36” square baby blanket, you’ll be making one block using each stitch pattern.
  • If you want to make a 54”x44” throw, you’ll need a total of two blocks in each stitch pattern.

Class 1: March 6, 2016

Abbreviations to know this month:
st: stitch
ch: chain
sc: single crochet

Block One:  Rib-It! Rib-It!

Instructions:
Row 1: Ch 39, sc in second stitch from hook and each ch across; 38 stitches
Rows 2-55: ch 1 (does not count as a st), turn, sc blo in each st across (including 1st st); 38 stitches
Border: *work 38 sc along one side of the square, ch 1 (does not count as stitch), repeat from * on each side of the square.  Fasten off and weave in ends


Block 2: Tiramisu
(inspired by the stitch pattern in http://rosylittlethings.typepad.com/TiramisuBlanket.pdf)

Instructions:
Row 1: Ch 38, sc in second stitch from hook and each ch across; 37 stitches
Row 2: Ch 1 (does not count as a st), turn, [make 2 sc in next st, skip a st] across, ending with ONE sc in the last st of the row.
Repeat Row 2 until block is approximately square.
Border: *work 38 sc along one side of the square, ch 1 (does not count as stitch), repeat from * on each side of the square.  Fasten off and weave in ends

Thursday, May 14, 2015

Crocheted Shoulder Cozy

Crocheted Shoulder Cozy
A free pattern from River Colors Studio and Lazy Mama Designs

You will need:
2 skeins Noro Silk Garden Sock (store sample used color S272)
1 crochet hook, size G

Reminder:  A single crochet decrease turns two stitches from the previous row into one stitch in the row you are making.  In this pattern it is worked as follows: insert hook in next chain-1 space, yarn over and pull up a loop; insert hook in following chain-1 space, yarn over and pull up a loop (there should now be three loops on hook); yarn over and pull through all three loops on hook.

Pattern:
Chain 204 stitches.  Being careful not to twist the chain, join the ends of the chain together with a slip stitch.

Setup Round: Chain 4, double crochet in second stitch from where you joined.  Chain 1, [skip a stitch, double crochet in the following stitch, chain 1] around to the beginning of the round, then slip stitch into the third of the beginning four chains.

Round 1: Chain 2, [single crochet in next chain-1 space, chain 1] around to the beginning of the round, then slip stitch in first chain of the beginning two chains.

Round 2: Chain 4, [double crochet in next chain-1 space, chain 1] around to the beginning of the round, then slip stitch into the third of the beginning four chains.

Repeat rounds 1 and 2 for a total of about 8”, ending with round 2.

First decrease round: Chain 2, [single crochet in next chain-1 space, chain 1; single crochet in next chain-1 space, chain 1; work a single crochet decrease (see above directions) using the next two chain-1 spaces, chain 1] around to the beginning of the round, then slip stitch in first of the beginning two chains.

Beginning with round 2, work rounds 1 and 2 until piece measures about 12” from the beginning chain, ending with round 2.

Second decrease round: Chain 2, [single crochet in next chain-1 space, chain 1; work a single crochet decrease using the next two chain-1 spaces, chain 1] around to the beginning of the round, then slip stitch in first of the beginning two chains.

Beginning with round 2, work rounds 1 and 2 until piece measures about 16” from the beginning chain, ending with round 1.  Fasten off, then use a crochet hook or darning needle to weave ends in.  Wash and block, gently stretching the fabric to maximize its length or width, depending on your preference.  After being washed and blocked to be wider, the store sample measures approximately 14”x 27” when laid flat (about 54” around at bottom).

Thursday, September 29, 2011

I've been working at the yarn store ...

... all the live-long day (on Tuesdays and Thursdays while LazyKid is at school)
I've been working at the yarn store
Trying to put some wool away ...
0929111236a.jpg

(I had the easy job - Cathy - or is it Kathy? - had to put all of the inventory in the computer and put price stickers on all of it)

Wednesday, August 24, 2011

New class in development: Super-size Scrappy Square Blanket

My most recent attempt to use up scrap sock yarn generated a lot of interest, both in the Muggle public and at sit-and-knit at my local yarn store.  

I'm guessing that there are a lot of people like me who save oddball amounts of leftover yarn with the intention of doing "something" with it someday, but they have a hard time finding a pattern that doesn't end up looking like something the cat barfed up.  With truly random color choices, there's always an unfortunate possibility that your project will turn out to look significantly less than awesome.

I'm thinking of writing up the patterns for both the solid square blanket (above) and a super-sized granny square afghan (which would be along the lines of this one on Ravelry).  Or maybe a rectangular one in stripes?  These projects have all the hallmarks of being a Lazy Mama favorite:
  • You design the color progression to avoid unfortunate color neighbors
  • Uses yarn you've already got on hand
  • Works with any gauge and thickness of yarn
  • Pattern lets you keep working until you get bored - makes an infinite number of sizes.
  • No seams, and it's easy to work in the ends as you go, so practically no finishing.
I'll need to work up some samples this weekend to get my instructions ironed out, but I think these patterns show a lot of promise.

Thursday, July 28, 2011

Upcoming class - crocheting rag rugs

A lot of people love the look of traditional rag rugs, but they're not thrilled with the idea of having to sew together miles and miles of braid with stiff thread and a heavy duty needle.  Luckily, you can get a similar result with the same materials much more easily - with crochet!  

And better yet, it doesn't require any special stitches or equipment - just single crochet and a size Q hook.

On Sunday, September 11, I'll be teaching a class on the rag rug crochet technique at River Colors Studio.  I'll cover fabric selection and preparation, different shapes you can make, how to make an extra-reinforced version that will stand up to heavy wear, and more!  I'll provide a written pattern to make a circular rug, and in class we'll work on a project that can either be the beginning of a rug, or a chair pad or trivet if you don't want to make something quite so large.

Call soon to register - there's been a LOT of interest in this project when I've brought it to the sit-and-knits on Saturday afternoons.

Tuesday, June 28, 2011

Super stash-busting extravaganza

A few weeks ago I taught a beginning crochet class at River Colors, and my student caught onto things so quickly that we had time to get into some of the more advanced topics, like changing colors and making granny squares.  One of the projects I used as an example of how she could use these skills was the standard stash-buster blanket ... which I've never actually made.  It's been on my radar for a couple of years now, and the stash of leftover sock yarn has been growing and growing, but I could never decide on a pattern I liked enough to commit the time and energy to make.

But I was inspired by my student to give it a try, so I hauled out the jar of sock yarn scraps and started organizing them.  I like the look of a scrappy blanket ... as long as it's not too scrappy.  I want the colors to sort of flow into each other, not look like I made the thing in the dark while blindfolded.  Kind of hard when half of my yarn is boring husband/in-law yarn and the other half is whackadoo Lazy Mama/Kid yarn.


So far, so good!

Friday, March 26, 2010

Breeding like, well,

This is what happens when I decide to make destash Easter rabbits for my daughter's preschool class ... they take over! That's fourteen rabbits, including the two evil zombie twins there in the back row. I'm partial to the decapitated bunny heads in the front rows, and not just because they took half as long to make :)

Anyway, the pattern is loosely based on my Zombie Bunny crochet pattern, which you can find in my etsy shop here.

Thursday, March 25, 2010

New tutorial: Changing color in the Zombie Bunny ears

I had a question from a customer about how to do the color changes on the ears in my Zombie Bunny pattern.


Since it's really easy to do, just hard to describe, I went ahead and made a photo tutorial on flickr. You can find it here.

Feel free to let me know if there are any other techniques you'd like to see - if I can manage to photograph them without growing an extra arm, I'll be happy to post the pictures!

Wednesday, April 22, 2009

What happens when you forget about the load of felting in the washer?

This used to be about 10" tall.  It was supposed to felt and get smaller, but I wasn't aiming for something that's too small to hold my cell phone.
This used to be a hat.  A very, very big hat.  Now it's a bowl.  A relatively small, very attractive bowl.

And the fuzzy red slippers that I had previously felted to be slightly too big for my feet, which I was trying to refelt to be a little more snug?  They're about 3/4" too long ... for my four-year-old.  Oops.

Tuesday, February 10, 2009

The last of the cotton market bags

The construction on this is really nice - there's a double bottom that isn't joined all the way around, so you can flip the whole thing inside out and stuff the bag into the bottom to keep it tidy when it's not in use.

I think I've got one more market bag left in me before I'm done with this for a while, and I think I'm going to combine the bottom of this bag with the sides of the sea shell tote, just to see how they work together. Wish me luck!

Wednesday, February 04, 2009

What I've been up to

Well, first of all, I've been dealing with the near-record January snowfall (around 40" ... just in January) here outside of Cleveland. The snow has come regularly in large quantities with no thaws in between, which is why both sides of my driveway look like this:


The snow is so deep that Lazy Kid hasn't been able to get out to play, since every time she tries she either gets stuck in a waist-deep drift or loses one of her boots somewhere in the side yard. This means we're all going stir-crazy, which may be why these have been so much fun:


I went stash-diving and came up with a whole bunch of kitchen cotton and leftover Paton's Grace mercerized cotton, most of which has been crocheted into reusable shopping bags. I made these two ... on Sunday. God, I love crochet. It's fast and uses lots of yarn, which is a good combination when trying to clear out stash.
The first bag is cuter, but smaller, while the second bag holds a lot more but looks more utilitarian. The load in the second one during the photo shoot: fourteen library books and seven CDs. The librarians were impressed when I got there - it was like one of those clown cars where more and more people keep getting out, only in my case it was almost-overdue library materials.

I have a third bag in process that should be finished tonight or tomorrow, and it's both gigantic and a HUGE suck on my yarn supply, so this may be my last one for a while. Unless I can make shopping bags out of leftover sock yarn ... hmm ...

Thursday, January 22, 2009

It's just so pretty


And it's cashmere! swoon

Tuesday, February 19, 2008

Making progress on the list

Remember my ambitious to-do list? I'm making progress. Here's the dress for LazyToddler, now completed and currently in use:

It's made in Plymouth Yarn jeannee, color 20, a worsted weight yarn that's 51% cotton and 49% acrylic. That, plus some madras plaid fabric I've had for at least seven years or so.


I'd love to share the pattern with you, but the stitch pattern is taken from one pattern, the bodice from another, the sleeves from a third, the shells around the hem and sleeves from a fourth, and the actual ruffle I just sort of faked until it looked right.

So basically this is a one-off ... but if you want to duplicate it, my best recommendation is to find a dress that's the shape you want and trace the pieces onto a piece of butcher paper or newsprint. Pick a stitch pattern and crochet until the pieces are the same size as the paper pieces. That's what I did, and I think it turned out okay. It's a bit on the wide-but-too-short side, but I'm thinking on the positive side and saying she'll be able to use it next year as a shirt, and she can just wear a pair of leggings under it this year as a dress.

Monday, February 11, 2008

Faux Chocolate Easter Bunny Pattern Page


Nothing says “Easter” like a chocolate bunny … unless it’s a chocolate bunny that can be used year after year without getting its ears bitten off!

This pattern is suitable for beginners, but does assume that you know how to make a single crochet stitch.

Finished size is about 10" from bottom to the tip of the ears.

A person with average sewing skills should be able to complete this pattern in less than 3 naptimes (6 hours).

Photos from the pattern:

The vanishing loop method of working in the round


Finishing the head

Pattern includes illustrated instructions, and it is packaged in a resealable plastic bag (6"x9"), ready to hang and sell. Pattern also includes a link to this web site, where buyers can access a free pattern to make a Goodie Basket to match the bunnies.

Wholesale price: $4.00/pattern

Suggested retail price: $7-$9, or whatever the market will bear in your area

Free shipping on your first order! Shipping charges for subsequent orders will be the actual charges for USPS Priority Mail to your destination.

I am willing to make free samples to display in your shop, if you are willing to provide the materials. Please contact me for more information on this service.

For more information or to place an order, please contact Gretchen Woods at Lazy Mama Designs: lazymamadesigns (at) yahoo (dot) com.

NEW!! You can also place orders through my shop at etsy.com - just convo me with a request, including the number of patterns you'd like to buy, and I can post a custom listing for you at the wholesale price.

Thank you for your interest, and I hope to hear from you soon!

Tuesday, February 05, 2008

Bad light day


Gahhhhh - the photos of these dudes are just awful. You know it's a bad photo day when Crocheted Faux-Chocolate Easter Bunnies aren't cute. I really need to dig the Easter baskets out of the attic and try this again the next time we see sun. So, like, May, I guess.
In the meantime, show the ugly photo some love: http://www.etsy.com/view_listing.php?listing_id=9385110 Please?

Saturday, September 29, 2007

Free pattern: Basket o' Entrails, as seen in the Zombie Bunnies pattern

Abbreviations:
sc = single crochet
yo = yarn over

Note: Except for the handle, the basket is worked in the round, with no slip stitches between the end of one round and the beginning of the next. You may want to use a stitch marker or piece of yarn to mark the first stitch of each round.

Also, if you've made a Zombie Bunny, you don't need to read the directions for the first five rows - they're the same as for making the body of the bunny.

For the basket:
Row 1: With accent color, make a circle with about a 6” tail.

Put the crochet hook through the circle, yo, and pull a loop through the circle; yo and complete the sc. Repeat this six more times, for a total of 7 sc around the circle. The first stitch is always a little scrunched up and is really hard to use, so just ignore it for the rest of these instructions and pretend that you only have 6 sc in the row.
Pull the tail of the circle to tighten it – you should end up with a tiny circle of 6 stitches with no hole in the middle.

Row 2: Make 2 sc in each sc around the circle (12 stitches).
Pointer: You may find it helpful to use a stitch marker of some kind to mark the first stitch in each row. You can buy plastic markers at craft stores, or you can pin a safety pin around the stitch. Or you can just lay the tail of the yarn across the work before you start the first stitch of the row (photo on the right above), then pull it out and replace it when you get back around to it. Fewer things to buy and pieces to lose, which is always good around our house.
Row 3: (2 sc in first sc, then 1 sc in following sc). Repeat around (18 stitches).

Row 4: (2 sc in first sc, then 1 sc in following 2 sc). Repeat around (24 stitches).

Row 5: (2 sc in first sc, then 1 sc in following 3 sc). Repeat around (30 stitches).

Row 6: Sc through the back loop only of each sc in the round (30 stitches). Just ignore the color change in the photo below - to match the sample you'll continue in your original color.

Rows 7-12: Sc through both loops (that is, make a normal sc) in each sc in the round (30 stitches per round).

Row 13: Sc in each of the next 5 scs, then chain 1 and turn the piece over so that the inside of the basket is facing you.

Rows 14-37: Sc in each of the five stitches in the handle, then chain 1 and turn the piece.

Row 38: Sc in each of the five stitches in the handle, then cut the yarn leaving about a 10" tail, yo and pull the tail through the last loop on the hook to finish off the handle. Use the tail to attach the handle to the other side of the basket. Weave in the ends.

To make the entrails:

  • In the main color, chain 61.
  • Starting with the second chain from the hook, sc in the next 20 stitches. As you crochet, the chain should start to corkscrew around itself.
  • Now chain 21, then starting with the second chain from the hook, sc in each of the next 20 stitches. You should be back at the point where this chain branched off from the original 61-stitch chain. Repeat this step as many times as you like to make as many "branches" as you think will look good in the basket.
  • Sc in each of the remaining stitches in the original chain. Cut the yarn, leaving about a 4" tail, then yo and pull the tail through the last loop on the hook to finish off. Weave in both yarn ends.
  • For added security, you may want to make a couple of stitches with a needle and thread through both the bottom of the basket and the entrails, just to keep them from falling out or getting lost during play.

Note to self: Get a manicure before shooting the next batch of crochet photos.

Thursday, August 30, 2007

Zombie Bunnies Pattern Page

Zombie Bunnies!

Something evil this way … hops? These cute little guys are so easy to make, you’ll find yourself groaning, “must … make … more … zombies!” Switch the color scheme and leave off the ghoulish details and they are great for Easter baskets or baby gifts.

Finished size is about 9” from bottom to tip of the ear.

This pattern is suitable for beginners, but does assume that you know how to make a single crochet stitch.

A person with average sewing skills should be able to complete this pattern in about 3 naptimes (6 hours).

Photos from the pattern:

Vanishing loop method of working in the round

Changing color in the middle of the row


Pattern includes illustrated instructions, and it is packaged in a resealable plastic bag (6"x9"), ready to hang and sell. Pattern also includes a link to this web site, where buyers can access a free pattern to make the Baskets o' Entrails to match the bunnies.

Wholesale price: $4.00/pattern

Suggested retail price: $7-$9, or whatever the market will bear in your area

Free shipping on your first order! Shipping charges for subsequent orders will be the actual charges for USPS Priority Mail to your destination.

I am willing to make free samples to display in your shop, if you are willing to provide the materials. Please contact me for more information on this service.

For more information or to place an order, please contact Gretchen Woods at Lazy Mama Designs: lazymamadesigns (at) yahoo (dot) com.

NEW!! You can also place orders through my shop at etsy.com - just convo me with a request, including the number of patterns you'd like to buy, and I can post a custom listing for you at the wholesale price.

Thank you for your interest, and I hope to hear from you soon!

Sunday, March 04, 2007

Finished, finally


The skirt, which I talked about here, finally has a matching top. I give you, the Gretchen-designed tank top of doom, which was completely ripped out and restarted at least twice, and is still a little funky on one side, but at least it covers my bra straps and it's done. Hurrah! Now I can move on to that cute little green knit tank top I've been dying to do since Christmas. That'll give me something to do in the hotel room for the next two months, I guess.