Pages

Showing posts with label kid stuff. Show all posts

Thursday, April 26, 2012

Lazy Kid room overhaul

Lazy Kid's birthday is coming up this weekend, and we decided it was time for her to have a bit more "grown up" looking room.  First up: troll Craig's List for weeks to locate a non-ugly loft bed set we could afford.

Next up: Paint the walls and drawer fronts in Lazy-Kid-mandated colors.  Note: the polka-dot things are storage buckets we screwed to the side of the loft so she'd have someplace to put her alarm clock and box of kleenex.  I was pretty excited to find something that matched ALL of the colors the kid had already chosen.  Yay, Target!

We picked out some coordinating fabrics and used it to cover some foam-core to make bulletin boards to display her artwork.

We repainted her shelf, and the ladder rungs to the loft.

We finally cut her curtains off so they don't drag on the floor, bought some of the easy-fill picture frames for kid artwork, and got a desk chair.

We fixed her bookcase so the back doesn't fall off anymore, and I reorganized her books so that she can find them more easily.

We're also testing a super-secret product for Lazy Husband's work, which I can't talk about here, but it's super cool and I can't wait to show you the shots of that.

At any rate, the room is ostensibly "done," with only a few things here and there that need to be fixed (like I really should HEM the curtains, not just whack them off with a pair of shears and say they're good enough). The kid loves it so much that she actually keeps it clean, I love that the part you can see from the hallway looks much nicer than it did before, and Lazy Husband loves that the whole shebang only cost about $500, including the bed, dresser, new desk, chair, etc.  That's a win-win-win situation!

Monday, October 17, 2011

No mermaids here

This year I decided to pull the mermaid costume listings from my etsy shop so that I could concentrate on training my intern on the finer points of ninja-costume-sewing:
She ran the accelerator, I steered.  And nobody ended up bleeding on the costume - bonus!

Tuesday, June 07, 2011

Pass it on!

Took a class in block printing from Lizzie House while I was at Squam this year, and as soon as I got home I decided I needed to share my New Favorite Hobby with Lazy Kid.  She took to it like a duck to water:

She's six years old, and yes, that's a sharp linoleum knife she's using, and yes, I did spent like 20 minutes going through all the hideous things that would happen if her hands got anywhere near the sharp end of the blade.  I've got her trained to the point where all I have to do is whisper "hospital" and she stops what she's doing and moves her hands back to where they're supposed to be.

She's really good at removing the background stuff around the main design, but I do the detail work for her.  That keeps her fingers well back, and prevents the "oops, the knife slipped and I ruined my block" meltdown that would inevitably occur otherwise.  But she's got a good eye for design, so she draws 'em, I outline 'em, she carves out the bulky stuff, and we both print 'em.  Great division of labor, I think!

Tuesday, May 03, 2011

Angry Birds party prep, part 4 - the actual party

Whew!  Are you sick of Angry Birds yet?  I know I am ... especially after we inflated 40 balloons, tied strings to them, decorated them with faces, and taped them to the ceiling the day of the party.
The balloons proved to be a big hit with the kids, especially when I allowed them to pull them down and pop them.  Forget the carnival games - we want mass destruction!
Speaking of mass destruction, the carnival game was a big success, too.  When we ran it at school for 22 kids, we had two towers and two groups of four kids would take turns throwing the balls to knock down their tower.  We made sure all the kids got a turn to throw, but not everyone got to be the one who knocked down the tower.  At the actual party, we gave each kid their own tower and let them throw the balls until all of the pigs were down, then they got to help build the tower for the next kid.


We only had a handful of kids, so this didn't involve too much waiting - otherwise I would have run two towers, or had them work in pairs or something.

Perhaps you're wondering how I made the pigs?  With porcupine kooshy balls, of course!
I cut off the spines in the area I planned to use for the face, then glued on some googly eyes and added details with a Sharpie.  I'm particularly proud of the ears, which are just the finger loop that was originally attached to the ball, cut in half and glued on with E6000 glue.  This dude made it through the whole party with ears intact, which counts as a success in my book.

After the carnival game we took a break to get some snacks and take some pictures with the photo opportunity.  That worked out well, too, with the handles staying attached and everyone being willing to get their picture taken with it.  We need to work on these kids' angry faces, though.
After that we proved that 5- and 6-year-olds really don't have any basic sense of direction, at least not while blindfolded.
I ended up using eyeballs instead of eyebrows for the game, partly because I didn't feel like cutting out the eyebrows by hand (I already had some extra eyeballs from another project and could easily make more with two paper punches).  I'm glad I did, because the Octoclops angry bird is too funny for words.

And that's about it for the themed stuff.  We sang, ate cake, opened presents, ran around the house in various sparkly costumes (the kids) or ate unhealthy amounts of guacamole (the adults) until it was time for the guests to go home.  The goodie bags for the kids included some cookies, the birds' nests, a punch balloon, one of the crocheted angry birds, and a shrinky-dink necklace of the red bird that I made at 11pm the night before the party.

And the verdict?
This was the best party ever!

And next year I think I'll just take them bowling :)

Angry Birds party prep, part 3 - the refreshments

It's not a theme party without over-the-top food, right?  For LazyKid's school party I took the easy way out and made a box mix with frosting-in-a-spray-can, added a cupcake pick and some red or green sugar sprinkles, and voila!  Cuteness!
I had a few picks left over after the school party, and those came in handy for dressing up some of the food I prepared for the grownups in attendance at the actual party at our house.
The kids' food, on the other hand, needed no dressing-up at all, since it was all part of the table decoration:
In case you're wondering, that's pepperoni slices (red birds), colby cheese triangles (yellow birds), string cheese cut into rounds (egg birds), melba toast slices (blocks), two sizes of pretzel rods (blocks), corn chips and Doritos (more yellow birds), green grapes (pigs), and blueberries (blue birds).  The toy in the center is from a Happy Meal that LazyGrandma picked up on her way out to visit us this week, and it plays the most annoying music I have heard in a long time.  Needless to say, the kids loved it.

Since I hadn't planned on doing a really decorated cake, I made some sugar cookies that were easy to make look (sorta) like red birds, golden eggs, and pigs.
These were actually easy to make, if somewhat time-consuming.  I made the sugar cookie dough earlier in the week, dying half of it light green.  The day before the party we went into cookie production mode, baking and decorating all of them over the course of the day.  The eggs were easiest - roll an oval of dough in your hands, then smash it flat on the cookie sheet using the bottom of a glass that's been dipped in sugar.  When they were baked and cool, I spread premade cookie icing on them, then LazyKid flipped them upside down and dipped them in gold sparkly sugar.

The pigs used a similar method - one large ball of dough with two smaller balls stuck to it on the cookie sheet, flattened with the bottom of a glass dipped in a LOT of sugar (lest the ears stick and get ripped off).  When baked and cooled, we decorated them with premade black decorator frosting and stuck on some candy eyes.  We initially tried to use green frosting to make them darker (the ones in the back), but the lighter ones looked better.

The birds took the most effort, but were still easy.  Those were balls that I didn't flatten on the sheet, just baked so they would be rounded when they came out.  Cooled, then frosted with red cookie icing, which I also used to stick on the candy eyes.  Unfortunately, the slope of the cookies made them drip a little, so I tried to stick the eyes on so that the drips looked like the feathers atop the bird's head.  After that was dry, I used black decorator frosting to pipe on the eyebrows, and a little yellow frosting for the beak.

After making a couple of dozen of the cookies, I was ready to tackle the cake.  I had extra batter left when I made the cupcakes, which I went ahead and baked in an 8" cake pan and some mini muffin tins, then froze until the day before the party.  Thawed out the cake and cupcakes , flipped the cake over so I'd have crisp edges to work with, nestled the cupcakes in to look like tail feathers, and went to town with the frosting and a star tip.
The only trick here was that I only had white cookie icing, not frosting, so after I got the body and eyebrows done, I used a moist finger to smooth the red frosting down under the eye area, then flooded it with cookie icing.  Added the beak, and the black details with a smaller tip, and it was done!  The best part of it was, the cake was so small that it was just big enough for each person at the party to have a piece, with no leftovers to store.  Score!

The final bit of food I made special was in the goodie bags the kids took home after the party.  I made little nests with melted peanut butter chips and chow mein noodles, then added some Whopper eggs and blue Peeps leftover from Easter.  Put in a nice red party bag, it looked pretty decent, even if none of the kids probably ate them!
The kids also took home some of the cookies, but I didn't bother getting a picture of that.

That's about it as far as food goes ... stay tuned for more info on the actual party!

Thursday, April 28, 2011

Angry Birds party prep, part 2 - the banner

Okay, so now here's my favorite project (at least so far): The Pin-The-Monobrow-On-Red-Bird game!  There are tons of Angry Birds images online, but none of them were anywhere near the resolution I'd need if I wanted to print something large enough to use for a game.  So I found an image I liked, printed it as large as I could, and got started duplicating it on a much larger scale.

First, I drew a grid of 1" squares over the picture, using a ruler and pen to just draw them right on the printout:
Next, I laid out my banner paper on the floor and taped it down to make a stable drawing surface.  Since my paper was only 12" wide, I needed 3 strips taped on top of one another to get the size I wanted for the project.  I cast another grid on the banner paper, this time with squares 6" on each side.  Then I spent the better part of 90 minutes copying each square from the printout onto the corresponding square on the banner.  Some of the squares had a lot going on, so I cut those squares into quarters and copied each quarter over.  It was actually much easier to do than it is to describe.
Then LazyHusband and I went insane.
But sometime before 10:30 last night, the drawing was done!
All I had left to do was erase all of the gridlines on the banner and paint the whole thing ... with watercolors ... which required a tiny paintbrush and two coats to get a decent-looking color.  Oh, well, it was done shortly after lunch today, and I couldn't be happier with the result:
Seriously, how awesome is that?  All I have left to do is make some fake eyebrows for the game and tape the strips together on the back, and it's done and wicked cool.  I mean, come on, look at the comparison:

Angry Birds party prep

LazyKid turns six years old tomorrow, and party preparations have been underway for weeks.  We're big Angry Birds fans around here, and when we saw this cake, we knew we had to do an Angry Birds party (albeit with no fancy moving-parts cake!).  Since you can't go out and buy many Angry Birds-themed items right now, it's going to be a crafty, crafty party, I thought I'd share some of our projects here.

One of the first things we decided was that there was no way that Lazy Mama was making that cake, and the edible toppers I found on etsy, while outrageously cute, were way out of our budget.  Cupcake picks to the rescue!

These were so simple, and turned out so cute!  First, I bought the 1" digital images of the pigs and birds from an etsy shop, then used a scrapbooking punch to cut them out.  Found some cardstock in colors that matched the artwork and used another punch to cut out 2 1/2" circles and 2" flowers.  I used a gluestick to attach the art to the centers of the flowers, then taped a lollipop stick to the back.  Then I used the gluestick again on the back of the flowers, which I stuck to the circles.  I found this was a little awkward with the stick in there, but it worked well if I gently bent the circle in half to make a sort of shallow trough for the stick to sit inside.

LazyKid loves balloons, so I knew we needed to have plenty of these Angry Birds balloon characters:

I blew up a bunch of balloons one day, cut out the faces the next, and we'll be sticking the things on until the party starts on Sunday, I suspect.  The balloons are hanging from a quicky swag I made using several very long strands of yarn held together and twisted together to form a loose cord.  The tails of the balloons can be slipped in between the strands to hold the balloons in place, at least temporarily ... I'd use something more secure if I was going to have this as an outdoor decoration.

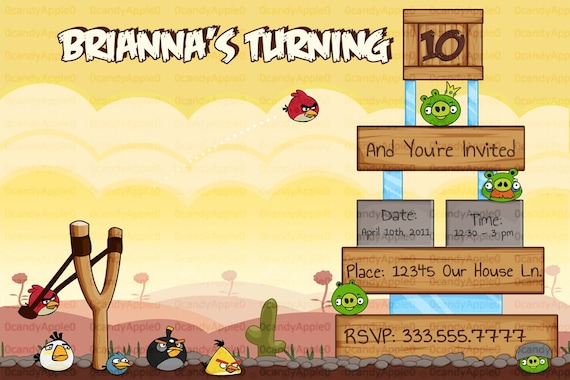
Party invitations were easy - I ordered them from DigiSweets, too, then printed them at home on photo paper.  We used this design:

While all this was going on, in my spare time I was working on pieces for the Angry Birds carnival game we're going to play at the party - basically throwing stuffed birds at a tower of blocks to see if we can knock off the pigs.  There are a ton of designs for Angry Birds amigurumi on etsy and Ravelry, but I'm pretty good at winging these things, so I made up my own.  I'll have better pictures later, but I have to show off the Mustache Pig now, at least, because he's so stinking cute!
Reminds me of my old trombone teacher ... but I digress.  Anyway, in addition to the pigs and birds, we needed a tower that was larger than the wooden blocks we had on hand.  Luckily, I had been volunteering at LazyKid's school pizza day and saving the Capri Sun cartons to use as giant building blocks.  A few minutes on each one to break it down, flip it inside out so the brown cardboard was out, tape it together, and use a marker to apply a white-trash version of faux bois, and voila!  Wood blocks!
The only officially licensed Angry Birds item we've purchased for the party so far is a poster, which we found on Amazon.com.  We're using it to make a photo op where the kids can look through the hole in the poster and look like the red bird.  I used spray adhesive to stick the poster down to a piece of cardboard, then trimmed neatly around the edges to get rid of the sticky overspray.  And then I did the unthinkable:
This would have been a lot less stressful if I had remembered to do it when there was still time to have a replacement shipped if I screwed it up.  Luckily, it all worked fine:
Realizing that having somebody's hand in the picture looks dorky, I used some extra cardboard and duct tape to make handles for the back so the kids can hold them invisibly.
Well, this post is getting way too long, and I'm nowhere near done, so I'd better just arbitrarily end now.  Check back soon for more Angry Birds posts!

Tuesday, March 08, 2011

My daughter, the artist

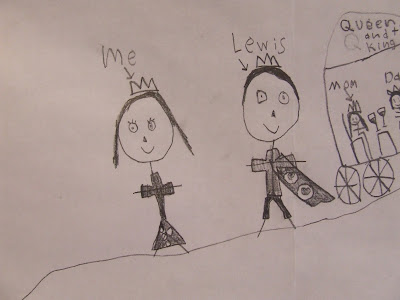
The other night I traced off some of my daughter's drawings to embroider as part of an ongoing project.  The most recent one I chose is, without a doubt, my favorite drawing ever.  


Need any explanation of the awesomeness?
It's the first time she's put a body underneath the clothes (or put the girl in something other than just a triangle for a body/dress).  It's the first time she's drawn a cape.  It's the first time she's drawn eyelashes on the girl.  It's the first time she's used triangles for noses.  What really cracks me up is her saying, "I sort of messed up Lewis's eye, but I fixed it so it just looks like he's winking at me."

First carriage.  First wheels with spokes.  First time drawing people sitting in chairs.  Also, the goblets crack me up.

I think this might be Lewis's mom (on the dragon-looking horse) and little brother (in the tower).  This is awesome because, dude, it's a chick in armor on a horse with a sword and a shield, and a boy stranded in the tower.  And the tower roof has shingles.  Plus, the peace sign on the shield cracks me up.

First feathers, first attempt to draw a bird that looks anything like an actual bird.  Also, the "caw" cracks me up.

Wednesday, December 15, 2010

Just a quick update

Check out my happy little buttoneers from last week's class!

Crafty kids + brains the size of planets + yarn and buttons = about a dozen of the world's most interestingly non-standard ways to sew buttons onto plastic canvas.  I wish I had taken pictures of some of their finished projects - it was a total hoot to see what they came up with.  And of course, good little craft teacher that I am, I told them all that as long as they were happy with the results, it looked great to me.  And it did ... as long as you didn't plan on actually using the buttons for anything!

Monday, November 08, 2010

Fun with Fibers, week 2: Spinning

This week we're covering how to take individual fibers and turn them into things like yarn, rope, and thread.  A good overview of some of the history behind spinning can be found here: http://www.historyforkids.org/learn/clothing/spinning.htm


I'm demonstrating the use of a drop spindle, which I made using a blank CD, a blob of Play-Dough, and a highlighter.  You can find information on how to make your own (slightly more durable) homemade version of a drop spindle at many sites online, including here: http://www.spindleandwheel.com/content/view/15/76/


Our project this week is a twisted cord, which we'll use as a hanger for a fall decoration.  I've included printed directions in my handout, but if anyone has mislaid them, you can find (illustrated) directions at the following locations:

And that's about it, I guess.  Hope everyone is having fun and learning a lot!

Friday, November 05, 2010

Prep work

Spent all morning prepping materials for Monday's Fun with Fiber class, then spent most of the afternoon playing around with my new drop spindle:
What?  Haven't you ever made a drop spindle out of a blank CD, a blob of Play-Dough, a highlighter, and a marker cap?  Jeez, you guys are no fun at all!

Wednesday, November 03, 2010

Relieving some aggression

I've been trying out some new techniques as I prepare for the class I'm teaching to my daughter's kindergarten class, and with the surplus of leaves in our yard, it seemed like a good time to try leaf pounding.  Here's a Japanese maple leaf on untreated muslin:

I had the best luck with the leaves that were the juiciest - the ones I picked right off the tree worked even better than ones from the same tree that had already fallen.  I got a purply-brown (the Japanese maple), a pretty bright red (from a burning bush plant), and even a spring green (from a sweet gum tree that hadn't turned yet).

I was surprised by just how much pounding was required to get this to work, and by how tricky it was to find leaves that were flat enough to show up well.  Anything with really raised veins prevented the hammer from reaching the non-veined parts easily, which gave a pretty bad transfer.  You can even see in my "good" ones above that I ran out of interest before I was able to completely fill in the outline of the leaf.

I can't decide whether this would be a good project for the class or not.  On the plus side, who doesn't have fun with hammers?  On the minus side, do I want to be responsible for eight 5-yr-olds armed with hammers?  Probably not.  Maybe I'll write it up as a bonus project to try at home ... yeah, that's the ticket!

Monday, November 01, 2010

Trying to clear out some of my drawers (and use up half-finished crafts)

Ridiculously easy craft: take one $1 headband from the fabric store, and whip-stitch on a hand crocheted cotton flower.


Five minutes later, you've got a stylish winter accessory:


 Meanwhile, LazyKid was busy with a little art of her own.  
She's all proud of how she used so many geometric shapes in her sketch.  I'm proud that she remembered "geometric" from her art class last week.