Pages

Showing posts with label bonus project. Show all posts

Friday, March 19, 2010

Another thing to do with your kid's artwork

When Lazy Kid painted some lovely watercolor fruits this summer, I knew I was going to have to do something special to preserve them for posterity. One scan, 10 minutes of editing/cutting/pasting, and less than an hour of sewing later, I've got two new placemats for our table.

I used the inkjet-ready, colorfast cotton pages you can find at most sewing and craft stores. I set my printer to print photos at the highest quality, and they turned out pretty sharp:


After I got the Lazy Kid fabric printed, I dug out some of my favorite stash, which I've used to make curtains for my last two kitchens, and which happened to coordinate perfectly with the colors of the fruit. Score!


I sewed strips onto three sides of the art to get it to be the right height for a placemat, then sewed the larger block onto the side to make it the right width. Grabbed some coordinating fabric scraps for the back, found some batting that was just large enough to work, and made myself an inside-out (quilt) sandwich. Stitched around the outside but left an opening for turning, turned it right side out, then topstitched around the edge to help it lay flat and close the turning opening. Topstitched around the Lazy Kid art to help it lay flat, and it was done!

Now, the fabric I printed at home is only "washable," not actually washable, so I'm going to have to Scotchguard the living heck out of these before I let Lazy Kid anywhere near them. But once that's done, I have hopes that these will be cheering our table for the rest of the summer!

Thursday, August 14, 2008

Parenthack - how to keep the sand on the sand art

Last time I did sand art with Lazy Kid she insisted that we hang the resulting work of art up on the refrigerator ... where it then shed sand all over my hardwood floor, despite the Contact paper. Not good.

So when we made new sand art yesterday, I decided to try something different. This time I waited until it was dry, then put the art in a plastic sheet protector (like you'd use in a notebook) before we stuck it to the fridge. Now all of the sand gets caught in the sheet protector, and she can still see her work of art every day. Neato mosquito!

Oh, and in case you were wondering, this time we used watered down glue (about 2/3 glue and 1/3 water), a paintbrush, and gravity to make some cardstock sticky enough for the sand. They turned out pretty cool - this one's my favorite:

Tuesday, June 17, 2008

Sand Art for Small People

We picked up some sand art kits from the $1 bins at the front of Target a few weeks ago, and they've been a big hit ... except that it takes me longer to peel off all the stickers than it does for Lazy Kid to pile obscene quantities of sand on the resulting sticky patches. And she gets frustrated when the color doesn't go in the tiny little spots she's targeting ... which is why I came up with my own version of sand art that's easier for small kids to handle.

Safety warning: This project isn't for kids who still put stuff in their mouths all the time, unless you REALLY want to be cleaning multi-colored sand-filled poop up for several days. And you don't, trust me.

Materials:
Contact paper (clear or colored)
Colored sand
Optional: scissors and paper, or photos cut from magazines, or other flat stuff to stick down
Outside area to work that you don't mind having covered in sand

Technique:

Cut Contact paper to be about the size of a sheet of printer paper. Peel backing off to expose the sticky side, then tape it securely sticky-side up to a table or work surface. I found it was easiest to use one of my trusty craft trays for this (makes it easier to pick up and knock off the excess sand at the end).

Stick down any paper or other flat things you want to use. If you want to mimic a "real" sand art page, cut shapes out of construction paper and then cut inside them to form just the frame of the shape, so that the child can sprinkle sand inside the outline. Or just stick down pictures, or sequins, or glitter, or random sticks that blow onto the sheet from the windstorm that has kicked up since you started the craft.

Let child apply sand to the sticky parts of the Contact paper.

We still had the sand in the little bags it came in, so I just cut the corner off the bag and let her pour it and spread it out with her fingers.
You could also put it in small bowls and let them use spoons or their fingers to sprinkle it on the paper. You can get really creative with this - put their hand down and sprinkle around it to make a handprint, then fill it in with a different color; trace letters or pictures you slide underneath the clear Contact paper; etc.


When you've finished all the sand stuff, pick up the paper and knock off the excess (and trust me, there WILL be excess). We did this by just picking up the whole tray so I didn't have to deal with floppy sticky sandy Contact paper much.

If you want to preserve the sand art (i.e. not have it dribble sand all over your kitchen floor for the next three weeks), stick a piece of clear Contact paper on the art so the sand is sandwiched between the sheets. If you want, cut the outside of the sheets to be even, or into a shape, but remember - the sand is going to REALLY dull the scissors fast, so don't use your good sewing scissors for this!

If you used clear Contact paper for both sheets, you can hang the art in the window as a suncatcher. Otherwise, it looks great on the refrigerator, or as a small placemat for snacks, etc.

Hope you have fun with this project! Now, let's just hope I can find a cheap source for more sand, because we're going through it at a fast clip around here ...

Tuesday, December 18, 2007

Free pattern - The (Almost) No-Sew Fairy Skirt

What you'll need:
  • One yard of each of four different colors of tulle or netting (finer works better - don't make more than one of the colors out of the really stiff stuff, or it'll be too itchy). This will make a skirt that's about 18" long - if you want it longer, just double the length of skirt you want, and buy that many inches of each color tulle.
  • One 10-yard spool of each of two different colors of 1/4" ribbon
  • A piece of 1-inch non-roll elastic that's large enough to fit the waist of the child snugly with about 1" of overlap at the ends

What to do:

  1. Overlap the ends of the elastic by about an inch, making sure you don't have the elastic twisted. Machine- or hand-sew the edges together through the overlap. If you think you may have to make the skirt larger in the future, use thread that's easy to see, and don't overlap your stitches much or it will be a pain to take out.
  2. Cut the tulle or netting into strips that are 36" long by about 4" wide. I do this by folding it in quarters and using a ruler and a rolling cutter, but you could use scissors if you had to.
  3. Cut the ribbon into pieces between 30" and 36" long (shorter for older kids, so you can get more pieces out of the spool).
  4. Fold one piece of tulle in half and put it under the elastic so that the fold is in the middle of the elastic circle and is toward your right. It isn't essential to have the ends of the tulle exactly even - in fact, it probably looks better if you don't.
  5. Use the tulle to make a slipknot around the elastic - bring the ends of the tulle up over the elastic and tuck them through the loop in the tulle, then pull the ends back to your left to tighten it around the elastic. You want it snug but not so tight that it rolls the elastic.
  6. Repeat steps 4 and 5 for the remaining tulle and ribbon, alternating colors in whatever order you choose. Use enough strips to cover the elastic, but don't pack them in there so tightly that it starts getting weird looking. You should end up with a waistband that looks like this:
  7. Now comes the annoying part. In order to keep the slipknots from, well, slipping, you need to tie the tails together. To do this, take one tail from color A and tie it to one tail of color B. It doesn't matter if you use a square knot or a granny knot or some fancy thing you learned in Girl Scouts 20 years ago - just tie the suckers together. Then take the other tail of color B and tie it to one tail of Color C. Take the second C tail and tie it to a D, etc. You'll end up with each color tied to the color on either side of it. This will give you a waistband that looks like this:
  8. If you want, tie bells to the ends of some of the ribbons (or sew them to the elastic waist), or glue on fake flowers or sequins or whatever suits your fancy. The more sparkly and crusty it gets, the more the kid is going to like it ... and the less washable it will be, so use your judgement about how fancy it needs to get. Oh, and you may want to spray the skirt with Static Guard every once in a while - otherwise, the skirt tends to climb up the kid's body, eventually engulfing their mouth and asphyxiating them. Well, not really, but it IS sorta annoying to have the top layer of tulle stuck to you.

Please note that this pattern is for personal use ONLY and may not be reproduced except for your own use. If you wish to make these to sell, please contact me to secure permission. I'll probably give it to you, if you ask nicely and send me cookies (and a check).

I hope you enjoy this project - and that you send me lots of pictures of kids wearing your finished creations! I'd love to start a group on flickr, if we get enough fairies out there :)


Tuesday, December 05, 2006

As promised, a project to use those handprints you made

Here's the long-awaited project I mentioned that will give new life to all those handprints you traced based on my post a few days ago ...
Christmas Handprint Ornaments

What you'll need:

  • one 8 1/2"x11" piece of red felt for the pillow
  • one 8 1/2"x11" piece of purple felt for the handprint
  • about 6" of 1/4" (or narrower) red ribbon for the hanger
  • red embroidery floss
  • green embroidery floss
  • A good-sized handful of polyester stuffing

What to do:

  1. Cut out the pillow pieces - two squares the same size, each at least 3/8" wider than your handprint all the way around. For reference, last year's pillow was 4" square; this year's is about 4 1/2" square.

  2. Cut out the handprint - I usually just pin the handprint to the felt and cut around the outside of it.

  3. Use the red thread to sew the handprint to the front of one of the pillow pieces. Keep in mind that there is a "front" side to most felt - the back side often has noticeable pockmarks in it from the manufacturing process. Make sure you put the handprint right-side out on the right side of the pillow. I used a fairly large whip stitch to sew the hand on because I like the look of it; you could also use a blanket stitch, or very small stitches in a purple thread so it would be invisible on the finished pillow.

  4. Use the red thread to embroider an inscription on the hand. In our case, we only have one kid, so I've just been putting on the year. If you're making these for several kids, you might want to add initials or the child's first name. I generally do this freehand because I haven't found a way to mark this finely on dark felt. That's why my years always look lopsided, er, "primative."

  5. Use the red thread to attach the ribbon to the "wrong" side of the back of the pillow (you'll be sewing the ribbon on the ugly side so that the nice side will show in the finished pillow). To sew the ribbon on, cross the ends at a 90-degree angle, overlapping the ends a little on either side of the crossover. Lay the crossed ribbon so that the overlapped ends are parallel to two sides of one corner of the pillow back, and about 1/4" or more in from the edges. Sew in place using a fine running stitch, going from one raw edge up to the crossover and back down to the other raw edge (in sort of a V shape). Or, you could just use a hot glue gun ... just make sure that it's attached MORE than 1/4" inside the edge of the pillow, so the ends will be covered up when we sew the pillow together.

  6. Use the green thread to sew the front of the pillow to the back, wrong sides together and edges lined up exactly. I used a fairly long running stitch, again because I like how it looks (and it's really quick). If you'd rather do a blanket stitch around the edge of the pillow, or an invisible stitch, go for it. Just make sure you leave enough of the seam unsewn so that you can get the stuffing in.

  7. Stuff the pillow, making sure you push the filling into the corners as best you can. Don't stuff it too full, though, or the stuffing will be visible in the gaps of your running stitch.

  8. Finish sewing the pillow shut with the green thread, continuing in whatever stitch you used in step 6.

I think this took me about 2 hours to complete, and that was working on it in bits and pieces while I had the stomach flu. Might take a little longer if you're not familiar with handsewing; might take less time if you use a glue gun for some of the parts.


Other ways you could use these:

  • Hang them on their own special tree or garland

  • String all of them together once the child is grown and use that as the garland for a tree or mantle (or give it to the child to decorate their own home)

  • Use them as placecards for Christmas dinner

  • Make them in less Christmassy colors and use them as sentimental decorations throughout the year

  • Help a child make one for mom, adding some potpouri or a spritz of perfume when putting in the stuffing

  • Pincushion

Thursday, November 09, 2006

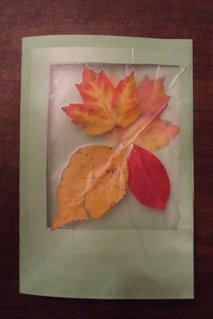
Bonus project - Cards by kids

With Christmas card making season almost upon us, I thought I'd share my idea for making quick and easy cards with kids, even ones who are too young to give a darn about crafts. The instructions here are for a pretty low-budget, basic card, but you'll see how it's possible to really glam this up if you have older, craftier kids.

Materials for each card: one sheet of construction paper, two or three pieces of clear Contact paper (each about 6" wide and no more than 8" long), and things to stick to the Contact paper (sequins, glitter, leaves, photos, stickers, pieces of colored paper, petals - pretty much anything that's pretty flat will work)
  1. Take a sheet of construction paper or printer paper (or fancy cardstock, whatever you have) and fold it in half so that you have a 8 1/2" x 5 1/2" rectangle.
  2. Cut a window in the front of the card. You don't want it to be too large, or there won't be any room left to write inside the card, because the inside of the card is going to show through the window.

  3. Cut two pieces of contact paper so that each is at least 1" wider and 1" taller than the window you just cut in the card.

  4. Open the card up and lay it on your work surface so that the outside of the card is facing up.

  5. Now arrange your decorations in the window of the card. You may want to save a few decorations to stick to the inside of the card later on to give it a 3-D effect. Some of the decorations may be attracted to the Contact paper via static electricity as you're putting it on, so be try not to make the design too finicky, or you'll end up repositioning a lot of the decorations.


  6. With the decorations arranged in the window, peel the backing off of one piece of Contact paper and stick it to the front of the card so that it overlaps the window by about 1/2" on all sides. Press down on the decorations to stick them firmly to the Contact paper.


  7. Pull the card away from the table - hopefully the decorations should stick, while the table doesn't. Reposition any decorations that fell off.

  8. Now open the card to the inside and stick a second piece of Contact paper over the first, again overlapping the sides of the window.

  9. If you saved a few decorations, scatter them on the inside of the card and cover them with an additional piece of Contact paper.

  10. Write your message, and you're done!

This size of card is great for giving to people in person, but you may want to start with a smaller card size if you're planning to mail it. Otherwise, you can do what I did with this one - fold it in thirds and stick it in a business envelope :)