Pages

Showing posts with label fun with fiber. Show all posts

Thursday, September 18, 2014

Check it out - I'm getting paid to actually use my degree!

First, my boss asked me to start writing ad copy for our online store:

Debbie Bliss Fine Donegal is a luscious fingering weight wool with just enough cashmere to make it something special.  A tweedy single-ply, this yarn is both lofty (read: warm) and easy to work with.  Try a versatile neutral like Snowdrift, which has a cream base and touches of blue and yellow in the tweedy bits ... or go for the wilder Blackberry with its black base and flashes of bright primary colors.  And check out the pattern support Debbie Bliss has provided - you can use Fine Donegal to make beautiful garments, accessories, and more!

Then she asked me to make some tutorials to post on the shop blog and newsletter:


And design some projects and write up the patterns to use in the shop.  So, after only like 10 years, I'm finally getting paid to do the subject in which I got a master's degree!

Wednesday, December 15, 2010

Just a quick update

Check out my happy little buttoneers from last week's class!

Crafty kids + brains the size of planets + yarn and buttons = about a dozen of the world's most interestingly non-standard ways to sew buttons onto plastic canvas.  I wish I had taken pictures of some of their finished projects - it was a total hoot to see what they came up with.  And of course, good little craft teacher that I am, I told them all that as long as they were happy with the results, it looked great to me.  And it did ... as long as you didn't plan on actually using the buttons for anything!

Monday, December 06, 2010

Fun with Fibers, week 5: Sewing

This week we're entering the exciting world of sewing through a rather practical door - buttons!  I'm sure I'm not the only mother who seems to spend half of her free time finding buttons in the wash, finding buttons in the backpack, figuring out which buttons go where, cursing the lack of matching buttons in my button box, and finally sewing the darn things back onto my kid's clothes.  Tell me I'm not alone, people!

After today's tutorial the kids should be able to sew a button back on by themselves.  Well, okay, maybe with a little hand-holding (and needle-threading), but it's still an improvement over complete cluelessness.  And it gets them ready to sew more exciting things next week!

You can read more about the history of sewing on Wikipedia: http://en.wikipedia.org/wiki/Sewing
More about the history of buttons here: http://www.bbc.co.uk/dna/h2g2/A23623616

If you happen to have a lot of buttons laying around (thanks, mom, for the 5-pound tin of yard sale buttons last summer!), there are lots of cool crafts for kids to make with them.  Some involve sewing, lots involve glue, and all of them are fun.  You can find an overview of them here: http://www.google.com/images?q=button+crafts&hl=en&prmd=i&source=lnms&tbs=isch:1&ei=UAf9TODCM8H7lweZpLyMBQ&sa=X&oi=mode_link&ct=mode&ved=0CBUQ_AU&biw=1138&bih=544

A couple of my favorites:


Well, that's about it for this week.  I'd better go shovel out my driveway if I'm going to make it to school in time!

Monday, November 29, 2010

Fun with Fibers, week 4: Finger crochet

Today we're learning how to finger crochet, which is an easier variation of finger knitting or spool knitting.  It's exactly the same as making a regular crocheted chain, only we're using our fingers instead of a crochet hook.  The finished chain is similar to what you'd get using a lucet, a medieval device used to make cord and rope: http://en.wikipedia.org/wiki/Lucet

Wikipedia has a good history of crochet, which you can find here: http://en.wikipedia.org/wiki/Crochet

All crochet starts with a slipknot of some sort - you can see the technique for making one here:

The technique I'm teaching the kids in class gives you the same result as the techniques you can find online, I just think it's a little easier for the young kids to learn my method.  But if you want the "official" way, you can find a good tutorial here:
http://www.wikihow.com/Crochet-a-Bracelet-With-Your-Fingers

There are plenty of other crochet and braiding techniques that don't require tools, but I haven't tried them all (yet!).  Here are some that might be fun if your child has exhausted the potential of finger crochet:
http://knitty.com/ISSUEsummer06/FEATfingerknitting.html
http://www.stringpage.com/braid/fl/fingerloop.html

And finally, if your child is ready to try spool knitting, you have lots of choices of "spools" or "nancies" to use.


The bottom one is the one my daughter uses.  The little arm on the side helps tension the yarn, and the part with the prongs on the top spins so you don't have to keep turning the whole thing around.

Finally, spool knitting is pretty much the same thing as the knitting looms you see at craft stores that can be used to make everything from socks to hats to scarves to blankets.  They generally come with directions, and they make great gifts if you've got a child who has a long attention span and an interest in crafts.

Monday, November 15, 2010

Fun with Fibers, week 3: Decoration

This week in class we're making Ojo de Dios, a traditional craft of the Huichol people of Mexico.  A version of these decorative objects were made as ritual protection for children - parents would add a new color of yarn for each year of the child's life.

photo source here

Ojo de Dios is a very simple craft.  Yarn is wrapped around two sticks over and over again, making a pattern of concentric rings.  The basic movement used for this is hard to describe, but easy to see in the following illustration:
illustration source here

There are many online tutorials for this craft; some of the ones I like best are http://michellesjournalcorner.blogspot.com/2009/07/ojo-de-dios-aka-gods-eyes-craft.html,
http://www.caron-net.com/kidfiles/kidsapr.html and http://gingerbreadsnowflakes.com/node/20.

Ojo de Dios can be made using any straight supports - craft sticks, chopsticks, pencils, twigs, 2x4s, whatever you've got on hand - and can be anywhere from 1" to several feet across.  Using multi-colored or self-striping yarn eliminates the need for tying lots of knots to join on the new colors of yarn.  And a hot glue gun works well to glue the supports together, as well as to fasten off the yarn once the weaving is done.

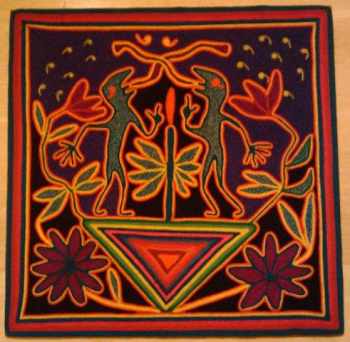
We also talked about another traditional Huichol craft, yarn painting.  Here, colored yarns are pressed into warm beeswax to form patterns and pictures that often tell stories related to the tribe's history and legends.

photo source here

Time permitting, we will give that a try during a future class - one when I'm prepared to deal with 5-year-olds with a lot of glue on their hands (and faces, and clothes, and hair ...)!

Friday, November 05, 2010

Prep work

Spent all morning prepping materials for Monday's Fun with Fiber class, then spent most of the afternoon playing around with my new drop spindle:
What?  Haven't you ever made a drop spindle out of a blank CD, a blob of Play-Dough, a highlighter, and a marker cap?  Jeez, you guys are no fun at all!

Monday, October 25, 2010

Fun with Fibers, week 1: Dyeing yarn with Kool-Aid


My go-to guide for dyeing yarn with Kool-Aid is the 2002 article in the online magazine Knitty, which can be found here: http://www.knitty.com/ISSUEfall02/FEATdyedwool.html  It's got explicit directions, as well as samples of what colors you get from different flavors of the drink mix.  I've tried the directions, and they work well at home and only require standard kitchen equipment.

Additional information for the lecture this week came from http://www.colour-experience.org/teknicolour/teknol_historical/teknol_historical_1.htm

More information and activities for modern dyes: http://www.rsc.org/Chemsoc/Activities/Perkin/2006/index.html

Craft project for natural dyes: http://tlc.howstuffworks.com/family/nature-craft-activities-for-kids4.htm

********************
Yarn: Sensations Kashmira, which is readily available at JoAnn Fabrics.  Any yarn with a high content of wool or other animal fiber could be substituted, but keep in mind that anything that is mostly cotton or acrylic won't hold the dye.   Dyed yarn should be colorfast and safe to hand-wash, but it will fade in the light and will probably felt if washed in a machine.

Dye: One packet of Kool-Aid per 20-yard hank of yarn.  The article says you can dye up to an ounce of wool with one packet, but for the most saturated colors, use more Kool-Aid and less yarn.

Dye pots: We're using plastic leftover containers I bought at the grocery store.  In the past I've used Pyrex custard cups, Corelle bowls, and glass casserole dishes.  You want something that's wide and shallow to make it easy to reach the yarn and have it spread out enough to get good contact with the dye.  It also needs to be microwaveable and something that you don't mind getting a little stained (which usually doesn't happen, but I'd hate for you to be disappointed when it did).

Stirring: We're using chopsticks, but you could also use plastic spoons or other disposable items.

********************
Educators:  when you're dyeing hanks of yarn with a class full of kids, you have to do things a wee bit differently.  Here's what I did:
- Selected inexpensive yarn - one skein of Sensations Kashmira from JoAnn Fabrics was enough for 10 hanks that are about 20 yards each.
- Wound the hanks, then tied each one with acrylic yarn at three places to keep it from tangling when being manhandled.
- Prepared the hanks by dunking them in slightly soapy water and squeezing them gently to get them thoroughly wet.  I did this a few at a time in a basin of water, then wrung each hank out and rinsed it in running water.
- Prepared the "dye pots," which were inexpensive plastic storage containers (shallow, large footprint containers work best), by placing a damp hank of yarn in each and adding a shot of clear water to keep it wet until class time.  Each child has one dye pot.
- Gathered the rest of my materials, including: a plastic tarp to protect the work area, several disposable chopsticks to use for stirring, a few plastic drinking cups we could use to transfer water, one package of Kool-Aid for each child, a roll of paper towels, a large container of water (there isn't a water supply in the classroom), and a bath towel I didn't mind staining.  The children already had smocks at school to cover their clothes.
- Each child got a dye pot with damp yarn inside, and a packet of drink mix.  They took the yarn out of the pot, emptied the drink mix into the pot, then added about 1/2 cup water and stirred the mix until it dissolved.  Then they added the yarn, squished it down into the dye, and added enough water to cover the yarn completely.
- I took the sealed pots to the room with a microwave, and microwaved them until the water in each pot was mostly white or clear - about 5 minutes or so, checking every two minutes.
- I showed the kids the pots before I rinsed them so they could see that the dye had been absorbed, then I took the pots to the bathroom and rinsed each hank separately under warm water, squeezing them firmly to get all the water out.  I rolled all of the hanks up in a bath towel and jumped on it a few times to get some more of the water out, then put each hank in a plastic bag with the child's name on it.