Pages

Saturday, September 13, 2008

Newest finished project - socks for ME!!!!!


Pattern: Kaibashira by Chrissy Gardiner
Yarn: Soxx Appeal by Knit One Crochet Too in 9260 Raspberry Sundae
Verdict: Hell, yeah! I love these socks. I love this yarn. I love this pattern. It's 75F outside and I still want to wear wool socks, that's how great they are. Seriously, I can't wait to start another pair for myself once I finish a couple of Lazy Mama projects that are on the needles right now. The only thing I might do differently is the cast-on scalloped edge. I think ribbing might work better to help them stay up ... but then again, that edge is pretty cute.

Monday, September 08, 2008

Show a Clevey some love

The Cleveland Handmade etsy team is doing a series of interviews with featured artists in the NE Ohio area. The first one is SaraKate, who makes really cool purses. You can check out the interview here, and her etsy shop here.

Way to go, SaraKate! You've got much more interesting answers to the questions than I'll come up with ;)

Sunday, September 07, 2008

Attack of the (formerly) UFOs

After a brief family meeting, it was decided that I would take some time this weekend to get started on my holiday etsy shop sewing, since I've got Halloween, Thanksgiving and Christmas all looming on the horizon. My first goal was to clear out some of the UFOs that have been hanging around, clogging up the cutting table and taking up space in my brain.


So, in roughly the order they were completed, here's the list of the FOs from this weekend:
  1. SWAK blanket as a gift for a friend.
  2. Two custom mermaid costumes.
  3. A school bag for Lazy Kid, who starts "real" preschool tomorrow.
  4. Some throw pillow covers for Christmas, made from redwork patterns I got here. Sorry for the embarrassingly bad photo, but I was in a hurry. Notice I've got two pillow covers but only one pillow? Waiting for a sale at Joanns to get another one ...
  5. Two eyelet lace SWAK blankets for the shop.
  6. A Halloween Hexagon quilt from stash fabric, which is all basted and ready to start quilting.
  7. Three madras plaid homespun SWAK blankets for the shop.
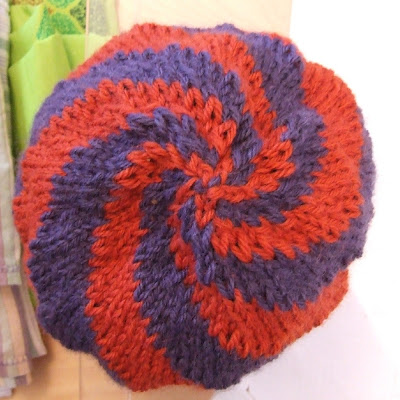
  8. A swirly wool toddler/child hat that I'm insanely proud I designed myself. See how the stripes swirl and decrease toward the top of the hat? Brilliant!
  9. Pieces for the next baby quilt for the shop cut out and ready to start piecing.
  10. And, if I stop typing and get my butt in gear, I may be able to finish my first pair of winter socks of the season, which are about 3/4" from the toe decreases right now.

So I'm going off to watch football (yawn) and knit furiously fast. Hope your weekend was equally productive!

Before and after

This is the inside of my sewing machine.

This is the inside of my sewing machine after I sew a bunch of quilts, mermaid costumes, pillows, and other stuff without bothering to do any cleaning.

This is the pile of stuff I picked out of the inside of my sewing machine.

The sad thing is that I sort of let it collect on purpose, because it's more rewarding to fish out a huge pile of stuff than it is to pull out tiny bits of fluff. I am a sick, sick woman.

Sunday, August 31, 2008

Thursday, August 28, 2008

Mermaid tail for dress-up

Okay, when Lazy Kid spends all morning playing with her new imaginary friend, Alice the Mermaid, you can't expect me to refrain from busting out the sequins during naptime to make a mermaid tail, can you? Didn't think so.


Not bad for freehanding the design and basing the sizing off of a pair of leggings I swiped from her room after she was asleep. The fabric choice is admirably scaly (and from my stash, so therefore both free and studio-clearing), but the edges of the sequins are scratchy and have caused Lazy Kid to collapse in hysterics at least three times (since 4pm). Of course, she collapses in hysterics at least twice a day anyway, so it's probably not so bad, but I think any future iterations of this design will be made from the softer fabric Lazy Grandma used to make the shirt.

Future versions probably won't be lined in purple silk, either, but hey - I had it in the stash, and it was exactly the right size to fit the pattern pieces, so what's not to love about that? My daughter may have the only silk-lined dress up clothes in the state (country?), but that's fine by me.

So, how much would you be willing to pay for one of these for your daughter/granddaughter/niece/friend's kid? Would $30 be too much for a reversible, shiny-on-one-side, custom-fit play skirt? Too little? What do you think?

Wednesday, August 27, 2008

Happy happy joy joy

Photos of the studio reorganization:

The valance of awesomeness, next to the mobile of zen raindroppyness:


What makes the valance so awesome? See for yourself:

The heart of the redesign, which puts my sewing machine in a place that - for once - isn't facing a blank wall. Oh, the inspiration! Oh, the run-out room for my quilts! Oh, the ugly back of the desk that I covered up by thumbtacking an antique quilt over it!

Of course, my cutting area still looks like this, so there's still a ways to go before it's perfect, but we're getting better. Oh, and I cleared room to set up my photo lighting cube semi-permanently in the basement, so it won't be such a hassle to set it up and take it down for just one or two shots. This should make it easier to get stuff listed ... if I'd ever quit organizing and start sewing, that is!

Tuesday, August 26, 2008

mmmm ... hippies

I'm in the process of making another batch of SWAK blankets, this time using some rather unusual fabric I found on sale a few months ago. Unexpectedly, when I iron it it smells exactly like the hippie clothing store in Blacksburg, Virginia ... or at least, what the store used to smell like when I graduated way too long ago. Yum - patchouli-scented swaddling blankets!

I may have to post a warning for these: "Excessive exposure to this blanket may cause a lack of ambition, a tendency to wear peasant skirts with jingly bells on the hem, and a wicked case of the munchies."

Friday, August 22, 2008

Studio redesign

In my quest to turn an inadequate space into the most workable studio I can, I spent the entire morning rearranging the furniture in my office/studio. There are only two things that didn't get moved at all, and that was partly because I was too lazy to completely unload the 6-foot-tall bookcase :)

I'm most excited about the fact that I FINALLY took down the awful navy light-blocking curtains the previous owners left in the room. They've been open the whole time, but they were sucking the life out of the room, even when they were open all the way. I've got some fabric and trim set aside to make a valance for the room, which hopefully will get done this weekend, and I'm really excited about how those will turn out. I've had this fabric since about 2002, and I've never found a worthy project for it, but I think this is it.

And, I finally got the mobile hung up ... it's been hanging at a cockeyed angle off one of the curtain hooks since, um, Christmas.

I'm still trying to find homes for all of the orphan projects and in-process stuff, so I won't post a photo yet. Can't let you know what it's really like in here on a daily basis, now can I? That's the number one reason I don't do things like the "corners of my home" group on Flickr ... trust me, you don't want to see what goes on in the corners of MY home ;)

Wednesday, August 20, 2008

Another reason I love Ravelry

http://woolly-knit-bits.blogspot.com/2008/08/pratchgan-2008-mission-accomplished.html

New merchandise


Cute little lined cotton zip bags, with a strap suitable for use around a child's or adult's wrist. I made one for Lazy Kid, who had plenty of purses but none that actually closed, so when she took her change to the mall to ride on the little rides, she'd sling the purse around and quarters would go flying everywhere. The bag turned out so cute that I thought there might be a market for them. Find all four designs in the "bags" section of my etsy shop.

Parenthack - how to keep parents from cheating at kids' card games

Lazy Kid has reached the age of Go Fish, Crazy Eights, and various other card-based games. She understands all of the rules and loves to play, but her hands aren't quite large or nimble enough to hold all the cards, so she spreads them out on the floor in front of her. Personally, I don't mind this, because it makes it easier for me to arrange it so she wins occasionally ... but Lazy Husband was getting frustrated because he was trying not to cheat by seeing her cards.

Enter ... the Lazy Parent 6000 (aka a cardboard box with 3 flaps folded inside*):


We use it with the open side toward Lazy Kid so that she can put her cards inside it or on the flap, and the extra surface on top makes a convenient place to put the communal stack of cards so they don't get mixed in with her jumble. The box is tall enough so that Lazy Husband can't see over it, so he can't cheat. Now, if we could just get her to stop announcing the color and number of every "fish" she draws, he'd be on the straight and narrow.

*fairy costume optional

Tuesday, August 19, 2008

Very excited!

I got an order today to sell some of my SWAK swaddling blankets/nursing covers in a "lactation boutique" in a hospital in Georgia. Basically, it's a shop inside the hospital that focuses on things new mothers (especially those who breastfeed) might need. What a great idea! I wish I had had access to something similar when my daughter was first born ... we had a rough go of it at first, and a little extra support would have been appreciated.

Hospitals are a retail avenue I've been hoping to break into, but most don't have such a specialized shop. I'm not sure my blankets would sell next to the standard hospital gift shop "flowers and a get well card" fare, so I haven't investigated it too much.

Now I need to get off my butt and look for similar boutiques in other hospitals. Hurray for new business opportunities!

Thursday, August 14, 2008

Parenthack - how to keep the sand on the sand art

Last time I did sand art with Lazy Kid she insisted that we hang the resulting work of art up on the refrigerator ... where it then shed sand all over my hardwood floor, despite the Contact paper. Not good.

So when we made new sand art yesterday, I decided to try something different. This time I waited until it was dry, then put the art in a plastic sheet protector (like you'd use in a notebook) before we stuck it to the fridge. Now all of the sand gets caught in the sheet protector, and she can still see her work of art every day. Neato mosquito!

Oh, and in case you were wondering, this time we used watered down glue (about 2/3 glue and 1/3 water), a paintbrush, and gravity to make some cardstock sticky enough for the sand. They turned out pretty cool - this one's my favorite:

When I hit the lottery

I am going to buy one of these. Maybe two. Or six. And then have them design all of the rest of the furniture in my house. Because this?

There are no words to describe the immensity of its awesomeness.

Monday, August 11, 2008

Free pattern - Lazy Lids

A lot of my personal projects lately have come from patterns that are available free online. In the spirit of good will and paying back all the designers who have shared their work for free, I'm putting up my awesomely easy hat as a free pattern for you to try. They make great holiday gifts, and they take so little yarn and time that you won't even mind (much) when the recipient loses one.

As with all of my patterns, please contact me if you'd like to make these for sale. I can usually be convinced, but it's going to cost you ... chocolate, if nothing else.

Lazy Lids


This knitted wool hat has an easy Fair Isle band that helps keep your head extra toasty. Instructions given for newborn, toddler, and adult sizes, plus tips on how to customize the fit. Please note that I added an inch to the toddler size after taking the photo but before writing the directions, so your kid's ears won't stick out like my kid's do :)

Unstretched Sizing:

  • Newborn - 14” around
  • Toddler – 17” around
  • Adult – 20” around

Materials:

  • Two partial skeins worsted weight yarn in coordinating colors. I used Wool-Ease in #104 Blush Heather and #140 Rose Heather, which is 3 oz/85 gms per 197 yards/180 meters. Any yarn of a similar weight should work, as long as you check your gauge
  • US size 6 double-pointed needles, and a 16” size 6 circular needle
  • Four stitch markers, tapestry needle, scissors, etc.
Gauge: 21 st and 24 rows = 4 inches on US 6 needles in stockinette stitch.
  1. With main color, cast on 73 (89, 105) stitches on the circular needle. If you’re making this a custom size, cast on a number of stitches that is one greater than a multiple of four (72+1, 88+1, etc.). Join, making sure not to twist the stitches. Mark the first stitch of the round with a marker or the tail of the cast-on.
  2. Work K2P2 ribbing to the last stitch before the join, then K2tog with the last stitch and the first stitch of the next round. 72 (88, 104) stitches.
  3. Continue in K2P2 ribbing for about 6 (8, 10) rounds, or until ribbing is desired height. Knit around one round, increasing one stitch somewhere in the round using any increase method. 73 (89, 105) stitches.
  4. Knit two or three rounds in the main color, then begin the Fair Isle pattern. This is just [K1(main color) K1 (accent color)] all the way around. As long as you’ve got an odd number of stitches, subsequent rows should end up with the colors forming a checkerboard (instead of alternating columns of color). Repeat this round until the Fair Isle band is 8 (10, 10) rounds high, or desired height. Cut the accent color yarn, leaving a 4-inch tail and complete the remaining steps using the main color.
  5. Knit 4 (8, 10) rounds, or until the piece is long enough to cover the person’s head from midway over their ears up to where their head starts to curve toward the top of the skull. The toddler size fits my largish 3-year-old and the adult size fits my largish adult woman’s head, so adjust the sizing accordingly if you’re knitting for someone with a huge (or tiny) noggin. Somewhere during all these rounds, do one K2tog to decrease back down to 72 (88, 104) stitches.
  6. Knit the next round, placing a stitch marker every 18 (22, 26) stitches.
  7. On the next round, knit to two stitches before the marker, then K2tog. Repeat this for each group around, and keep decreasing each group each row until you have 12 stitches between markers. Switch to working on the double-point needles instead of the circular whenever you feel it’s necessary.
  8. On the next round, knit 4 stitches then K2tog and repeat around. This will give you a decrease at the middle and end of each group of stitches.
  9. Next rounds: (K3 then K2tog) around. (K2 then K2tog) around. (K1 then K2tog) around. (K2tog) around. (K2tog) around. You should have four stitches left at the end of this last round.
  10. Cut the yarn, leaving about a 4-inch tail. Draw the yarn through the stitches remaining on the needles and fasten off, burying the tail inside the hat. If possible, try the hat on the intended wearer to make sure it’s long enough … if not, you can frog the rows with decreases and add a few extra rows of stockinette stitch before you redo the decreases. Trust me, it doesn’t take too long, and your recipient’s ears will thank you for it. When the hat is long enough, weave the ends of the yarn in on the inside of the piece, and voila! A hat!

Thursday, August 07, 2008

Photo shoot with a 3-year-old


Guess this isn't the shot I'll be using to publicize the hat pattern.

Tuesday, August 05, 2008

Serendipity

When we moved a little over a year ago, I was so excited to be back near my preferred quilt shop that I splurged and bought fabric for a bunch of different projects. Most of the projects are finished, but a couple were of the "not-such-a-great-idea" variety, and those have been sitting at the bottom of the to-do pile for months. The fabric would get used eventually, I figured, even if it wasn't in what I originally planned. But every time I looked at the fabric, I saw wasted $$. Good thing the pile kept getting deeper, so deep you could barely see the offending prints sticking out one side.

Then today I finished up a quilt top that's a prototype for a new pattern ... and also a gift for a friend who is expecting her first baby any day now. Most of my prototypes have muslin backs to save material costs, but since this is a gift, I wanted to find something a little jazzier. Most of the fabric for the front came from my stash, but I didn't think I had anything large enough left for the back ... but it was worth a try, if only to keep me from having to wake Lazy Kid to go to the fabric store before dinner.

After digging through my drawers of full-width fabric and finding nothing that wasn't too small or too ugly, I was ready to give up when I spotted one of the "not-such-a-great-idea" fabrics out of the corner of my eye. Yes, that $18 piece of red flannel was exactly the right color to coordinate with the quilt top, and it is - get this - exactly 2" larger than the top, all the way around.

For once I have exactly the right piece of fabric in my stash, exactly when I need it. Praise Jeebus and pass the ammunition, I may be able to finish this sucker after all!

Here's a sneak peek ... Kylie-Ann, don't scroll down unless you want to ruin the surprise!
.
.
.
.
.
.
.
.
.
.
.
.
.
.
.
.
.
.
.

Monday, July 28, 2008

More hats

First there was the Irish Hiking Hat, made for my mother from cotton yarn I bought in Blacksburg.
She liked it so much that she asked me to make another one from the organic cotton yarn we salvaged from a really, really bagged out cardigan I made for her for Christmas last year (hint: The Fairly Easy Fair Isle doesn't translate well to thinner yarn on larger needles to get gauge). So after something like five hours of the two of us frogging and rewinding the yarn from the sweater, I got around to doing this:


Same hat as before, only now you can see the cables better. She liked THAT one so much, she decided that's what she wants me to do with all the yarn - make her enough hats so that she's not heartbroken when she loses one (which happens several times a winter). I was kinda sick of cables by then, and I didn't have enough of the next color to make the whole cable band, anyway, so I decided to practice my fair isle technique in a gauge that was a little more robust.


This hat totally kicks ass, and I think I may have to add a leash to it so she doesn't lose it the first time she wears it. Can't you just see it - an idiot hat instead of idiot mittens?

Since I came up with the pattern for this one all by myself (yay!), I can sell them if I want ... not sure I can get enough $$ for a hand-knit hat to justify the time spent making them, but they will make awesome Christmas presents for, oh, EVERYONE I'VE EVER MET.

Oh, and Laura - I totally need to teach you to knit, because these would be soooo nice in the CottonEase you like so much :)

Friday, July 25, 2008

Not a pattern, but it IS new merchandise


Now available in the store. So cute, it makes me want to hide it in a closet and keep it for myself.

Thursday, July 24, 2008

More personal knitting

In case nobody's noticed, I'm getting a lot of personal crafting done recently, but I've been posting virtually nothing work-related. Fear not, fellow crafters! I've got a couple patterns in testing right now, and I should have them ready for you sometime in August (maybe sooner?).

In the meantime, check out what I've been up to:

Picovoli by Grumperina, in the Knit One Crochet Too Ty-Dy yarn I got in Blacksburg.


This is the second time I've knit this pattern, and I love love love it. I highly recommend it, as it's a fit-as-you-go, top-down, all-in-one-piece-so-there's-no-seams pattern. And the fit came out nicely both times - pretty true to the measurements given in the pattern. I'm having a bit of trouble with the picot neckline wanting to sag, and I ran out of yarn before I could do picot edging on the sleeves, but otherwise I'm super-happy with how this turned out. I even wore it out to dinner tonight, the day after I finished it!

Also, Foliage by Emilee Mooney, knit from some organic cotton I had leftover from a sweater I knit for my mother for Christmas.


I made this up as a birthday present for a friend who has beautiful long wavy red hair, and I purposely made it large so it would have plenty of ease to fit over her barrette without snagging or squishing her hair. It fits perfectly, and it's sooooo soft. I love the finished fabric this cotton makes ... just wish I could remember the manufacturer. Oh, well - I guess OOAK objects are good, too ... I'll just have to "borrow" it from her when I go to visit ;) Anyhoo, the hat pattern was a lot of fun, if a bit attention-intensive. It's the first time I've had to follow a chart as part of a project, and it went pretty well. I pulled out the magnetic board I used to use when I did a lot of cross-stitch, and it worked great to help me keep track of my place in the chart. I'll definitely have to try that again next time I use a chart.

Monday, July 21, 2008

Well, that didn't work out as planned

Shawl was nice and cozy and necessary in the freezer-temperature reception hall, but I spent so much time chasing after Little Miss Dances To Every Song that I couldn't keep it on. And out of 100 photos of the wedding and reception, here's the best one of me:Can you tell I'm the photographer in the family?

Creepiest. Listing. Ever.

http://www.etsy.com/view_listing.php?listing_id=12952245

Tuesday, July 15, 2008

Emergency Shawl

When it's one week before my sister-in-law's wedding, I'm leaving for the east coast the next day, and I realize that my shoulders look like pizza and I don't want to gross everyone out by exposing them in my halter-style dress, there's only one thing to do: go stash-diving and knit a shawl. Fast. Like, in less than 8 hours of total working time.

Look how well the teal in the yarn matches the awesome sandals I'm going to be wearing. Now THAT'S some good stash-diving!

(I get bonus points for posting this from Dial-Up Land, where it took me damn near as long to upload the photos and post here as it did to make the shawl. Seriously, we have got to do something about my MIL's internet access.)
Oh, and you can find more info on the yarn and pattern (which is free) here. At least, you can if you're on Ravelry!

Thursday, July 03, 2008

On the hoop


Step 1: Find fabric you can't live without.
Step 2: Trace one of the motifs from the fabric (while watching a dreadfully boring movie).
Step 3: Transfer motif onto linen and choose embroidery thread to complement the fabric.
Step 4: Embroider motif, squinting regularly to make sure you're following the actual tracing and not the shadow that also showed up because your wax transfer paper is really, really old.
Step 5: Wait until kid is asleep to even contemplate adding beads - do you know how much of a mess a 3-year-old can make with a whole tin of seed beads?
Step 6: Turn the whole thing into a purse that will sell on etsy like hotcakes. Hotcakes, I tell you!

Tuesday, July 01, 2008

Bandana pants!

I've been wanting to make a pair of these for a while, but when I saw the patriotic bandanas in the $1 bin at Target, I knew what my kiddo was going to wear for the 4th of July.

I started them when LazyHusband was reading LazyKid her bedtime stories, and they were finished except for fitting the elastic waistband - before she actually made it into the bed. Yes, they're that fast. Dang, I need to make more of these ... can you say, scrap-tacular? I can!


Edited 7/2/08:
I finished them up this morning, and of course she wanted nothing to do with them. I wanted her to try them on tonight so I could get a photo of them, and after LazyHusband referred to them as her "twinkle twinkle" pants, we couldn't get them off her. She's decided they're pajamas ... and I can't really say she's wrong.

Sunday, June 29, 2008

More fun with photos


Custom mini Busy Baby Book for an etsy customer + scrap red fabric + my new photo setup = cooooooooooool.

Monday, June 23, 2008

Latest finished project - my first scarf in a long, long time

Practically everyone who learns to knit starts with a scarf, and about 3' into it they start to hate, hate, HATE knitting. Scarves are a dumb first project because they take forever and they're right in your face, so any mistakes you make are there front and center all winter long.

However, sometimes you need a mindless project, something you can memorize and just zone out for a while instead of having to pay attention to row counts and stitches and blah-de-blah-blah. That's how I ended up with this beauty:

It's made from Reynolds Odyssey merino wool in color 404, which is a lovely grey/purple/tan/green mix that worked nicely with this pattern. I used all of two skeins, and while I thought it was going to be a bit on the short side, once I washed it and blocked it, it was suddenly a lot longer (and wider - thanks, lace!) and is now the length of a normal scarf.

The (free) pattern is "Two Weeknights With Warrick Worsted Wave Scarf," which can be found here. It works up into the prettiest, simplest lace pattern that's sooooo soft now that it's had its soak.
I had so much fun with this one I may have to go stash diving to see if there are any other scarves in there waiting for their turn on the needles.

Sometimes I'm silly

I ordered a photo cube a few weeks ago, and it's been sitting in a (big) box on the floor in my living room while I dug myself out of a pile of housework and projects. Today I finally had the time to put it together and play with it for a little while, and boy, was it fun! It's amazing how much crisper and more professional everything looks in a well-lit white cube.

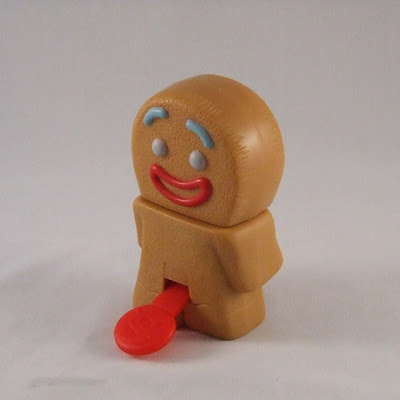
But on to the silly part. What was the first thing I photographed? One of my SWAK blankets? An amigurumi animal? Nope. It was a Happy Meal toy I put together backwards and have been saving for just this occasion, because it makes me giggle every time I see it.

Much more fun than photographing blankets, even if it doesn't pay me anything.

Tuesday, June 17, 2008

Hah!

Jessica sweater designed by Jennifer Thurston, knit in Lana Gatto wool by Filatura e Tessitura di Tollegno S.p.A. (or however it's supposed to be capitalized).

This was a fun sweater, one where just about the time I would get sick of knitting on one piece, it was done and it was time to do something else. Of course, that meant it took me four nights to sew the whole mess together, but it's not like I had anything better to do ;)

And it knit up right on target for sizing with the needles and gauge suggested, so whoopee! No adjustments! No disappointingly small sweater!

If I make this again in another colorway, I think I'll sew the striped part onto the picot edge a little differently. The way I did it this time - slip stitching it to the same row I used to turn under the edging - makes it flip out a little too much for my taste. I'd rather have it lay flat, which it should do if I just attach the striped sections a couple rows down the inside of the picot.

All in all, I loved this project - can't wait until it's cool enough to wear it for more than 10 minutes without breaking out in hives! Stupid summer ...

Back from vacation, full of yarn

Sorry for the lag in posts a week ago, but I was away on a short vacation to scenic Blacksburg, Virginia. My husband and I both graduated from Virginia Tech, and he was going to be in that general area on business anyway, so it seemed like a good time to introduce Lazy Kid to the college she will be attending (in 15 years).

It was a good trip, full of hiking and eating and swimming in the hotel pool. And no trip to Blacksburg would be complete without a trip to Mosaic.

After a (blissfully child-free) hour of cogitating over which colorways would work best for my projects, I came away with two yummy yarns:
First up, Ty-Dy 100% cotton from Knit One Crochet Too, in color 795. As you can see, this sucker hit the needles fast - before I even was finished with my current sweater project - and after three failed attempts at getting the gauge right, I think I'm pretty close now. It's about the same thickness as kitchen cotton, but it's the caviar version - so soft and drapey it will probably bag out as badly as the bamboo version I made of the same sweater. This is being used to make the "ballet" sweater from the July 2006 issue of Magknits (which is kinda beside the point since Magknits went kaput and took their archives with them). Luckily, the designer has made it available elsewhere, so you can find it here.

Exhibit B: Ranco Multy in Color 314 from Araucania Yarns (75/25 wool/polyamide). Check out the link for a much better photo of the colors ... it's much prettier in person than in my badly-lit kitchen. Once I invest in a ball winder these babies are going to turn into the Clover Lace Wrap from Stitch N Bitch Nation (link to the picture on Ravelry here). Good thing I was looking up a link for that ... found the errata page with some major sleeve renovations ... it would have sucked to find that out after I had already turned out Gorilla Sleeves (or Pygmy Sleeves).

And that current sweater project? "Jessica" designed by Jennifer Thurston. It will be done tonight, as I only have one sleeve left to sew in, if I ever get off the darn computer and start sewing.

Guess that's my exit line :)

Sand Art for Small People

We picked up some sand art kits from the $1 bins at the front of Target a few weeks ago, and they've been a big hit ... except that it takes me longer to peel off all the stickers than it does for Lazy Kid to pile obscene quantities of sand on the resulting sticky patches. And she gets frustrated when the color doesn't go in the tiny little spots she's targeting ... which is why I came up with my own version of sand art that's easier for small kids to handle.

Safety warning: This project isn't for kids who still put stuff in their mouths all the time, unless you REALLY want to be cleaning multi-colored sand-filled poop up for several days. And you don't, trust me.

Materials:
Contact paper (clear or colored)
Colored sand
Optional: scissors and paper, or photos cut from magazines, or other flat stuff to stick down
Outside area to work that you don't mind having covered in sand

Technique:

Cut Contact paper to be about the size of a sheet of printer paper. Peel backing off to expose the sticky side, then tape it securely sticky-side up to a table or work surface. I found it was easiest to use one of my trusty craft trays for this (makes it easier to pick up and knock off the excess sand at the end).

Stick down any paper or other flat things you want to use. If you want to mimic a "real" sand art page, cut shapes out of construction paper and then cut inside them to form just the frame of the shape, so that the child can sprinkle sand inside the outline. Or just stick down pictures, or sequins, or glitter, or random sticks that blow onto the sheet from the windstorm that has kicked up since you started the craft.

Let child apply sand to the sticky parts of the Contact paper.

We still had the sand in the little bags it came in, so I just cut the corner off the bag and let her pour it and spread it out with her fingers.
You could also put it in small bowls and let them use spoons or their fingers to sprinkle it on the paper. You can get really creative with this - put their hand down and sprinkle around it to make a handprint, then fill it in with a different color; trace letters or pictures you slide underneath the clear Contact paper; etc.


When you've finished all the sand stuff, pick up the paper and knock off the excess (and trust me, there WILL be excess). We did this by just picking up the whole tray so I didn't have to deal with floppy sticky sandy Contact paper much.

If you want to preserve the sand art (i.e. not have it dribble sand all over your kitchen floor for the next three weeks), stick a piece of clear Contact paper on the art so the sand is sandwiched between the sheets. If you want, cut the outside of the sheets to be even, or into a shape, but remember - the sand is going to REALLY dull the scissors fast, so don't use your good sewing scissors for this!

If you used clear Contact paper for both sheets, you can hang the art in the window as a suncatcher. Otherwise, it looks great on the refrigerator, or as a small placemat for snacks, etc.

Hope you have fun with this project! Now, let's just hope I can find a cheap source for more sand, because we're going through it at a fast clip around here ...

Wednesday, June 04, 2008

A cautionary tale

Once upon a time (Tuesday) I bought one of those squishy U-shaped neck pillows for my daughter to use with her new carseat, which otherwise seemed to propel her sleeping head forward at a dangerously lolling angle that looked worrisome (and uncomfortable). But when we got the pillow home and tried it out, it was way to overstuffed to work around her little nubbin of a neck.

"Not a problem!" I thought, getting out the seam ripper. "I'll just take out some of the beads and redistribute the rest of them so it's more comfortable for her."

The seam ripper was, of course, in my sewing room, so I sat down and started working on the project. I had a plastic bag all ready to catch the beads, and the three-year-old was safely engaged in some diverting activity far, far away. I had forgotten how much fun it is to work with polystyrene beads ... and these were literally the size of pinheads, they were that small. I should know, since they're now spread all over my studio. See that stuff on my jeans? It's not dandruff. Thank you, ceiling fan.


Thank you, static electricity.

(Hee - that looks like my hand is being swarmed by albino aphids)

Thank you, Lazy Kid, for the photos, especially the action shot of me attempting to milk the little monsters out of the nipple that was obviously their entry point during the original construction process. If anyone needs any help milking nanny goats or heifers, let me know - I had an hour of practice this afternoon.

Eventually I wised up and took the project out onto the front porch, where I ended up spreading beads all over the porch, sidewalk, and flower bed. I'm going to be vacuuming the little buggers out of my house for months. Grrrrr. At least the significantly smaller pillow works - that would have been the kicker if I went through all that and it still didn't work. Now I just have to find a place to store the beads where Certain People can't find them or reach them.

Note to self: All projects involving fake fur and/or polystyrene beads must be completed outside the house, preferably outside the county.