Pages

Thursday, July 24, 2008

More personal knitting

In case nobody's noticed, I'm getting a lot of personal crafting done recently, but I've been posting virtually nothing work-related. Fear not, fellow crafters! I've got a couple patterns in testing right now, and I should have them ready for you sometime in August (maybe sooner?).

In the meantime, check out what I've been up to:

Picovoli by Grumperina, in the Knit One Crochet Too Ty-Dy yarn I got in Blacksburg.


This is the second time I've knit this pattern, and I love love love it. I highly recommend it, as it's a fit-as-you-go, top-down, all-in-one-piece-so-there's-no-seams pattern. And the fit came out nicely both times - pretty true to the measurements given in the pattern. I'm having a bit of trouble with the picot neckline wanting to sag, and I ran out of yarn before I could do picot edging on the sleeves, but otherwise I'm super-happy with how this turned out. I even wore it out to dinner tonight, the day after I finished it!

Also, Foliage by Emilee Mooney, knit from some organic cotton I had leftover from a sweater I knit for my mother for Christmas.


I made this up as a birthday present for a friend who has beautiful long wavy red hair, and I purposely made it large so it would have plenty of ease to fit over her barrette without snagging or squishing her hair. It fits perfectly, and it's sooooo soft. I love the finished fabric this cotton makes ... just wish I could remember the manufacturer. Oh, well - I guess OOAK objects are good, too ... I'll just have to "borrow" it from her when I go to visit ;) Anyhoo, the hat pattern was a lot of fun, if a bit attention-intensive. It's the first time I've had to follow a chart as part of a project, and it went pretty well. I pulled out the magnetic board I used to use when I did a lot of cross-stitch, and it worked great to help me keep track of my place in the chart. I'll definitely have to try that again next time I use a chart.

Monday, July 21, 2008

Well, that didn't work out as planned

Shawl was nice and cozy and necessary in the freezer-temperature reception hall, but I spent so much time chasing after Little Miss Dances To Every Song that I couldn't keep it on. And out of 100 photos of the wedding and reception, here's the best one of me:Can you tell I'm the photographer in the family?

Creepiest. Listing. Ever.

http://www.etsy.com/view_listing.php?listing_id=12952245

Tuesday, July 15, 2008

Emergency Shawl

When it's one week before my sister-in-law's wedding, I'm leaving for the east coast the next day, and I realize that my shoulders look like pizza and I don't want to gross everyone out by exposing them in my halter-style dress, there's only one thing to do: go stash-diving and knit a shawl. Fast. Like, in less than 8 hours of total working time.

Look how well the teal in the yarn matches the awesome sandals I'm going to be wearing. Now THAT'S some good stash-diving!

(I get bonus points for posting this from Dial-Up Land, where it took me damn near as long to upload the photos and post here as it did to make the shawl. Seriously, we have got to do something about my MIL's internet access.)
Oh, and you can find more info on the yarn and pattern (which is free) here. At least, you can if you're on Ravelry!

Thursday, July 03, 2008

On the hoop


Step 1: Find fabric you can't live without.
Step 2: Trace one of the motifs from the fabric (while watching a dreadfully boring movie).
Step 3: Transfer motif onto linen and choose embroidery thread to complement the fabric.
Step 4: Embroider motif, squinting regularly to make sure you're following the actual tracing and not the shadow that also showed up because your wax transfer paper is really, really old.
Step 5: Wait until kid is asleep to even contemplate adding beads - do you know how much of a mess a 3-year-old can make with a whole tin of seed beads?
Step 6: Turn the whole thing into a purse that will sell on etsy like hotcakes. Hotcakes, I tell you!

Tuesday, July 01, 2008

Bandana pants!

I've been wanting to make a pair of these for a while, but when I saw the patriotic bandanas in the $1 bin at Target, I knew what my kiddo was going to wear for the 4th of July.

I started them when LazyHusband was reading LazyKid her bedtime stories, and they were finished except for fitting the elastic waistband - before she actually made it into the bed. Yes, they're that fast. Dang, I need to make more of these ... can you say, scrap-tacular? I can!


Edited 7/2/08:
I finished them up this morning, and of course she wanted nothing to do with them. I wanted her to try them on tonight so I could get a photo of them, and after LazyHusband referred to them as her "twinkle twinkle" pants, we couldn't get them off her. She's decided they're pajamas ... and I can't really say she's wrong.

Sunday, June 29, 2008

More fun with photos


Custom mini Busy Baby Book for an etsy customer + scrap red fabric + my new photo setup = cooooooooooool.

Monday, June 23, 2008

Latest finished project - my first scarf in a long, long time

Practically everyone who learns to knit starts with a scarf, and about 3' into it they start to hate, hate, HATE knitting. Scarves are a dumb first project because they take forever and they're right in your face, so any mistakes you make are there front and center all winter long.

However, sometimes you need a mindless project, something you can memorize and just zone out for a while instead of having to pay attention to row counts and stitches and blah-de-blah-blah. That's how I ended up with this beauty:

It's made from Reynolds Odyssey merino wool in color 404, which is a lovely grey/purple/tan/green mix that worked nicely with this pattern. I used all of two skeins, and while I thought it was going to be a bit on the short side, once I washed it and blocked it, it was suddenly a lot longer (and wider - thanks, lace!) and is now the length of a normal scarf.

The (free) pattern is "Two Weeknights With Warrick Worsted Wave Scarf," which can be found here. It works up into the prettiest, simplest lace pattern that's sooooo soft now that it's had its soak.
I had so much fun with this one I may have to go stash diving to see if there are any other scarves in there waiting for their turn on the needles.

Sometimes I'm silly

I ordered a photo cube a few weeks ago, and it's been sitting in a (big) box on the floor in my living room while I dug myself out of a pile of housework and projects. Today I finally had the time to put it together and play with it for a little while, and boy, was it fun! It's amazing how much crisper and more professional everything looks in a well-lit white cube.

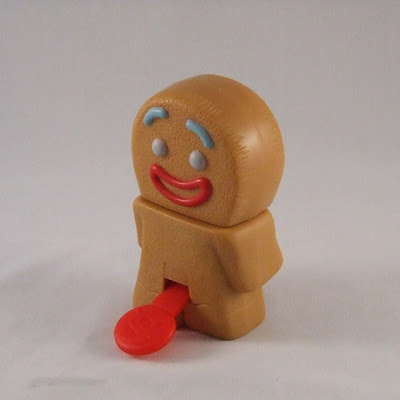
But on to the silly part. What was the first thing I photographed? One of my SWAK blankets? An amigurumi animal? Nope. It was a Happy Meal toy I put together backwards and have been saving for just this occasion, because it makes me giggle every time I see it.

Much more fun than photographing blankets, even if it doesn't pay me anything.

Tuesday, June 17, 2008

Hah!

Jessica sweater designed by Jennifer Thurston, knit in Lana Gatto wool by Filatura e Tessitura di Tollegno S.p.A. (or however it's supposed to be capitalized).

This was a fun sweater, one where just about the time I would get sick of knitting on one piece, it was done and it was time to do something else. Of course, that meant it took me four nights to sew the whole mess together, but it's not like I had anything better to do ;)

And it knit up right on target for sizing with the needles and gauge suggested, so whoopee! No adjustments! No disappointingly small sweater!

If I make this again in another colorway, I think I'll sew the striped part onto the picot edge a little differently. The way I did it this time - slip stitching it to the same row I used to turn under the edging - makes it flip out a little too much for my taste. I'd rather have it lay flat, which it should do if I just attach the striped sections a couple rows down the inside of the picot.

All in all, I loved this project - can't wait until it's cool enough to wear it for more than 10 minutes without breaking out in hives! Stupid summer ...

Back from vacation, full of yarn

Sorry for the lag in posts a week ago, but I was away on a short vacation to scenic Blacksburg, Virginia. My husband and I both graduated from Virginia Tech, and he was going to be in that general area on business anyway, so it seemed like a good time to introduce Lazy Kid to the college she will be attending (in 15 years).

It was a good trip, full of hiking and eating and swimming in the hotel pool. And no trip to Blacksburg would be complete without a trip to Mosaic.

After a (blissfully child-free) hour of cogitating over which colorways would work best for my projects, I came away with two yummy yarns:
First up, Ty-Dy 100% cotton from Knit One Crochet Too, in color 795. As you can see, this sucker hit the needles fast - before I even was finished with my current sweater project - and after three failed attempts at getting the gauge right, I think I'm pretty close now. It's about the same thickness as kitchen cotton, but it's the caviar version - so soft and drapey it will probably bag out as badly as the bamboo version I made of the same sweater. This is being used to make the "ballet" sweater from the July 2006 issue of Magknits (which is kinda beside the point since Magknits went kaput and took their archives with them). Luckily, the designer has made it available elsewhere, so you can find it here.

Exhibit B: Ranco Multy in Color 314 from Araucania Yarns (75/25 wool/polyamide). Check out the link for a much better photo of the colors ... it's much prettier in person than in my badly-lit kitchen. Once I invest in a ball winder these babies are going to turn into the Clover Lace Wrap from Stitch N Bitch Nation (link to the picture on Ravelry here). Good thing I was looking up a link for that ... found the errata page with some major sleeve renovations ... it would have sucked to find that out after I had already turned out Gorilla Sleeves (or Pygmy Sleeves).

And that current sweater project? "Jessica" designed by Jennifer Thurston. It will be done tonight, as I only have one sleeve left to sew in, if I ever get off the darn computer and start sewing.

Guess that's my exit line :)

Sand Art for Small People

We picked up some sand art kits from the $1 bins at the front of Target a few weeks ago, and they've been a big hit ... except that it takes me longer to peel off all the stickers than it does for Lazy Kid to pile obscene quantities of sand on the resulting sticky patches. And she gets frustrated when the color doesn't go in the tiny little spots she's targeting ... which is why I came up with my own version of sand art that's easier for small kids to handle.

Safety warning: This project isn't for kids who still put stuff in their mouths all the time, unless you REALLY want to be cleaning multi-colored sand-filled poop up for several days. And you don't, trust me.

Materials:
Contact paper (clear or colored)
Colored sand
Optional: scissors and paper, or photos cut from magazines, or other flat stuff to stick down
Outside area to work that you don't mind having covered in sand

Technique:

Cut Contact paper to be about the size of a sheet of printer paper. Peel backing off to expose the sticky side, then tape it securely sticky-side up to a table or work surface. I found it was easiest to use one of my trusty craft trays for this (makes it easier to pick up and knock off the excess sand at the end).

Stick down any paper or other flat things you want to use. If you want to mimic a "real" sand art page, cut shapes out of construction paper and then cut inside them to form just the frame of the shape, so that the child can sprinkle sand inside the outline. Or just stick down pictures, or sequins, or glitter, or random sticks that blow onto the sheet from the windstorm that has kicked up since you started the craft.

Let child apply sand to the sticky parts of the Contact paper.

We still had the sand in the little bags it came in, so I just cut the corner off the bag and let her pour it and spread it out with her fingers.
You could also put it in small bowls and let them use spoons or their fingers to sprinkle it on the paper. You can get really creative with this - put their hand down and sprinkle around it to make a handprint, then fill it in with a different color; trace letters or pictures you slide underneath the clear Contact paper; etc.


When you've finished all the sand stuff, pick up the paper and knock off the excess (and trust me, there WILL be excess). We did this by just picking up the whole tray so I didn't have to deal with floppy sticky sandy Contact paper much.

If you want to preserve the sand art (i.e. not have it dribble sand all over your kitchen floor for the next three weeks), stick a piece of clear Contact paper on the art so the sand is sandwiched between the sheets. If you want, cut the outside of the sheets to be even, or into a shape, but remember - the sand is going to REALLY dull the scissors fast, so don't use your good sewing scissors for this!

If you used clear Contact paper for both sheets, you can hang the art in the window as a suncatcher. Otherwise, it looks great on the refrigerator, or as a small placemat for snacks, etc.

Hope you have fun with this project! Now, let's just hope I can find a cheap source for more sand, because we're going through it at a fast clip around here ...

Wednesday, June 04, 2008

A cautionary tale

Once upon a time (Tuesday) I bought one of those squishy U-shaped neck pillows for my daughter to use with her new carseat, which otherwise seemed to propel her sleeping head forward at a dangerously lolling angle that looked worrisome (and uncomfortable). But when we got the pillow home and tried it out, it was way to overstuffed to work around her little nubbin of a neck.

"Not a problem!" I thought, getting out the seam ripper. "I'll just take out some of the beads and redistribute the rest of them so it's more comfortable for her."

The seam ripper was, of course, in my sewing room, so I sat down and started working on the project. I had a plastic bag all ready to catch the beads, and the three-year-old was safely engaged in some diverting activity far, far away. I had forgotten how much fun it is to work with polystyrene beads ... and these were literally the size of pinheads, they were that small. I should know, since they're now spread all over my studio. See that stuff on my jeans? It's not dandruff. Thank you, ceiling fan.


Thank you, static electricity.

(Hee - that looks like my hand is being swarmed by albino aphids)

Thank you, Lazy Kid, for the photos, especially the action shot of me attempting to milk the little monsters out of the nipple that was obviously their entry point during the original construction process. If anyone needs any help milking nanny goats or heifers, let me know - I had an hour of practice this afternoon.

Eventually I wised up and took the project out onto the front porch, where I ended up spreading beads all over the porch, sidewalk, and flower bed. I'm going to be vacuuming the little buggers out of my house for months. Grrrrr. At least the significantly smaller pillow works - that would have been the kicker if I went through all that and it still didn't work. Now I just have to find a place to store the beads where Certain People can't find them or reach them.

Note to self: All projects involving fake fur and/or polystyrene beads must be completed outside the house, preferably outside the county.

Wednesday, May 28, 2008

And now for something a little different


This is what the mindless stitching turned into - a set of four framed mini quilts, one for each season. My favorite is fall:

Now available in my etsy shop - get 'em while they're hot!

I don't think I ever showed you how this turned out

Remember the matchy-matchy borders I previewed for you a few weeks ago? Well, that was the MoYo Throw prototype. I've sold the quilt already, but I had the presence of mind to snap a couple photos before it headed home on the plane with my mother-in-law:


I really love how this one turned out. This was a project where the dimensions were fudged to match the amount of fabric available, the yo-yos were cut using my Corelle dinner plates as templates, and the fact that the border ended up presentable was a freakin' miracle, as I totally didn't measure it before I started. So basically I did everything wrong, and it still looked good. Behold the power of the yellow/blue/white combination!

Trivia: The original title for this design was "Puckered Plates" because I thought the blue/white yo-yos looked like porcelain and I used my dinner plates as the templates for them. I still like the name, even if I like "MoYo Throw" better ;)

Come, learn from me!

I'm now officially in the Birds of a Feather online catalog:


Monday, May 19, 2008

WIP Monday

So, what are they? Not telling yet ... but I will give you a hint. The next step involves a hammer and an awl. Any time I get to whack holes in stuff with pointy tools, I'm a happy, happy girl.

Genius at work

Proof that my daughter can now draw almost as well as I can ... and she's three.
Not bad for her first attempt at drawing a person, huh? I love the feet - they crack me up. Now, just wait until you see what I have planned for Lazy Kid's first portrait masterpiece ...

Buy me!


Friday, May 16, 2008

Awwww...

Lazy Kid shows off some of the results of our craft binge:

The individual-sized-cereal-box puppet, which is significantly more complicated than the construction paper ones that inspired it (find them in Incredibly Awesome Crafts for Kids by Better Homes and Gardens). We added a polar fleece sleeve to make this look more like the "alligator" it's supposed to be ... the hot pink fleece Lazy Kid picked out kinda takes away from the effect, doesn't it?

Next up: Using glitter glue to make prints for birthday thank you cards.

This was supposed to be "use glitter glue to make pictures on craft foam," but Lazy Kid prefers to make huge blobs of color, and I thought those would take forever to dry. So we pressed pieces of paper onto the craft foam and made prints from the blobs, like these:

We got about four prints from each set of glue blobs, and the remaining glue washed off of the craft foam really easily so we can use the foam again next time. We got a couple extra prints by pressing paper onto the first (somewhat globby) print from each series.

Still in process: Salt clay figures, most of which are painted a hideous Pepto-Bismal pink. Yum.

Keeping the kiddy crafts corralled

Lazy Mama HQ was Kid Craft Central yesterday, with no fewer than three ridiculously involved craft projects begun and sorta finished. Go, us!

While we were in the thick of it, it occurred to me that my method of keeping the kid craft projects corralled might be of interest to my readers, some of whom might not have come up with it on their own. Our house is somewhat small, you see, and while we managed to find a small closet to house all the kid craft supplies, Lazy Kid doesn't have a dedicated craft table or anything like that. Instead, she's got sort of a corner of our kitchen counter, and for larger projects we spread out on the dining room table. So being able to keep the craft surfaces clean - and pick them up quickly when we're done - is important to my sanity.

Enter the plastic serving tray. We bought several of these from Target a few years ago, originally as a way to contain the cat food that our messy eaters nudge out of their bowl when they're famished. Then the trays got cleaned up and actually were used as serving trays when we ate out on our patio. And now they've been drafted into duty as craft stations, keeping crayons from rolling off the table, paints from staining the tablecloth, and cotton balls from blowing all over the house when the door opens.

They wipe clean easily, and best of all, when I need room on the dining room table or kitchen counter, I just pitch all the craft supplies onto the tray and throw the whole thing back in the closet. Cleanup doesn't get much easier than that, unless you count the old "fingerpaint in the bathtub and hose the kid down afterward" trick.

So if you're doing kid crafts, keep your eyes on the clearance rack at Target - they change plasticware designs every month or two, and when they do, you can get one of the older designs at a significant discount.

Wednesday, May 14, 2008

Class - MoYo Throw, June 22 and 29 2008

The lovely folks at Birds of a Feather in Avon, Ohio, have graciously invited me to teach a class based on my MoYo Throw pattern. In case you've been living under a rock this week, the MoYo Throw features yo-yos that are almost 5" across, made from fabric from the Benartex line "Gilded Opulence." I am in love with that fabric, and I think you will be too when you see it in real life.


I'll be covering the whole quilt from start to finish - the only out-of-class work will be the initial cutting and maybe some of the hand-gathering on the yo-yos. It should be a lot of fun, and the quilts should be showstoppers when we're done.

Liz is selling kits for the project in two different color ways - one lime/fuschia like my sample, the other a more muted one based on the red/gold colorway for the yo-yos. Kits are available either as part of the class, or separately if you don't feel like being social while you work on the project. I understand. Just remember, though - where I go, chocolate follows, so you might want to think about that class after all :)

Anyhow, if you're in the area and interested, I'll be teaching the 2-session class on June 22 and June 29 from 1-3pm each day. Contact Birds of a Feather at 440-934-2374 to register or to order a kit.

Hope to see you there!


MoYo Throw Pattern Page

MoYo Throw Pattern
What do you call yo-yos that are almost 5" across? Mo-Yos! They're "mo" simple, "mo" fun, "mo" quick, and "mo" stunning than any yo-yos you've ever seen. What a great way to showcase a couple cool fabrics (or make a unique gift in record time!).
Approximate finished dimensions: 40"x50"
A person with average sewing skills should be able to finish the machine sewing in about two naptimes (4 hours). This project requires several hours of additional time for handsewing, but this time can be squeezed in whenever you have a few minutes.
Photos from the pattern directions:
Closeup of the yo-yo

Sewing the yo-yos before gathering them:

Pattern includes illustrated directions and suggestions for additional variations on the project. It is packaged in a resealable plastic bag (6"x9"), ready to hang and sell.

Wholesale price: $4.00/pattern
Suggested retail price: $7-$9, or whatever the market will bear in your area

Free shipping on your first order! Shipping charges for subsequent orders will be the actual charges for USPS Priority Mail to your destination.

I am willing to make free samples to display in your shop, if you are willing to provide the materials. Please contact me for more information on this service.

For more information or to place an order, please contact Gretchen Woods at Lazy Mama Designs: lazymamadesigns (at) yahoo (dot) com.

NEW!! You can also place orders through my shop at etsy.com - just convo me with a request, including the number of patterns you'd like to buy, and I can post a custom listing for you at the wholesale price.

Thank you for your interest, and I hope to hear from you soon!

Teaching a young child to sew

Yeah, okay, maybe I'm a little ambitious here, but Lazy Kid has mad skillz when it comes to small motor play, and she's bored with sticking laces through beads, and the laces on her lacing cards are so long they get tangled or so short she pulls them all the way through each hole. Plus, she just sort of laces the cards in a random order from random directions, so they don't look like anything when she's done. She gets really frustrated when she ends up with this tangled ball of nasty yarn with a cute cow lacing card buried in the middle. So what's a crafty mommy to do? Get all DIY with the problem, that's what.

And so, I proudly present a free tutorial on making your own learn-to-sew card for really young kids. Please note that this is a supervised activity - young children should NEVER be left alone with needles, even blunt plastic ones.

Materials:
  • A piece of cardboard (preferably corrugated, but definitely sturdy) about the size of a sheet of notebook paper
  • A pair of scissors sturdy enough to cut through the cardboard
  • A hole punch sturdy enough to cut through the cardboard (mine's a cheapy from Office Max, and it worked fine)
  • A marker/pen/pencil/crayon
  • A scrap of yarn about 2 feet long
  • A button that's larger than the holes the hole punch makes and that has holes large enough for the yarn needle to go through
  • A BLUNT tapestry needle, yarn needle or plastic canvas needle - preferably plastic

Steps:

  1. Punch a series of holes along one side of the cardboard, about 2" apart and as far in from the edge as the hole punch will go. Label the holes with numbers, either from left to right or right to left.
  2. Cut two smaller pieces of cardboard, each about 3-4" square. Punch two holes in each piece of cardboard, at approximately the same distance you used in step 1. Label these holes with two consecutive numbers, as in the photo below.
  3. Thread the yarn scrap through the needle, then even up the ends and tie them so that the needle will not come loose from the yarn. Thread the needle and yarn through one hole on the button, pulling the knot snug against the button. This will keep the child from pulling the thread all the way through the holes.
  4. First show the child how to sew on just the larger piece of cardboard, with the needle coming "up at 1" and "down at 2" and "up at 3" and so forth across the piece.
  5. Next, show the child how to "unsew" the yarn by backing the needle out through the holes, "down through 3" "up through 2" "down through 1" etc.
  6. Finally, show the child how to "sew" the smaller cardboard pieces onto the larger piece by holding them over top while sewing. You may need to make the holes in the smaller pieces a little larger (two hole punches side by side) so the child can easily see to put the needle through both holes at once.
Lazy Kid "sewed" the cards in the photo above with only minimal guidance from me - mostly I just had to remind her that the needle didn't always go in from the same side of the board (which wraps the yarn around the edge of the card instead of making a nice running stitch).

After she completed this she wanted nothing more to do with it that day, and the next day she just wanted to hold the needle and swing the yarn around, which was all fun and games until the button on the other end of the yarn hit her in the face (which is why you NEVER leave a child alone with a needle - did I mention that before?).

So no, my three-year-old won't be entering any embroidery at the state fair this year, but she DID have fun with this the first time, and I think it will be popular in the future once she gets over the button-to-the-face incident. And once she gets good with the cardboard, it's on to more floppy materials like felt (and quilting cotton!).

Let me know how this works for you!

Looky where you can find me now!

http://ecraftclass.com/about/quilting/

more on this later ... it's way too late to be blogging right now. And yet here I am - it's a sickness, I tell you, a sickness.

Sunday, May 11, 2008

What's on the way?

Giant (almost 5" across!) yo-yos, fussy cut from "Gilded Opulence" by Paula Nadelstern for Benartex. Thanks to Birds of a Feather for providing the fabric - you ladies rock!

I'm calling these giants "mo-yos." snort So fun, so easy, so cute when they're done!

The sample quilt is complete, and the pattern should be ready to release early this week. And I'll be teaching a class based on this pattern at Birds of a Feather in June, so check back soon for dates and times if you're in the area.

Look, someone actually made my yo-yos!

Thanks to the anonymous block of the month participant who allowed me to photograph her beautiful block, which features pansies made using my yo-yo technique. Huzzah!

Friday, May 09, 2008

Sign that it's time to go buy more $0.10 stamps:


Yup, that looks professional.

Thursday, May 08, 2008

How I'm milking the system for all it's worth

Yesterday I put into place the first part of my plan to mooch as much free cash out of my purchases as I can. It was easy - I went to the grocery store and bought a combined $100 in gift cards to other stores where I was planning to shop.

My grocery store shopper's club keeps track of your purchases, and every $50 you spend gets you $0.10 off per gallon of gas at their stations. Given how expensive groceries are now, it doesn't take much to whack quite a bit off the price of a fill-up ... especially since the gift cards count as double points toward my gas discount. So $100 = $0.80 off per gallon, which if I wait until I'm on fumes and almost fill my gas tank translates to as much as $12.

And I paid for the cards with a credit card that gives me cash back on my purchases ... where I earn twice as much for grocery purchases. That means I earned about $2 from the credit card company.

And when I made my purchases today, anything in excess of the amount of cards I purchased went onto the same credit card, which is the one linked to my UPromise account. I earn UPromise money at Bed Bath and Beyond for any purchases made with that credit card, so that's another $1 or so. And I get the cash back on the credit card purchase, too, which is another $1 or so.

So basically it boils down to this: Buying the gift cards at the grocery instead of just paying with the credit card at the store earned me up to an extra $13, in addition to the $3 I would have earned if I just used the credit card linked to the UPromise account. Not too shabby, considering I was at the grocery store anyway, and I was going to buy the same stuff at the same stores whether I had gift cards or not.

Now, I know why the companies offer their cards for sale at the grocery. They're hoping that if you spend $25 on a gift card from Bath and Body Works, and your total comes to $22, you'll throw in an extra purchase so you won't have to carry around a piece of plastic that only has $3 left on it. If you buy one extra thing in addition to what you would have bought if you weren't using the gift card, they're making money off of you. But if you have the willpower (and purse space) to walk away from the extra purchases, gift cards that earn you extra grocery store credit can be a very deal.

Now I plan to go clean the store out of Home Depot cards so I can buy a new sink for our bathroom ... bwahahahahahahaha!

Tuesday, May 06, 2008

Sunday, May 04, 2008

Crafty birthday

LazyToddler is now officially LazyKid, having turned three years old earlier this week. We had the party today, complete with garden-themed birthday cake and food. I'm not usually a theme party kinda girl (last year she got cheap pizza and an ice cream cake, and the year before that we gave her a Kroger cupcake three days late), but I had fun this year. The cake was the best part ...

LazyKid helped make the "seed packets," and she helped mix the cake, but I decorated the whole thing after she went to bed so the final product would be a surprise. Decorating a cake after 10pm leads to flights of fancy that may include (but are not limited to) ...

... giant worms ...

... and bunny turds.

I was a little bit worried that the cake was going to be awful - I monkeyed around with the size of the pan so I'd have plenty of "garden" to decorate, and it took almost twice as long to bake as the original recipe suggested. I even had to wrap the edges of the pan in foil partway through to keep them from getting overcooked. That worked pretty well, actually, and the edge piece that I had was just as moist as the middle.

I was also a little bit concerned because I didn't notice until I was halfway done making the frosting that it never gets cooked or heated after the raw egg is added. But I solved that problem by feeding a healthy dose of extra frosting to LazyHusband last night and watching him carefully for signs of food poisoning. It's excusable to throw your spouse under the bus in an effort to keep kids from dying of salmonella, right?

All in all, it was a fun party, even if I didn't get to do some of the more elaborate things I had planned. I guess if I had gone all Martha Stewart on the decorations and games, my friends would have had to slap some sense into me, and that would have been unfortunate. So we'll just save the "pin the center on the flower" game we made for next year, and thank our lucky stars that the "toss the bunny in the rabbit hole" game never got finished.

And if there's any lingering doubt about my ability to give Martha a run for her money, you need look no further than my attempt at Ladybug Pizzas to see ... I'm not even in her league.

Who knew canned chopped olives looked so disgusting? Oh, well, at least they tasted better than they looked.

Out of retirement

I retired my large rotary cutting mat a few months ago when I switched to using a piece of antique furniture instead of my wobbly cutting table. Since then, it's been languishing in the attic ... until our friend forgot to bring his terrain maps when he came over to play Dungeons and Dragons minis with LazyHusband.
Yes, they were so desperate for "adult" game time that they made a war map out of a rotary cutting mat and some of LazyKid's blocks. I wish I had a photo of last weekend's Bristle Block cavern of doom, or whatever they were calling it.

Thursday, May 01, 2008

In retrospect,

... maybe it was a bad idea to let LazyChild help pull out the stuffing I needed for a project for her birthday party this weekend.

Maybe this will finally push me over the edge and give me an excuse to buy a Dyson. Yeah, right.

Saturday, April 26, 2008

aren't these cute?

They're from the same person who's custom-making table cards for my sister-in-law's wedding.

http://www.etsy.com/view_listing.php?listing_id=10742826

I might have to invest in these - surely I've got somebody I need to thank this much, right? (ahem, Kylie-Ann)

Wednesday, April 23, 2008

WIP Wednesday


I haven't decided what it's going to be when I'm done with the embroidery, but I'm having fun with the mindless follow-the-line stitching. Just what my brain needed this week!

Tuesday, April 22, 2008

snort - giggle

http://www.etsy.com/view_listing.php?listing_id=11164500

I swear, sometimes it's like my sense of humor got stuck in junior high.

Sunday, April 20, 2008

More Burchy goodness

I'm still in destash mode around here, and the next project on my list was to use up more of the Laurel Burch flannel I had left over from a quilt I made before LazyToddler was born. I've finished the second tummy time activity quilt from the fabric, and I only had to use a little bit of the extra flannel I bought last weekend (I can't believe it's still available! Hooray for slow sellers and/or reprints!).
There's a good chance this one is already spoken for, as a friend recently lamented that the first quilt made from these fabrics had sold before she could snap it up. But if she changes her mind, it'll be in the etsy shop soon, along with a couple of other designs from coordinating fabrics. So keep your eyes peeled!