
While I was at the beach I got an email from a Cleveland friend who found that the etsy Cleveland Street Team was sponsoring a forum on how to sell successfully at craft shows - did I want to attend? I was like, Heck, yeah! and Wait, Cleveland has a street team? Where do I sign up?
Turns out I sign up here. Which I did the day after I started to restock the shop, and the ladies I've corresponded with so far couldn't be nicer. It's a diverse group, with folks from all over the Cleveland area, doing all kinds of crafts, and it's exciting to learn about what everyone is up to. I look forward to picking their brains, exploiting their contacts, and buying their stuff in the coming months :)
I was lucky enough to sign up in time to make it to today's destash party, where we all brought extra craft supplies we didn't think we'd need ourselves and offered them to the group for ridiculously low prices. So basically we all unloaded our junk onto the other Cleveland crafters, who may or may not ever get around to using it, but we had a lot of fun doing it!
They're all probably going to end up reading this, so I won't gush about the group too much. Let's just say that it's the first time in a long time that I've been in a room of women who all understood the need for stash, the urge to create, and the idea of selling what I make. Plus, they're really freakin' funny. And I wasn't the only one standing in the kitchen at a party, knitting. And somebody made really good brownies ... and what's up with Ramona bringing half a pig with her? All I brought was a lousy chrysanthemum for the hostess. Here's a link to the photos from the party ... as usual, I look like a dork most of the time.
Anyway, if any of the non-etsy folks reading this are in the market for nifty stuff, stop by etsy and search for "Cleveland" in the tags ... we're all using it to make our stuff easier to find. We've got talent, and we're not afraid to share it with the rest of the country!
Saturday, September 29, 2007
Sock-happy
Remember how I finished one adult sock earlier this summer? I finished the other one earlier this month and forgot to post the photo. So here it is: The pattern is from Knit Socks Whatever the Yarn by Edie Eckman, and no, you're not imagining things, they are two different colors. That's what happens when they only have one skein two different colors of the cotton-wool blend I want to try ... I go all artsy and make non-matching socks. Good thing, too, since I misread the directions for the first sock and did K2P2 ribbing, and on the second I read the directions right and did K1P1 ribbing, so the suckers wouldn't match even if I had the same yarn. Oh, well - now I won't be tempted to wear them with shoes and get them all holey, right?
I also finished another pair of the toddler socks from the free pattern I used earlier this summer. I used a chunky organic cotton yarn I used to make my mother a copy of the Fair Isle sweater from the second Stitch N Bitch book, and these socks are the squooshiest socks I've ever seen. My goodness, I need a pair. Of course, the kid won't sit still long enough to get a photo, and won't take them off long enough for me to sneak them out of the room, so you'll just have to imagine the luscious pale blueness of them. Hoorah for socks you can finish during one movie!
The pattern is from Knit Socks Whatever the Yarn by Edie Eckman, and no, you're not imagining things, they are two different colors. That's what happens when they only have one skein two different colors of the cotton-wool blend I want to try ... I go all artsy and make non-matching socks. Good thing, too, since I misread the directions for the first sock and did K2P2 ribbing, and on the second I read the directions right and did K1P1 ribbing, so the suckers wouldn't match even if I had the same yarn. Oh, well - now I won't be tempted to wear them with shoes and get them all holey, right?I also finished another pair of the toddler socks from the free pattern I used earlier this summer. I used a chunky organic cotton yarn I used to make my mother a copy of the Fair Isle sweater from the second Stitch N Bitch book, and these socks are the squooshiest socks I've ever seen. My goodness, I need a pair. Of course, the kid won't sit still long enough to get a photo, and won't take them off long enough for me to sneak them out of the room, so you'll just have to imagine the luscious pale blueness of them. Hoorah for socks you can finish during one movie!
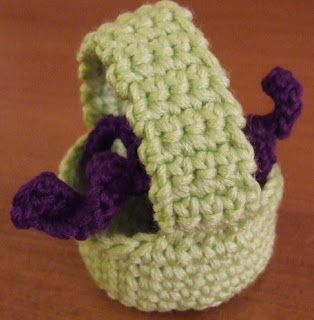
Free pattern: Basket o' Entrails, as seen in the Zombie Bunnies pattern
 Abbreviations:
sc = single crochet
yo = yarn over
Note: Except for the handle, the basket is worked in the round, with no slip stitches between the end of one round and the beginning of the next. You may want to use a stitch marker or piece of yarn to mark the first stitch of each round.
Also, if you've made a Zombie Bunny, you don't need to read the directions for the first five rows - they're the same as for making the body of the bunny.
For the basket:
Row 1: With accent color, make a circle with about a 6” tail.


 Repeat this six more times, for a total of 7 sc around the circle. The first stitch is always a little scrunched up and is really hard to use, so just ignore it for the rest of these instructions and pretend that you only have 6 sc in the row.
 Pull the tail of the circle to tighten it – you should end up with a tiny circle of 6 stitches with no hole in the middle.
Row 2: Make 2 sc in each sc around the circle (12 stitches).
 Pointer: You may find it helpful to use a stitch marker of some kind to mark the first stitch in each row. You can buy plastic markers at craft stores, or you can pin a safety pin around the stitch. Or you can just lay the tail of the yarn across the work before you start the first stitch of the row (photo on the right above), then pull it out and replace it when you get back around to it. Fewer things to buy and pieces to lose, which is always good around our house.
 Row 3: (2 sc in first sc, then 1 sc in following sc). Repeat around (18 stitches).
Row 4: (2 sc in first sc, then 1 sc in following 2 sc). Repeat around (24 stitches).
Row 5: (2 sc in first sc, then 1 sc in following 3 sc). Repeat around (30 stitches).
Row 6: Sc through the back loop only of each sc in the round (30 stitches). Just ignore the color change in the photo below - to match the sample you'll continue in your original color.
 Rows 7-12: Sc through both loops (that is, make a normal sc) in each sc in the round (30 stitches per round).
Row 13: Sc in each of the next 5 scs, then chain 1 and turn the piece over so that the inside of the basket is facing you.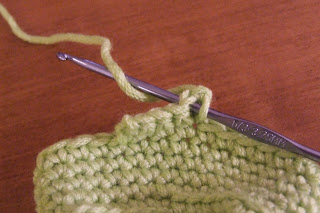
Rows 14-37: Sc in each of the five stitches in the handle, then chain 1 and turn the piece.
Row 38: Sc in each of the five stitches in the handle, then cut the yarn leaving about a 10" tail, yo and pull the tail through the last loop on the hook to finish off the handle. Use the tail to attach the handle to the other side of the basket. Weave in the ends.
To make the entrails:
- In the main color, chain 61.
- Starting with the second chain from the hook, sc in the next 20 stitches. As you crochet, the chain should start to corkscrew around itself.
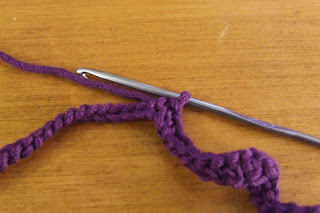
- Now chain 21, then starting with the second chain from the hook, sc in each of the next 20 stitches. You should be back at the point where this chain branched off from the original 61-stitch chain. Repeat this step as many times as you like to make as many "branches" as you think will look good in the basket.
- Sc in each of the remaining stitches in the original chain. Cut the yarn, leaving about a 4" tail, then yo and pull the tail through the last loop on the hook to finish off. Weave in both yarn ends.
- For added security, you may want to make a couple of stitches with a needle and thread through both the bottom of the basket and the entrails, just to keep them from falling out or getting lost during play.
Note to self: Get a manicure before shooting the next batch of crochet photos.
The etsy store is back in action!
Hooray, I've got a storefront again!
This time I'm keeping the patterns I sell in bricks-and-mortar stores out of the etsy shop, mainly to keep from undercutting the price the stores can get for the patterns. Plus they, ahem, weren't selling last time around ...
Anyway, the etsy shop is going to be the repository for all the actual stuff I have made - baby blankets, tummy time quilts, a series of Mophead-based loveys, etc. I'm gearing up for a local craft show I'll be exhibiting at the first weekend in December, so now I've got double the incentive to get stuff finished and into the "ready to sell" cat-hair-free isolation booth.
So check out the link to my etsy shop in the sidebar, and check back regularly for new items! Thanks!
Monday, September 24, 2007
Temporary spray adhesives
I've been playing around with a new toy, a bottle of Sulky KK 2000 temporary spray adhesive. Several quilt store owners have sung the praises of spray adhesives in place of pins when basting quilt layers together or positioning large pieces for applique. But today is the first time I've actually used it for a whole project ... I'm making a Simple Snowflakes Table Runner as a sample for a shop in Delaware. Here's how it's going ...
1. Used the spray adhesive to attach the backing to the batting, then trimmed the batting to be slightly larger than the backing. Flipped the batting over, sprayed it with adhesive, and attached the background fabric. Only problem so far is that the adhesive directions don't tell you how much to use - I think I may have erred on the side of caution on the backing, because it's a little less firmly attached than the background fabric. Still, it's holding together through light handling.
2. Used the adhesive to attach the snowflakes. Here's where it gets tricky, as I had been warned against just spraying the background fabric and sticking the snow to it - apparently the overspray can gum up the foot on the sewing machine when you're doing the quilting. So the obvious answer is to spray the snowflakes ... but that means that you'd have to handle a sticky, floppy snowflake and try to get it in just the right place on the quilt, which is challenging enough without the adhesive. So I did the following:
- Arrange the snowflakes on the background as if you were going to pin them.
- Mask off the bottom half of one snowflake (and the area around it) with an open magazine laid on top. Flip the top half of the snowflake over onto the magazine, so that now the back side of the top half of the snowflake is visible.
- Spray adhesive on the back side of the top half of the snowflake, then flip the half back up and arrange it in the proper place on the background.
- Turn a page in the magazine (so you've got an adhesive-free surface on top), slide the magazine up to cover the top half of the snowflake, and repeat the process to apply adhesive to the back side of the bottom of the snowflake.
- Repeat for the other snowflakes.
I minimized the overspray, and I think the snowflakes are anchored firmly enough to do the quilting without any pinning (other than to attach the cutting template to the folded fabric in the early steps, and I don't think there's any way around using pins there). I'm heading over to do the quilting now ... I'll let you know how it goes.
UPDATE: Oh Sulky temporary adhesive spray, where have you been all my life? My goodness, this stuff is awesome! I finished the quilting with nary a pucker, slip, or other movement. Out of all the snowflakes, only one point flipped up while I was sewing (usually it's more like 10 of them), and I only got the arm of the darning foot caught in one hole (usually it's more like 5). And everything stayed stuck down, despite numerous (gentle) rerollings to get it to fit through my machine. And the presser foot didn't get bogged down even once, so my overspray-free method must be valid. Hooray for the intersection of adhesive chemistry and quilting! Now if it only weren't $14 for a teeny tiny can ...
Tuesday, September 18, 2007
World domination tour, part two
Welcome to Quilter's Hive, the latest in a growing list of Lazy Mama distributors! Glad to have you on board, Joan!
Next up - an all day selling frenzy in Lancaster, PA. Wish me luck!
Next up - an all day selling frenzy in Lancaster, PA. Wish me luck!
Sunday, September 16, 2007
Welcome!
A big Lazy Mama welcome goes out to Calico 'n Cotton, the newest Lazy Mama distributors! I don't think they have a web site, but you can find them at 715 Asbury Avenue in Ocean City, NJ. Nice shop in a cute downtown area ... I was strong and managed to NOT buy more merchandise than I sold, for once!
And in case anyone is keeping track, I've got distributors in four states now ... and I plan to tackle Delaware and Pennsylvania this week. Can total world domination be far behind? Well, yes, but it's a place to start!
And in case anyone is keeping track, I've got distributors in four states now ... and I plan to tackle Delaware and Pennsylvania this week. Can total world domination be far behind? Well, yes, but it's a place to start!
Wednesday, September 05, 2007
New this football season - Lazy Mama Sunday classes!
Take advantage of the fact that your husband is going to be parked in front of the tv all afternoon for the next dozen Sundays and get out for a little crafty self-improvement ... sign up for my learn-to-crochet-zombie-bunnies class September 30th at Birds of a Feather!
In two hours you'll learn to make some basic crochet stitches, which you'll use to start making the parts for a zombie bunny in plenty of time to finish for Halloween. Included in the class price are illustrated directions for making the stitches you'll need to complete the whole bunny, just in case you need a little reminder of what you're supposed to be doing after you finish the class.
You can buy the pattern, crochet hook, yarn, and the class fee all at Birds of a Feather, and yes, they accept enrollment over the phone.
See you there!
And if you'd like to attend but can't make it on the 30th, let the folks at the shop know you'd like to attend on a different day - we may be scheduling a class for later in October if the first one is popular.
The links are up!
Check out the sidebar for links to the stores that carry my patterns, as well as to my etsy shop. The etsy shop is empty right now, but I'm stockpiling stuff to start posting as soon as we return from the beach later this month.

Thursday, August 30, 2007
Zombie Bunnies Pattern Page
Zombie Bunnies!
Something evil this way … hops? These cute little guys are so easy to make, you’ll find yourself groaning, “must … make … more … zombies!” Switch the color scheme and leave off the ghoulish details and they are great for Easter baskets or baby gifts.
Finished size is about 9” from bottom to tip of the ear.
This pattern is suitable for beginners, but does assume that you know how to make a single crochet stitch.
A person with average sewing skills should be able to complete this pattern in about 3 naptimes (6 hours).
Photos from the pattern:

Vanishing loop method of working in the round

Changing color in the middle of the row
Pattern includes illustrated instructions, and it is packaged in a resealable plastic bag (6"x9"), ready to hang and sell. Pattern also includes a link to this web site, where buyers can access a free pattern to make the Baskets o' Entrails to match the bunnies.
Wholesale price: $4.00/pattern
Suggested retail price: $7-$9, or whatever the market will bear in your area
Free shipping on your first order! Shipping charges for subsequent orders will be the actual charges for USPS Priority Mail to your destination.
I am willing to make free samples to display in your shop, if you are willing to provide the materials. Please contact me for more information on this service.
For more information or to place an order, please contact Gretchen Woods at Lazy Mama Designs: lazymamadesigns (at) yahoo (dot) com.
NEW!! You can also place orders through my shop at etsy.com - just convo me with a request, including the number of patterns you'd like to buy, and I can post a custom listing for you at the wholesale price.
Thank you for your interest, and I hope to hear from you soon!
Tuesday, August 14, 2007
Locker Pockets pattern page
Locker Pockets

Stash your stuff in style with this quick-to-sew organizer, perfect for hanging in a locker or on a bedroom wall. Easy to personalize with funky fabrics and patches or embroidery!
Finished size: 9”x26”
This pattern can be sold as a kit with fat quarters for the pockets and 1/3-yard cuts for the front and back. Also makes a great class for parents or parent/child teams - contact me to arrange for a designer-led class!
A person with average sewing skills should be able to complete this pattern in about 1 naptime (2 hours).
Photo from the pattern: Shaping the pockets

Pattern includes illustrated instructions, and it is packaged in a resealable plastic bag (6"x9"), ready to hang and sell.
Wholesale price: $4.00/pattern
Suggested retail price: $7-$9, or whatever the market will bear in your area
Free shipping on your first order! Shipping charges for subsequent orders will be the actual charges for USPS Priority Mail to your destination.
I am willing to make free samples to display in your shop, if you are willing to provide the materials. Please contact me for more information on this service.
For more information or to place an order, please contact Gretchen Woods at Lazy Mama Designs: lazymamadesigns (at) yahoo (dot) com.
NEW!! You can also place orders through my shop at etsy.com - just convo me with a request, including the number of patterns you'd like to buy, and I can post a custom listing for you at the wholesale price.
Thank you for your interest, and I hope to hear from you soon!
Wednesday, August 08, 2007
Mophead and Friends pattern page
Introducing ... Mophead and Friends!


These fast, fun little loveys are sure to gather lots of “awwwws” at a baby shower. Lots of snuggly fringe makes them popular with babies, while the “tuck in your back pocket” size is a hit with parents. Be sure to make more than one to prevent “lost lovey meltdown!”
Pattern includes directions for Mophead, Sleepy Lion, Fuzzy Flower, Shooting Star, and the abstract square.
Made from 1/3 yard cuts of fleece, these loveys are easy to pre-cut for customers who are looking for a quick project. They sell really well when displayed with samples of the finished loveys, so be sure to request some when you order.

Detail of my favorite design, Sleepy Lion.
Pattern includes detailed instructions and templates, and it is packaged in a resealable plastic bag (6"x9"), ready to hang and sell.
Wholesale price: $4.00/pattern
Suggested retail price: $7-$9, or whatever the market will bear in your area
Free shipping on your first order! Shipping charges for subsequent orders will be the actual charges for USPS Priority Mail to your destination.
For more information or to place an order, please contact Gretchen Woods at Lazy Mama Designs: lazymamadesigns (at) yahoo (dot) com.
NEW!! You can also place orders through my shop at etsy.com - just convo me with a request, including the number of patterns you'd like to buy, and I can post a custom listing for you at the wholesale price.
Thank you for your interest, and I hope to hear from you soon!
Sunday, July 15, 2007
Quick tip - makeshift light box
What's a crafter to do when she needs to trace a pattern, but there's no lightbox nearby?
 Improvise one with some scotch tape and a sunny window, that's what.
Tuesday, July 10, 2007
Knitty weekend
Here's what I managed to put out between Wednesday night and Sunday night:
 That's one cotton dishcloth from Mason Dixon Knitting, one pair of hopefully indestructible toddler socks in ugly acrylic from my stash, one half of a pair of socks for me (made with impossibly thin cotton/wool blend, pattern from Knit Socks Whatever the Yarn), about 2/3rds of a toddler sock in chunky neon blue acrylic, and seven balls of chenille yarn that was salvaged from mill ends from a weaver down in Kentucky. The last is probably the best - I bought a bag of about 5 pounds of chenille pieces a few years ago, not realizing that they were hanks made up of four-foot-long pieces of yarn with other yarn knotted to the ends. To get to the point where I can use the yarn I have to trim off the knots, then knot together the four-foot pieces, then roll it into balls, and make sure the knots end up on the inside when I use it. Waaaaay too much work, but it makes such cute crochet bunnies, and it was so cheap I can actually afford to sell them and make a profit. These are the last balls from the bag - thanks to crafting buddy Sybil for helping with the final push to get these done!
In case you were wondering, I was so insanely productive because I was at a gaming convention Thursday-Sunday. Two hours of riding in a car each way, plus hours of roleplaying games at the convention, plus a few hours of downtime at the hotel, and voila! A sock-tastic weekend! I think the best part was the look on the "serious" gamer's face when I won at Munchkin while turning the heel on my adult sock ... boy, was he ticked.
That's one cotton dishcloth from Mason Dixon Knitting, one pair of hopefully indestructible toddler socks in ugly acrylic from my stash, one half of a pair of socks for me (made with impossibly thin cotton/wool blend, pattern from Knit Socks Whatever the Yarn), about 2/3rds of a toddler sock in chunky neon blue acrylic, and seven balls of chenille yarn that was salvaged from mill ends from a weaver down in Kentucky. The last is probably the best - I bought a bag of about 5 pounds of chenille pieces a few years ago, not realizing that they were hanks made up of four-foot-long pieces of yarn with other yarn knotted to the ends. To get to the point where I can use the yarn I have to trim off the knots, then knot together the four-foot pieces, then roll it into balls, and make sure the knots end up on the inside when I use it. Waaaaay too much work, but it makes such cute crochet bunnies, and it was so cheap I can actually afford to sell them and make a profit. These are the last balls from the bag - thanks to crafting buddy Sybil for helping with the final push to get these done!In case you were wondering, I was so insanely productive because I was at a gaming convention Thursday-Sunday. Two hours of riding in a car each way, plus hours of roleplaying games at the convention, plus a few hours of downtime at the hotel, and voila! A sock-tastic weekend! I think the best part was the look on the "serious" gamer's face when I won at Munchkin while turning the heel on my adult sock ... boy, was he ticked.
Monday, July 02, 2007
South Sea Squares Quilt pattern page
South Sea Squares Quilt


This twin-size quilt in the colors of the islands will keep you toasty warm ... and no one needs to know that the raw-edge applique technique is so simple and fast you can complete it in a weekend. Grab five of your favorite batiks and get sewing, mon!
Approximate finished size: 66"x82."
This pattern can be made in batiks, flannels, novelty or seasonal prints - just about anything you can think of! Because this project splits up easily into several two-to-four hour segments, this would work well for a class held over multiple sessions.
A person with average sewing skills should be able to finish this project in about eight naptimes (16 hours).
Photos from the pattern:

Marking the square placement

Trimming the edges before binding
Pattern includes illustrated instructions, and it is packaged in a resealable plastic bag (6"x9"), ready to hang and sell.
Wholesale price: $4.00/pattern
Suggested retail price: $7-$9, or whatever the market will bear in your area
Free shipping on your first order! Shipping charges for subsequent orders will be the actual charges for USPS Priority Mail to your destination.
I am willing to make free samples to display in your shop, if you are willing to provide the materials. Samples of this pattern will be wallhanging size. Please contact me for more information on this service.
For more information or to place an order, please contact Gretchen Woods at Lazy Mama Designs: lazymamadesigns (at) yahoo (dot) com.
NEW!! You can also place orders through my shop at etsy.com - just convo me with a request, including the number of patterns you'd like to buy, and I can post a custom listing for you at the wholesale price.
Thank you for your interest, and I hope to hear from you soon!
Monday, June 25, 2007
Second is almost done
First Southwood Squares is done, second is quilted and ready to bind. I may change the name to South Sea Squares, because it looks so tropical in this color scheme.
Can I just say how much I love the binding clips you can buy at the sewing store, the ones that are basically rust-proof hairclips? They reduce the level of accidental accupuncture involved in binding the quilt to almost zero. And they held the binding as well as, or possibly better, than straight pins. Hurray! Now why didn't I spend the $6 on them years ago?
Can I just say how much I love the binding clips you can buy at the sewing store, the ones that are basically rust-proof hairclips? They reduce the level of accidental accupuncture involved in binding the quilt to almost zero. And they held the binding as well as, or possibly better, than straight pins. Hurray! Now why didn't I spend the $6 on them years ago?
Saturday, June 16, 2007
First of the Southwood Squares finished ... sorta
Okay, so the binding isn't on yet, and the photo shows mostly the room with just a squidge of quilt, but here it is:

That's the pieced version, which I may or may not decide to sell as a pattern. It looks great in the room, but the pattern isn't anything that hasn't been done before, and the directions I've written are really tedious. I think I can do a better job with the raw-edge applique version that's currently pinned and ready to sew tonight. It takes a lot less time to finish the actual quilt, the directions are a lot easier to write out, and the pattern is one that, while simple, I haven't seen anywhere else. Sounds like a winner to me!
I'm still planning to make this my first multi-size pattern, with directions for wall hanging, twin, double/queen, and possibly king size quilts. I may also make this pattern available with several different photos on the outside package, to make it appropriate for different times of year. If you're displaying the pattern in the summer, you could use the outer page with the sample quilt in the colors above. If you're selling the pattern in the winter, you could use a different outer page with a wintery or holiday color scheme.
I'm also thinking of making small sample quilts to display with the patterns - maybe two blocks wide by three tall, something that wouldn't take much time for me to throw together and could use up some of my stash so I don't bankrupt myself. I'm not about to spend three hours of quality time with my safety pins making twin quilts for every store that sells the pattern ... much as I'd like to, I don't think my fingers are up for it! As it stands now, my poor abused fingers have only bled on the quilt once, so I'm doing okay :)
Wednesday, May 30, 2007
Toddler socks
Finished embarrassingly late last night:
 Yarn: something worsted weight from my stash of moderate-to-junky yarns ... I'm not even sure if it's acrylic or wool. I suspect it's acrylic, but I'm not about to run the socks through the washer to find out!
Yarn: something worsted weight from my stash of moderate-to-junky yarns ... I'm not even sure if it's acrylic or wool. I suspect it's acrylic, but I'm not about to run the socks through the washer to find out!Needles: Size 6 DPNs
Pattern: free download from http://stitchesofviolet.blogspot.com/2004/11/mini-basketweave-toddler-sock-pattern.html
Notes: No wrapping to turn the heel! The pattern calls for making a flap, and then you pick up stitches down both sides of the flap to form the heel. Much less confusing than the short row heel I did on my first pair of socks, but I have a feeling it makes for a clunkier heel. In these that's actually good - the flap is made in a k1,sl1 pattern, which makes for a ridiculously dense finished fabric.
The pattern was developed for Children In Common, a charity that ships supplies over to Russian orphans who have not yet been adopted. Apparently warm socks are one thing the kids always need, no matter how many they send over. Anyway, since the socks will fit some kid no matter what size they turn out to be, there was no gauge on the pattern, and I was just hoping they would turn out to be the right size for some kid I knew. Luckily, they're the right size for my daughter, at least for the next few minutes! Not sure if they'll still fit this winter, but I can always make another pair on 7's or 8's if I need to. I think these took maybe 8 hours, start to finish ... okay, maybe a little more than that, but I finished the second sock in one naptime and two movies.
Oh, one last thing. I ran out of yarn about 1/2" from the end of the last sock. Can you tell which one has the different yarn spliced in? God, I'm good.
Sunday, May 20, 2007
What a working studio should look like
Not like this ... too sterile.
Not like this ... too cluttered.
Like this - perfect!

You can tell I'm in mid-project because 1) there are blocks all over the floor, 2) the table is covered in fabric scraps and recently-purchased batting, 3) the cutting table is serving double duty as a pressing station, and 4) the cats have been banned from the room.
That's the pieced version of Southwood Squares that's serving as a tripping hazard right now. I'm excited about how it's turning out ... can't wait to show you the finished product and get the pattern ready for sale!
Tuesday, May 15, 2007
WIP Tuesday
Here's a look at what's on my design wall ... er, cutting table, lounging around until I get a few hours to start a relatively tedious pin-and-sew-as-you-go session. Tentative pattern name: Southwood Squares. Unless I totally wimp out and/or get hit by a bus, this will be my first bed-sized pattern, and it will include directions for both pieced and raw-edge applique versions. Why? Because I need to make two of them for my guest room anyway! And making the same quilt twice gives me the heebie-jeebies, but making two different versions of the same basic idea doesn't offend my sensibilities nearly as much.
Very productive today - in one of my daughter's naptimes I managed to dig out the planning sketches I did when we were living in the hotel, confirm that I actually had enough yardage of the fabrics, cut the squares and sashing strips for the pieced version, cut the background and squares for the applique version, and cut backs for both quilts. There's going to be a whole lot of sewin' goin' on next week - yay!
Unless I totally wimp out and/or get hit by a bus, this will be my first bed-sized pattern, and it will include directions for both pieced and raw-edge applique versions. Why? Because I need to make two of them for my guest room anyway! And making the same quilt twice gives me the heebie-jeebies, but making two different versions of the same basic idea doesn't offend my sensibilities nearly as much.Very productive today - in one of my daughter's naptimes I managed to dig out the planning sketches I did when we were living in the hotel, confirm that I actually had enough yardage of the fabrics, cut the squares and sashing strips for the pieced version, cut the background and squares for the applique version, and cut backs for both quilts. There's going to be a whole lot of sewin' goin' on next week - yay!
Subscribe to:
Posts (Atom)