Pages

Sunday, February 18, 2007

Busy Baby Book pattern page


Busy Baby Book Pattern

Treat that new arrival as an excuse to raid your fabric stash (or hit the store for new goodies!) to make a soft cloth book to stimulate all of baby’s senses. Choose washable fabrics in bright colors with bold contrasts, or pick fabrics that have a variety of different textures. Go crazy with the embellishments, adding more color and texture with fabric scraps, yarn, or whatever you have handy.


This pattern would be perfect to display near your selection of fat quarters, or it could easily be made into kits using the awkward ends leftover from your finished bolts of cloth. It looks adorable made in black-and-white prints with bright accents, or it can be made in a variety of diffent colors and textures of scrap fabrics.

A person with average sewing skills should be able to finish this project in about one naptime (2 hours).

Pattern includes illustrated directions and is packaged in a resealable plastic bag (6"x9"), ready to hang and sell.

Wholesale price: $4.00/pattern

Suggested retail price: $7-$9, or whatever the market will bear in your area

Free shipping on your first order! Shipping charges for subsequent orders will be the actual charges for USPS Priority Mail to your destination.

I am willing to make free samples to display in your shop, if you are willing to provide the materials. Please contact me for more information on this service.

For more information or to place an order, please contact Gretchen Woods at Lazy Mama Designs: lazymamadesigns (at) yahoo (dot) com.

NEW!! You can also place orders through my shop at etsy.com - just convo me with a request, including the number of patterns you'd like to buy, and I can post a custom listing for you at the wholesale price.

Thank you for your interest, and I hope to hear from you soon!

Simple Snowflakes Table Runner pattern page


Simple Snowflakes Table Runner Pattern

Temperatures (and snow) may be falling outside, but your table will look cozy under this simple quilted table runner. The blue and white color scheme will dress up your table all winter long, while variations in green or red make quick holiday gifts.

Snowflake appliques are applied using a raw-edge technique that allows them to get fluffier each time they're washed. Approximate finished dimensions: 36”x12”

A person with average sewing skills should be able to finish this project in about two naptimes (4 hours).

Some of the photos that illustrate the directions:
Placing the template

Turning the corner when binding


Pattern includes illustrated directions, a full-sized template for the snowflake, illustrated binding directions, and suggestions for additional variations on the project. Pattern is packaged in a resealable plastic bag (6"x9"), ready to hang and sell.

Wholesale price: $4.00/pattern

Suggested retail price: $7-$9, or whatever the market will bear in your area

Free shipping on your first order! Shipping charges for subsequent orders will be the actual charges for USPS Priority Mail to your destination.

I am willing to make free samples to display in your shop, if you are willing to provide the materials. Please contact me for more information on this service.

For more information or to place an order, please contact Gretchen Woods at Lazy Mama Designs: lazymamadesigns (at) yahoo (dot) com.
NEW!! You can also place orders through my shop at etsy.com - just convo me with a request, including the number of patterns you'd like to buy, and I can post a custom listing for you at the wholesale price.
Thank you for your interest, and I hope to hear from you soon!

Basket Case Baby Quilt pattern page

Basket Case Baby Quilt Pattern

Small pieces make a big impact in this faux-woven quilt, which gets fluffier and more touchable every time it’s washed. Sure, the pinning will make you a “basket case,” but you only have to sew 35 seams!

This quilt features raw-edge applique which is applied to look as if the strips are woven. A quick trip through the wash fluffs up the edges and softens the effect. Approximate finished dimensions: 40”x40”.

A person with average sewing skills should be able to finish this project in about four naptimes
(8 hours).

Alternate colorway sample, made using bright flannels:

Pattern includes illustrated directions plus suggestions for additional variations on the project. Pattern is packaged in a resealable plastic bag (6"x9"), ready to hang and sell.

Wholesale price: $4.00/pattern

Suggested retail price: $7-$9, or whatever the market will bear in your area

Free shipping on your first order! Shipping charges for subsequent orders will be the actual charges for USPS Priority Mail to your destination.

I am willing to make free samples to display in your shop, if you are willing to provide the materials. Please contact me for more information on this service.

For more information or to place an order, please contact Gretchen Woods at Lazy Mama Designs: lazymamadesigns (at) yahoo (dot) com.

NEW!! You can also place orders through my shop at etsy.com - just convo me with a request, including the number of patterns you'd like to buy, and I can post a custom listing for you at the wholesale price.

Thank you for your interest, and I hope to hear from you soon!

Friday, February 16, 2007

Kid sweater of the week

Have I mentioned recently how much I love crochet? Soooo much. I started this at the hotel in San Diego, and only got to work on a little bit of it before we got home. A week after we're home, and it's done!

I made enough changes from the pattern I used for inspiration that I think we'll just consider this a Lazy Mama creation. Done in Paton's mercerized cotton, with three skeins leftover that are totally going back to Michael's tomorrow. Meanwhile, Liza loves her "new setter, new setter, new setter," to use her words. Threw a hissy fit when I tried to take it off of her this afternoon - that's always a good sign!

Monday, February 12, 2007

Depending on the kindness of strangers

We're just back from a vacation in San Diego, where I made an honest attempt to visit every quilt store in the county. That's a tall order, considering there are more than a dozen of them, and I was trying to fit in the visits around sightseeing with my family and visiting my sister-in-law. We did a lot of "Gretchen goes into the shop while Liza sleeps and Jason reads a book in the car," which was good in a way - no time to lollygag and shop too long when there's a cranky toddler waiting outside.

At first I wasn't sure how the area could support so many shops, but once I checked out their inventories, it became obvious that each store focuses on a different niche market. It's great, because each store has a REALLY good selection of fabrics and patterns within their niche - primitives, reproductions, brights, flannels, novelties, Asian fabrics, etc. I could tell almost immediately when I walked into a store whether they might be interested in buying my patterns.

You didn't think I was just visiting all these places to shop, did you? Silly, silly reader! I was selling like no tomorrow, and thanks to the kindness of some lovely ladies who didn't know me from Adam (or Eve), my patterns are now officially distributed in California! Thank you, Sue, Sue, and Karen!

So if you're near San Diego, check out the following shops for a selection of my work:

Now, if you'll excuse me, I've got a boatload of patterns to print, and new patterns to type up. I'm all chock full of inspiration and ambition now that my patterns are distributed in three states. Maryland, Delaware, and Pennsylvania - I'm coming for you at Easter!

Friday, February 02, 2007

Lazy Mama Designs - now available in Kentucky!

Thanks to Teresa Fritz at Corner Quilt Shop in Lexington, you can now buy my patterns within an hour's drive of my house! If you're in the area, be sure to stop by and say hi to the Jack Pack and Happy Hexagon Placemat displays!

The Corner Quilt Shop153 Patchen Dr. #67Lexington, KY 40517(859) 268-7467

Ahoy, matey!

My newest knit sweater is finished, and it's a smiling skull and crossbones for Kentucky's cutest pirate:


It's from a book I picked up at Christmas, Adorable Knits for Tots. There are plenty of other projects in there that I'm just itching to try, so you'll be seeing that title a lot in the next year or so.

Some thoughts on this project:

  • Working a design that requires 8 different spools of yarn at once sucks.
  • Finding out that you bound off the neck too tight - after you've sewn the neck and shoulder seam and worked all the loose ends in - sucks.
  • Patterns that come in sizes 1-2 and 3-4 suck. I made it in the 1-2 (Duh. Dumb move), and it's going to fit her for about a minute and a half. As a matter of fact, the sleeves were already an inch too short by the time she took it off after dinner.
  • Cheap synthetic yarn from Wal-Mart rocks ... at least when the wearer is too young to know the difference. The total cost for the two balls of yarn I needed for this project was under $10.
  • I'm getting faster at the whole knitting thing. By the end of the sweater, I could bang out 1.5 stripes on the sleeves in the course of one Baby Einstein video. Because you know that's how I measure projects now, right?
  • Thanks to my friends Sybil and Matt for convincing me not to use the white for the pattern on the front - it would have totally blended in and made this an even bigger waste of time than it was already.

Monday, January 22, 2007

Exciting news

While I was up in Cleveland over the weekend I stopped by my favorite quilt shop to interview the owners for a story I'm shopping around to some quilt magazines. I had them take a look at the patterns I've developed, and they're interested in selling them in the store! They even said they'd like the prototypes of the projects so they could make a nice display and do it as a trunk show.

Not only will my patterns soon be for sale in a real store, they even liked them enough to give me $40 in free fabric to remake the sample for the basket case quilt. Hoorah! After six hours of work today, I've got all of the patterns printed and updated with their suggestions (such as incorporating my Nap Rating system into the packaging) and all of the prototypes packaged up to send up north. Now I just have to buckle down and remake the quilt. Anyone want to come help me pin 160 little pieces of flannel?

In the interest of cross-promotion, be sure to check out their site, or stop by if you happen to be near Olmsted Falls, OH. You can find them at http://www.abigayles.com/ .

Thanks, Deb and Nancy!

Another etsy shop I love

http://www.etsy.com/shop.php?user_id=17579
How cute is the giant hamster? Really cute.
It's a 7-inch-tall hamster (that's the size of a soccer ball):

And the uber-cute (but much smaller) hedgehog:

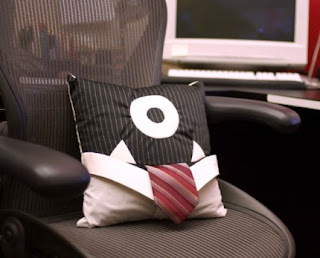
And the "monster boss" pillow, complete with working pocket and buttons on the back:

Must ... not ... spend ... $60 ... on a huge hamster ...

Sunday, January 14, 2007

Crawling out from under the crafting rock

I've been in the zone, trying to finish a sweater, so that I can move on to all the other projects that sound like much more fun than something crocheted out of chunky wool. That means I've been devoting all of my evenings (and some nap times, too) to yarn, not blogging, which is why I've been sort of quiet this week.

You can tell I'm Mama first, crafter second nowdays ... when Jason asked me how much longer before I'd be able to sew it together, I told him I'd probably be able to finish by the end of the next Baby Einstein video. I actually needed to use the special features on the DVD to drag it out long enough to finish, but I was pretty close.

So here it is:


And yes, that's my minty fresh bathroom, and yes, those are my pajama bottoms, which I didn't change out of until about 4:30 today ... now that's what I call a Good Day!!


On a technical note, I've been having some crochet gauge issues with the Happy Hooker patterns, so I took the time to make a guage swatch for this sweater before I started. I never do that. Figures that the time I check it, I was exactly on the money. Since all of my projects from the Happy Hooker book have been too small ... way, way too small ... and this pattern was from a different source, I'm starting to think that the folks at Stitch n Bitch crochet ridiculously loosely. My next two adult projects (that's projects for me, not the kid ... get your mind out of the gutter!) are from the Happy Hooker, so I'll let you know how many sizes of hook I have to go up to get the gauge right. I'm guessing at least two or three.


Oh, and here's how the challenge quilt is coming. I'm 3/8ths of the way done!
Actually, more than that, since I've finished one of the two fiendishly difficult blocks (see the overlapping stars in the bottom right corner? Had to paper piece the blue ones, then paper piece the pieced pieces into place exactly right so the points would line up ... and I got them right the first time, thank god). Hooray!
This is the first time that I've actually cared enough about a quilt to RESEW things that aren't exactly right. See how all the star points touch, and aren't cut off, and the folds that you can't see in the photo pretty much line up? That's because I've gone back and ripped out and redone at least one seam in every block, and usually sewn the block intersections at least 1 1/4 times each. And I've yet to curse at it ... not counting when I cut the fabric too small for the purple star, but that's allowable, as it means I'm going to have to order another piece of fabric to finish the quilt.
Check the shop for new patterns ... and I've got another one coming soon, as soon as I get off my butt and write it up.

Monday, January 08, 2007

New in the shop


Lazy Mama's Simple Snowflakes Table Runner, which takes those paper snowflakes you made as a kid and makes them look all fancy and quilted. Raw edge applique is very forgiving of mistakes, and the pattern is simple enough that you can finish it in a few hours. Check out the blue-and-white, use-all-winter color scheme, or get a jump on next year's holiday gifts by making one in red, green, or blue/silver.
This would be a great introduction to quilting for anyone with basic sewing skills, and it's interesting enough to keep even experienced quilters hooked. Lavishly illustrated directions, a full-sized template for the snowflakes - this pattern is a steal at only $5!

Wednesday, January 03, 2007

Possible collaboration with another etsy artist

I love the style of the stuff that lollipop art sells on etsy, and I thought it would be fun to try taking some of her images and making them into a quilt. Here's a prototype, hot off the sewing machine:


The images are printed on special fabric, then heat set to make them (sorta) washable. The quilt is machine pieced and machine quilted and is wall-hanging size (about 40" square, I think). And the coolest part is, it's a stash quilt - I didn't have to buy anything to make it! Sometimes that huge chest of leftover fabrics comes in handy, after all : )
I think it would be cool to make these and sell them together with the original art that's reproduced on the quilt - sort of a package deal, you know. I'll let you know how it goes.

Tuesday, January 02, 2007

Why, Lazy Mama, however do you get so much crafting done?

Baby Einstein videos and a wicked sense of determination to finish a sweater for myself before spring, that's how. And a willingness to "practice counting with my toddler" by reciting the crochet pattern aloud as I stitch.

Sunday, December 31, 2006

Free pointer - keeping a toddler out of your yarn


Now that my daughter is old enough to be into everything, one of her favorite games is "let's turn Mama's yarn balls into a tangled mess." Since this can happen in approximately 1/25th of a second (how does she do that?) and it usually takes me at least an hour to untangle the yarn afterward, I've had to come up with some strategies to head her off before she gets into trouble.


Most recently, I took some leftover styrofoam craft balls - you know, the ones you paint to make into planets for a science fair display - and some of my smallest balls of leftover yarn. I used a gluegun to glue the yarn to the ball, wrapping and glueing liberally at the beginning. I wrapped until the whole foam ball was covered and it looked vaguely like one of my real yarn balls, then I left the last few feet of yarn unglued so my daughter would have something to play with.


Whenever she makes a beeline for my yarn drawer, I remind her that those are MY balls, and she has her own yarn in her sewing box. As long as I don't trot them out too frequently, these keep her busy for at least 10 minutes or so. That's long enough to crochet a few inches, at least!

Tuesday, December 26, 2006

Skirt: accomplished!

I finally finished the "Violet Beauregard" skirt from the Happy Hooker Stitch n Bitch crochet book ... you know, the one I was going to whip up over Thanksgiving?


It's in shades of blue, mainly because that's all they had at Michael's crafts when I stopped by, but I'm happy with how it turned out. I even have enough yarn left that I can make a (relatively skimpy) top to go with it. Next up? A granny square beanie for my baby :)

Sunday, December 24, 2006

A merry Crafting to all ...

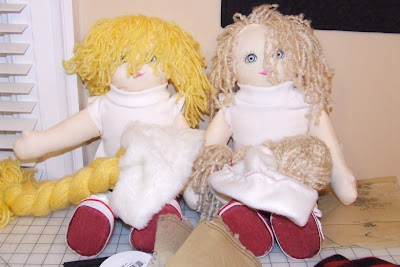
Things have been buzzing around here since my parents arrived to celebrate the holidays with us. Mom arrived with a pattern and bag of notions in hand, ready to work on a "dress up" doll for my daughter - you know, the ones with zippers and snaps and velcro and all that good stuff. It's supposed to be a Christmas present, but due to some unplanned sewing machine maintenance (and procrastination), it's what we've spent pretty much every free moment on since she got here.
So here's the view I've had of my mother this holiday:

And here's how far we had gotten as of my daughter's bedtime last night:

They're still mostly naked (except for the fiendishly difficult but really cute shoes), and in need of haircuts and hats, so we've got a ways to go.

And here's how we kept my daughter entertained for part of the time we've been sewing:

In case you were wondering, that's remnants of yarn, hot-glued to styrofoam craft balls so that it looks like a ball of yarn but will only unwind about two or three feet. Much preferable to her playing with real yarn balls (and getting them all tangled and forcing me to untangle them while cursing like a dockworker).

I'll be spending the next day and a half sewing clothes for the dolls ... yes, dollS, because my mother decided that making two was just as easy as one, so we might as well make an extra for the daughter of the infamous Sybil (who gave me the handprint tracing idea). We'll also be baking cookies, making a big Christmas Eve dinner, and delivering crocheted Christmas ornaments to the neighbors.

I wish all of you a very merry, and very crafty, Christmas (or winter holiday of your choice)!

- Lazy Mama

Monday, December 18, 2006

Not getting much done around here

In case you haven't noticed, I haven't posted a whole lot to the shop or this blog over the past few weeks. Between getting ready for my daughter's playgroup Christmas party, trying to get over an illness, and trying to finish holiday preparations, most of my free time has been spent on the couch, "resting my eyes," as my father would say.


Oh, I've been getting some crafts done for myself - I'm 3/4 of the way through the Violet Beauregard skirt from the Stitch 'n Bitch crochet book, and I've started and completely frogged at least two hats in the past two weeks. And, as I mentioned in a previous post, I've started working on some clothes for my daughter. The cursing hasn't gotten too bad on those yet, although I've yet to attempt the one that requires setting in gathered sleeves. I think I'll ask my husband to take my daughter out for the morning the day I try that step :)


But I thought I'd drop by and say hi, and post proof that apparently the crafty gene can be passed from mother to daughter:


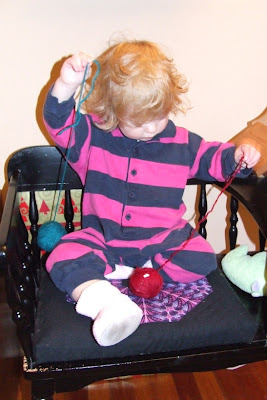
That's my girl, playing with yarn scraps and wooden spools, after having attempted (unsuccessfully) to eat a handful of 3/8" jingle bells that I was trying to thread onto pipe cleaners to make jinglers for her. Nothing like a handful of 4" long pieces of yarn to keep this kid busy for, oh, 10 or 15 minutes.

That wooden sewing box has all of her "safe" toys for in my sewing room ... we're trying to teach her that she can play with her sewing toys, but anything on my table is off limits. Now that she's got arms like an orangutan, that's more important than ever. I am convinced we're still going to make an emergency room visit to fish swallowed pins out of her gullet, no matter how well I hide them. Oh, well - by the time I was her age, I had already broken my leg twice, so I guess a few swallowed sewing notions probably aren't any worse.

Saturday, December 16, 2006

Free pointer - copying patterns the easy way

I decided the other day that my daughter is finally old enough that I can make her some clothes and finish them before she outgrows them. So I bought way too many kid-clothes patterns ... and she's in the smallest size of each of them. If it turns out that I like the way the clothes turn out, it would be nice to be able to make them in larger sizes as my daughter gets older. But as you probably know, if you cut out the tissue paper pattern for a small size, it's hard to readjust it for a larger size.

So before I started to make any of the patterns, I roughly cut out the pieces, then put them on top of a piece of kraft paper that was laying on the dense-pile carpet in my sewing room. While holding down the tissue paper, I used a transfer wheel (is that the right word? It's that little wheel on a handle that has pointy spikes, which you use with transfer paper to mark things on fabric when you're cutting out patterns) to trace around the size I wanted to make. Because the kraft paper was on a slightly yielding surface, the transfer wheel perforated through the tissue paper and kraft paper, but it didn't tear either one.

After I transfered all of the cutting lines and tailor's marks to the kraft paper, I was able to carefully punch out the pattern pieces, leaving the tissue paper intact for future projects. I made sure to write the pattern number, piece number, and any cutting instructions on each piece, just in case they get separated in the future and I have to sort them out again.

There are actually several benefits to using kraft paper for the pattern pieces. For example, the kraft paper patterns are much sturdier than tissue paper, so when my daughter grabs them off the cutting table, I don't freak out. And when the cat lays on them, they aren't ruined. And when I'm done cutting out the fabric pieces, I can roll the patterns up in a tube, put a rubber band around it, and slide it into the pattern envelope. Sure, it sticks out the top, but at least it's all together and ready to use if I decide to make the clothes in that size again.

Tuesday, December 05, 2006

As promised, a project to use those handprints you made

Here's the long-awaited project I mentioned that will give new life to all those handprints you traced based on my post a few days ago ...
Christmas Handprint Ornaments

What you'll need:

  • one 8 1/2"x11" piece of red felt for the pillow
  • one 8 1/2"x11" piece of purple felt for the handprint
  • about 6" of 1/4" (or narrower) red ribbon for the hanger
  • red embroidery floss
  • green embroidery floss
  • A good-sized handful of polyester stuffing

What to do:

  1. Cut out the pillow pieces - two squares the same size, each at least 3/8" wider than your handprint all the way around. For reference, last year's pillow was 4" square; this year's is about 4 1/2" square.

  2. Cut out the handprint - I usually just pin the handprint to the felt and cut around the outside of it.

  3. Use the red thread to sew the handprint to the front of one of the pillow pieces. Keep in mind that there is a "front" side to most felt - the back side often has noticeable pockmarks in it from the manufacturing process. Make sure you put the handprint right-side out on the right side of the pillow. I used a fairly large whip stitch to sew the hand on because I like the look of it; you could also use a blanket stitch, or very small stitches in a purple thread so it would be invisible on the finished pillow.

  4. Use the red thread to embroider an inscription on the hand. In our case, we only have one kid, so I've just been putting on the year. If you're making these for several kids, you might want to add initials or the child's first name. I generally do this freehand because I haven't found a way to mark this finely on dark felt. That's why my years always look lopsided, er, "primative."

  5. Use the red thread to attach the ribbon to the "wrong" side of the back of the pillow (you'll be sewing the ribbon on the ugly side so that the nice side will show in the finished pillow). To sew the ribbon on, cross the ends at a 90-degree angle, overlapping the ends a little on either side of the crossover. Lay the crossed ribbon so that the overlapped ends are parallel to two sides of one corner of the pillow back, and about 1/4" or more in from the edges. Sew in place using a fine running stitch, going from one raw edge up to the crossover and back down to the other raw edge (in sort of a V shape). Or, you could just use a hot glue gun ... just make sure that it's attached MORE than 1/4" inside the edge of the pillow, so the ends will be covered up when we sew the pillow together.

  6. Use the green thread to sew the front of the pillow to the back, wrong sides together and edges lined up exactly. I used a fairly long running stitch, again because I like how it looks (and it's really quick). If you'd rather do a blanket stitch around the edge of the pillow, or an invisible stitch, go for it. Just make sure you leave enough of the seam unsewn so that you can get the stuffing in.

  7. Stuff the pillow, making sure you push the filling into the corners as best you can. Don't stuff it too full, though, or the stuffing will be visible in the gaps of your running stitch.

  8. Finish sewing the pillow shut with the green thread, continuing in whatever stitch you used in step 6.

I think this took me about 2 hours to complete, and that was working on it in bits and pieces while I had the stomach flu. Might take a little longer if you're not familiar with handsewing; might take less time if you use a glue gun for some of the parts.


Other ways you could use these:

  • Hang them on their own special tree or garland

  • String all of them together once the child is grown and use that as the garland for a tree or mantle (or give it to the child to decorate their own home)

  • Use them as placecards for Christmas dinner

  • Make them in less Christmassy colors and use them as sentimental decorations throughout the year

  • Help a child make one for mom, adding some potpouri or a spritz of perfume when putting in the stuffing

  • Pincushion

Monday, December 04, 2006

New items in the shop

I've been a crocheting machine the last few weeks, so there's a new scarf and two new hats up for sale in the shop. Check them out if you've got time (and about $10 to spend on handmade Christmas gifts!).

One thing you won't find in my shop (because it's loosely based on another seller's pattern, and I'm awaiting permission from her to sell them) is my fully clothed bunny amigurumi toys. They're croched from leftover yarn I took with me over Thanksgiving, and I'm pretty happy with how they turned out. I really like the overalls on the one bunny, and I like how the cotton yarn I used on the girl bunny worked up. Take a look: